

I have already created Crystal Report for this example. You can read my previous article for creating Crystal Report,
Step By Step Creating Grouping In Crystal Report
Now follow the below steps for calling Crystal Report from ASP.NET code.
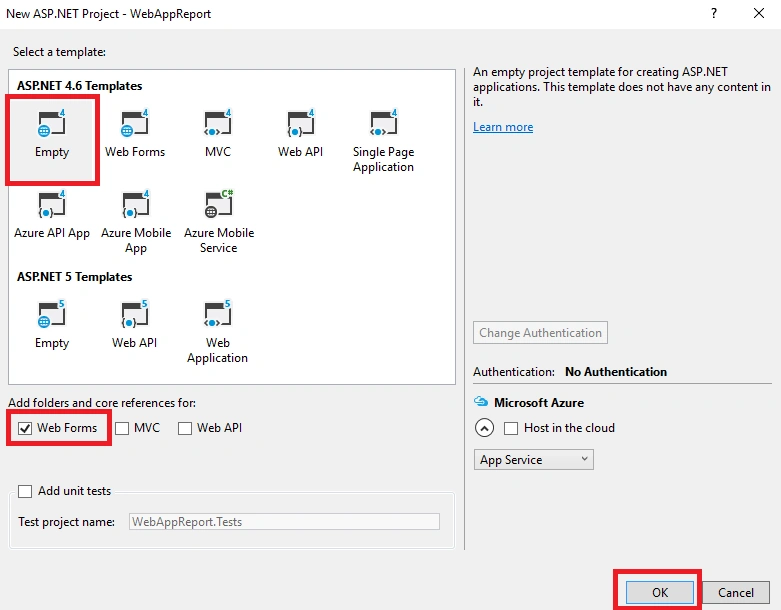
Step 1: Create a new ASP.NET project and add report in your project, here I have created Report folder and added 'CrystalReport2.rpt' file in it.


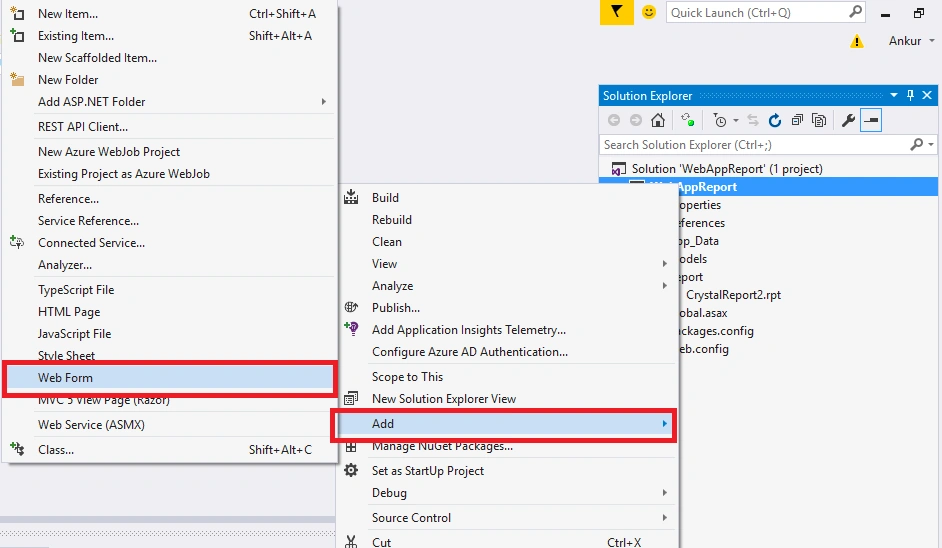
Step 2: Now add WebForm in your project by right click on Project, Add, then clicking Webform. Give it a name,
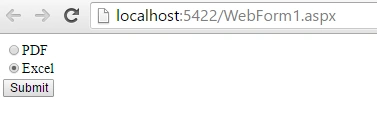
Step 3: Now, let's design your page, Drag and Drop 'RadioButtonList' and add 2 Items 'PDF' and 'Excel' add button, give a name 'btnSubmit' .
- <div>
- <asp:RadioButtonList ID="RadioButtonList1" runat="server">
- <asp:ListItem Selected="True">PDF</asp:ListItem>
- <asp:ListItem>Excel</asp:ListItem>
- </asp:RadioButtonList>
- <asp:Button ID="btnSubmit" runat="server" Text="Submit" OnClick="btnSubmit_Click" />
- </div>
Step 5: For Crystal Report you need 2 packages from NuGet Package manager: CrystalDecisions.Shared and CrystalDecisions.CrystalReports.Engine,

Step 6: After that we have to add assemblies in our code.
- using CrystalDecisions.CrystalReports.Engine;
- using CrystalDecisions.Shared;
- using System.IO;
- using System.Configuration;

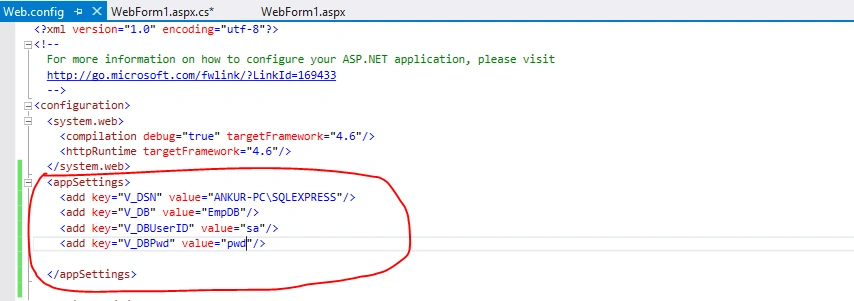
Step 7: For Connection String I have added Keys in Web.Config file, Add the following code in your web.config in <appSettings> tab.
Here I have created 4 keys for Server name, Database name, User Id, and Password.
Here I have created 4 keys for Server name, Database name, User Id, and Password.
Step 8: On Button Click event, add the following code:
- Create object for crystal report Export option class.
- Create object for destination option - for set path of your pdf/excel file save.
- Map your crystal report path.
- Set database Connection.
- Select report format (pdf/excel).
- protected void btnSubmit_Click(object sender, EventArgs e)
- {
- //Create object for crystal report Export option class
- ExportOptions exopt = default(ExportOptions);
- //create object for destination option - for set path of your pdf file save
- DiskFileDestinationOptions dfdopt = new DiskFileDestinationOptions();
- ReportDocument RptDoc = new ReportDocument();
- //Map your crystal report path
- RptDoc.Load(Server.MapPath("~/Report/CrystalReport2.rpt"));
- //Set database Connection
- setDbInfo(RptDoc, ConfigurationManager.AppSettings["V_DSN"], ConfigurationManager.AppSettings["V_DB"], ConfigurationManager.AppSettings["V_DBUserID"], ConfigurationManager.AppSettings["V_DBPwd"]);
- if (RadioButtonList1.SelectedItem.Text.ToString() == "PDF")
- {
- //Report pfd name
- string fname = "Report1.pdf";
- dfdopt.DiskFileName = Server.MapPath(fname);
- exopt = RptDoc.ExportOptions;
- exopt.ExportDestinationType = ExportDestinationType.DiskFile;
- //for PDF select PortableDocFormat for excel select ExportFormatType.Excel
- exopt.ExportFormatType = ExportFormatType.PortableDocFormat;
- exopt.DestinationOptions = dfdopt;
- //finally export your report document
- RptDoc.Export();
- //To open your PDF after save it from crystal report
- string Path = Server.MapPath(fname);
- FileInfo file = new FileInfo(Path);
- Response.ClearContent();
- Response.AddHeader("Content-Disposition", "attachment; filename=" + file.Name);
- Response.AddHeader("Content-Length", file.Length.ToString());
- Response.ContentType = "application/pdf";
- Response.TransmitFile(file.FullName);
- Response.Flush();
- RptDoc.Dispose();
- RptDoc.Close();
- RptDoc = null;
- ////End
- }
- else
- {
- // Excel Code goes here...
- string fname = "Report1.xls";
- dfdopt.DiskFileName = Server.MapPath(fname);
- exopt = RptDoc.ExportOptions;
- exopt.ExportDestinationType = ExportDestinationType.DiskFile;
- exopt.ExportFormatType = ExportFormatType.Excel;
- exopt.DestinationOptions = dfdopt;
- RptDoc.Export();
- string Path = Server.MapPath(fname);
- FileInfo file = new FileInfo(Path);
- Response.ClearContent();
- Response.AddHeader("Content-Disposition", "attachment; filename=" + file.Name);
- Response.AddHeader("Content-Length", file.Length.ToString());
- Response.ContentType = "application/excel";
- Response.TransmitFile(file.FullName);
- Response.Flush();
- RptDoc.Dispose();
- RptDoc.Close();
- RptDoc = null;
- }
- }
- /// <summary>
- /// setDbInfo - for connecting database table
- /// </summary>
- /// <param name="rptDoc">Crystal Report </param>
- /// <param name="ServerName">Database Server name </param>
- /// <param name="DatabaseName">Database name </param>
- /// <param name="UserName">DB Username </param>
- /// <param name="Password">DB Password </param>
- protected void setDbInfo(ReportDocument rptDoc, string Server, string dbName, string UserId, string Pwd)
- {
- TableLogOnInfo logoninfo = new TableLogOnInfo();
- // connect multiple tabel
- foreach (CrystalDecisions.CrystalReports.Engine.Table tbl in rptDoc.Database.Tables)
- {
- logoninfo = tbl.LogOnInfo;
- logoninfo.ReportName = rptDoc.Name;
- logoninfo.ConnectionInfo.ServerName = Server;
- logoninfo.ConnectionInfo.DatabaseName = dbName;
- logoninfo.ConnectionInfo.UserID = UserId;
- logoninfo.ConnectionInfo.Password = Pwd;
- logoninfo.TableName = tbl.Name;
- tbl.ApplyLogOnInfo(logoninfo);
- tbl.Location = tbl.Name;
- }
- }
Step 10 : Now run your application, select PDF and click 'Submit'. It will generate PDF report and if you want Excel Report then select Excel and click on 'Submit' Button.
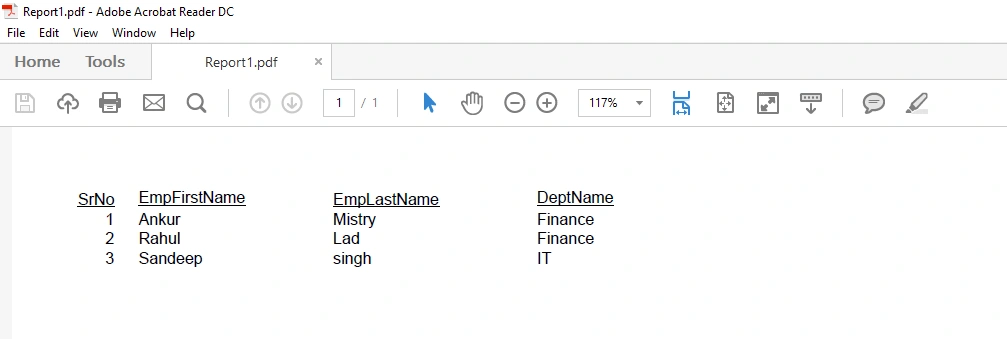
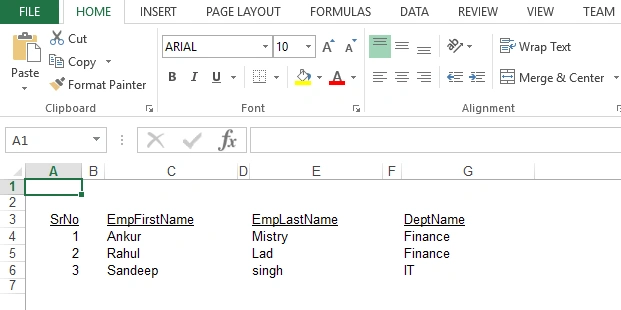
Here, we have't used CrystalReportViewer for Load and Display Report, Instead we have directly loaded PDF or excel report.
Hope you liked the article.
Hope you liked the article.
Guest UserPosted May 23, 2020, 12:00 PM
Ankur i love this article, i want to create something like this but using MVC not web form. Do you know how?
Hardik MasalawalaPosted Feb 6, 2020, 9:34 AM
Please upload solution with Package files and also DB scripts
Pradeep SahooPosted May 27, 2016, 7:53 PM
Nice article...Thanks for sharing...
Saktiprasad SwainPosted May 16, 2016, 3:52 AM
Nice article.
Sonu ChaudharyPosted Mar 31, 2016, 11:58 AM
good one
Ankur MistryPosted Jan 8, 2016, 8:35 AM
thank you all
Santhakumar MunuswamyPosted Jan 5, 2016, 11:21 PM
Thanks for nice share
Muhammad Aqib ShehzadPosted Jan 5, 2016, 7:35 AM
nice
Sabyasachi MishraPosted Jan 5, 2016, 3:19 AM
Good one
Humayun Kabir MamunPosted Jan 4, 2016, 10:53 PM
Nice...
Kumaresh RajalingamPosted Jan 4, 2016, 9:10 PM
Nice one
Karthikeyan KPosted Jan 4, 2016, 1:29 PM
Good one sir
Praveen KumarPosted Jan 4, 2016, 10:31 AM
It's awesome Ankur
Ankur MistryPosted Jan 4, 2016, 10:19 AM
Thank you Arul R
Arul RPosted Jan 4, 2016, 10:13 AM
Nice share