

In this article, we will explore about creating a simple online shopping site using Angular with Eclipse IDE. Most of all we use IDE’s like visual studio code, visual studio, etc. But there are some other tools which are very useful for developing Angular applications. One of the most used IDE is Eclipse. The Eclipse is an open-source popular IDE used by many developers around the globe. The Eclipse is also a user-friendly IDE especially developed for JAVA developers, and Eclipse comes in a variety of categories such as Eclipse for JAVA developers, Eclipse for C & C++ developers and Eclipse for JavaScript and web developers. You can find more information about Eclipse from the following link. Here we are going to use Eclipse for JavaScript and web developers IDE and you can download the following mentioned IDE from the following link.
Comparing with visual studio code, the Eclipse has some slight difference for example: In VS code we use Angular commands to create a component, class or a service. But here in Eclipse, the way of creating a component, class & as well as creating service is an easy way and we will explore it in the following steps as mentioned below.
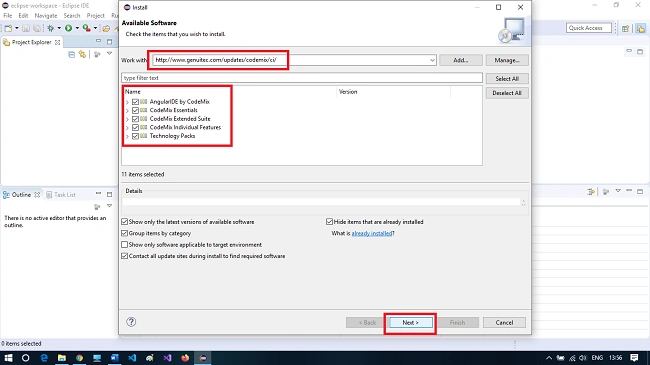
After downloading the IDE from the following link, we need to install some of the supporting plugins. Download the Angular IDE plugin from the following below link. Open Eclipse->help->install new software and paste the following link in work with label. By downloading the plugin from this link, the required plugins will be automatically added to Eclipse IDE.
http://www.genuitec.com/updates/codemix/ci/
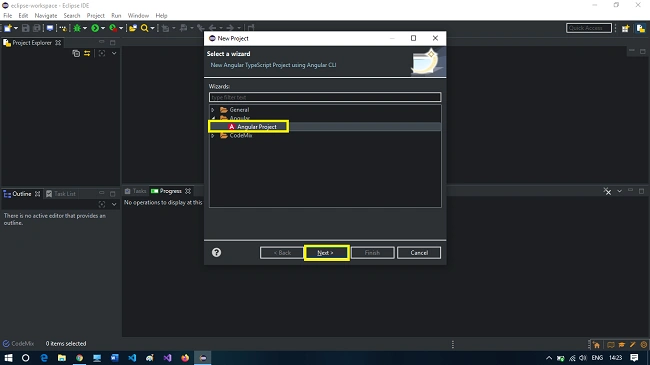
The first step is to create a new Angular project, for that select->file->new->project-> Angular project and click-> Next, and select the Angular CLI to version 8.3.12 and select->next.
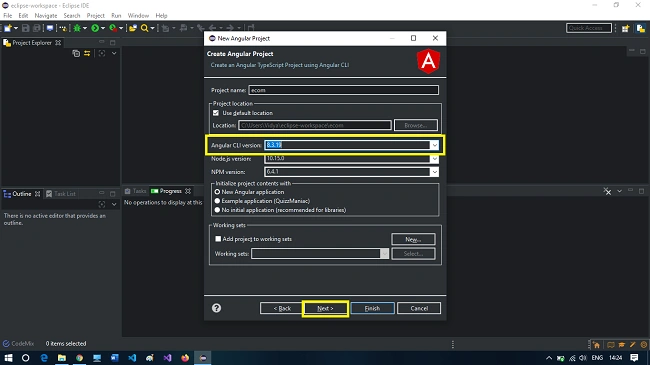
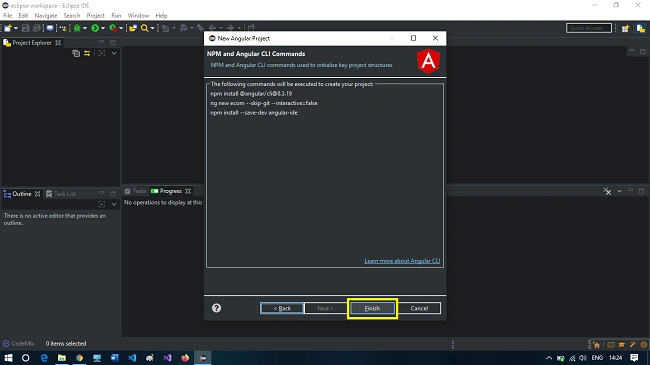
The Eclipse IDE will automatically execute the necessary process in order to create a Angular project, so click-> finish.
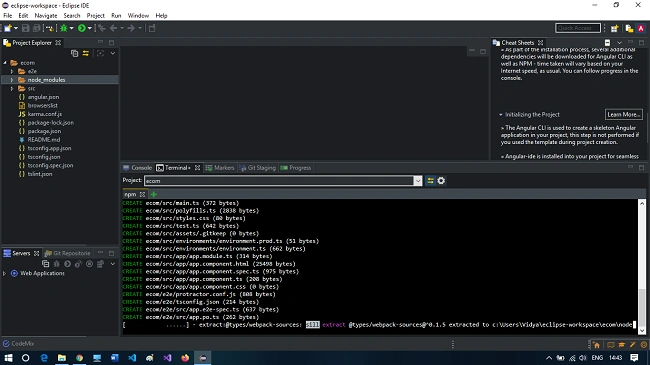
The next step is to install bootstrap to our project, which helps in providing a better UI experience, for that use the following command in the terminal. For using terminal in eclipse use the shortcut key ctrl+alt+T and enter the following command.
npm install bootstrap --save
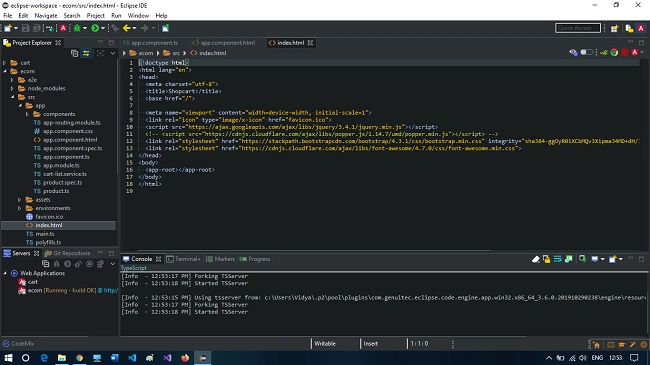
After that open index.html and add the following code inside of the head tag as shown below.
- <link rel="stylesheet" href="https://stackpath.bootstrapcdn.com/bootstrap/4.3.1/css/bootstrap.min.css" integrity="sha384-ggOyR0iXCbMQv3Xipma34MD+dH/1fQ784/j6cY/iJTQUOhcWr7x9JvoRxT2MZw1T" crossorigin="anonymous">
- <link rel="stylesheet" href="https://cdnjs.cloudflare.com/ajax/libs/font-awesome/4.7.0/css/font-awesome.min.css">
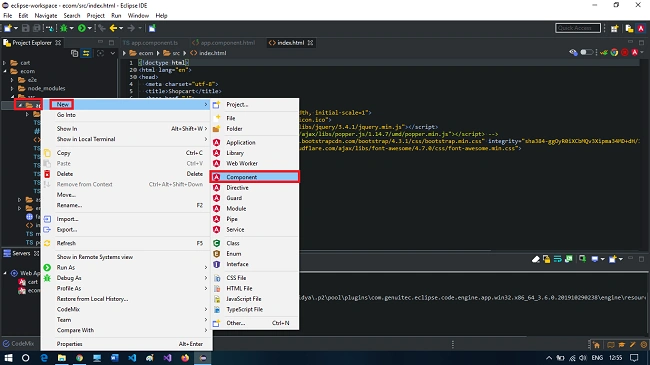
The next step is to we will create two new components named as shopping-cart and product-list, follow the below mentioned steps to create the components, Right click->app->new-> component
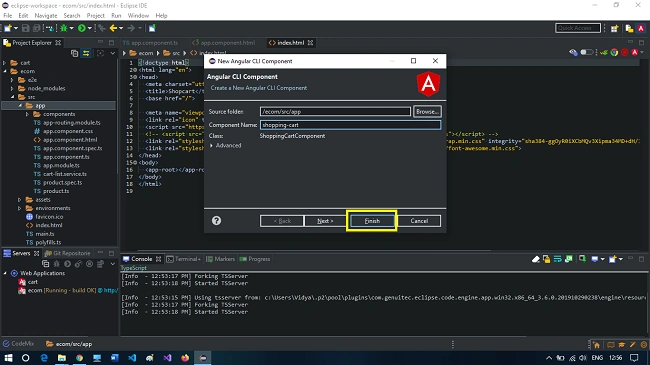
Then provide the name of the components and click->finish.
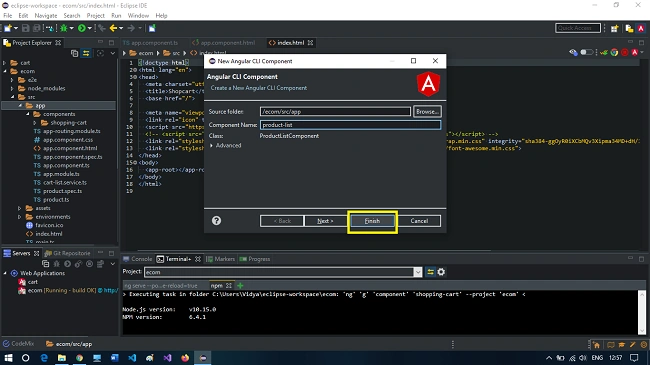
Now open app.component.html file and replace the following code inside of it.
- <!-- <app-navbar></app-navbar> -->
- <div class="container-fluid">
- <div class="row">
- <!-- <div class="col-sm-12"><app-header></app-header></div>-->
- </div>
- <div class="row">
- <div class="col-sm-12">
- <app-shopping-cart></app-shopping-cart>
- </div>
- </div>
- <div class="row">
- <div class="col-sm-12">
- <!-- <app-footer></app-footer> -->
- </div>
- </div>
- </div>
- <router-outlet></router-outlet>
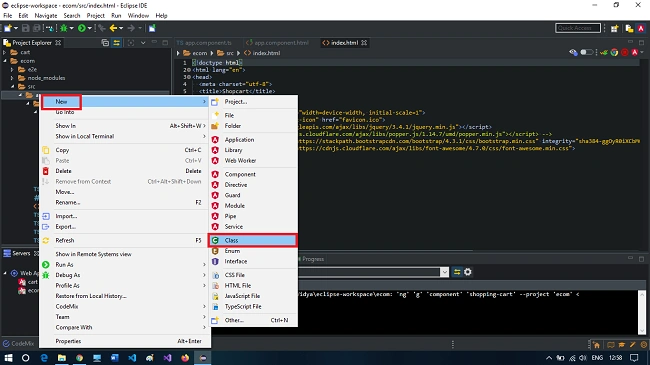
Then create a class file named as product, for that right click-> app->new->class and provide the name as product & click->finish.
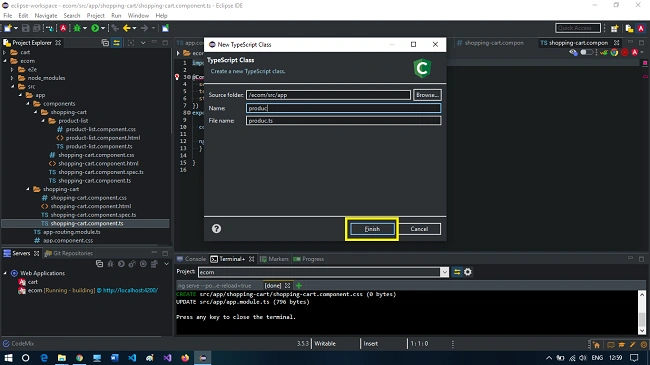
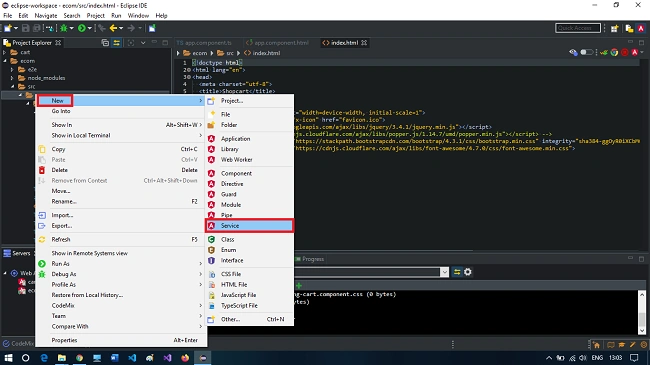
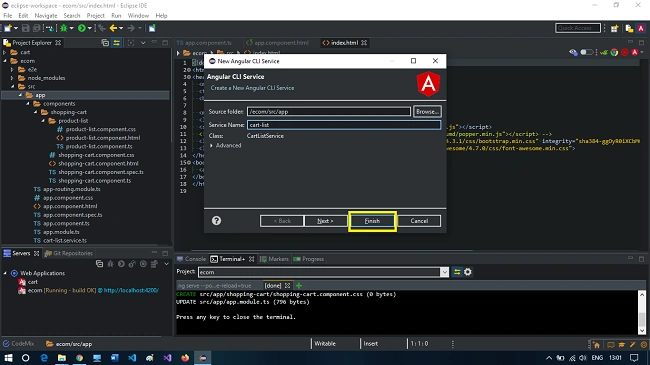
Continue to further step, now we need to create a service file named as cart-list.service and for that right click->app->new->service and provide the name for the service and then click->finish.
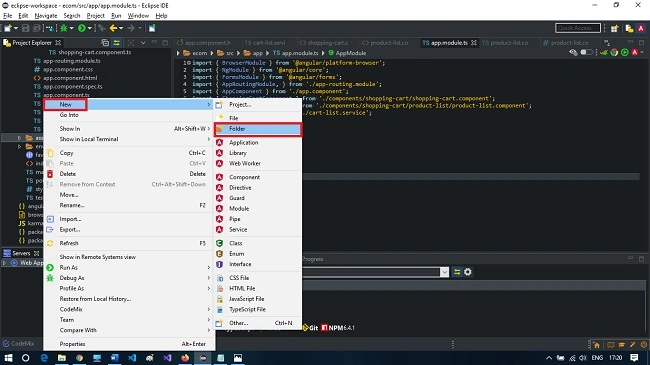
The next step is to create a new folder inside the assets folder. Create a new folder by right click->assets->new->folder and provide a name as a product for the folder. In addition to that, you can have some of the product images inside of that folder.
Now coming to the main point.
Step 1
Open the product.ts file and replace the following code inside of it. Then we can keep proceeding to next step.
- export class Product {
- constructor(public productId: number, public productImage: string, public productName: string, public productCost: number, public productDescription: string) {}
- }
- export class CartList {
- public sno: number;
- public productId: number;
- public quantity: number;
- public productName: string;
- public productImage: string;
- public productCost: number;
- }
Step 2
Open product-list.component.html file and place the following code inside of it.
- <nav class="navbar navbar-expand-lg navbar-light bg-dark">
- <a class="navbar-brand text-light" href="#">Shopcart</a>
- <button class="navbar-toggler" type="button" data-toggle="collapse" data-target="#navbarSupportedContent"
- aria-controls="navbarSupportedContent" aria-expanded="false" aria-label="Toggle navigation">
- <span class="navbar-toggler-icon"></span>
- </button>
- <div class="collapse navbar-collapse" id="navbarSupportedContent">
- <ul class="navbar-nav mr-auto">
- <li class="nav-item active">
- <a class="nav-link text-light" (click)="onList()" href="#">List
- <span class="sr-only">(current)</span>
- </a>
- </li>
- <li class="nav-item">
- <a class="nav-link text-light" (click)="onCart()" href="#">Cart
- <span class="badge badge-secondary">{{addToCart.length}}</span>
- </a>
- </li>
- </ul>
- <div class="form-group has-search" *ngIf="(showblock == 'list')">
- <span class="fa fa-search form-control-feedback"></span>
- <input type="text" (keyup) = "onSearch($event)" autocomplete="off" class="form-control" placeholder="Search">
- </div>
- </div>
- </nav>
- <div class="row" *ngIf="(showblock == 'list')">
- <div class="col-sm-12">
- <div class="page-header">
- <h1>Smartphone's</h1>
- </div>
- </div>
- <div class="col-sm-4 mb-3" *ngFor="let product of productList ; let i = index">
- <div class="card card-block">
- <img src="{{product.productImage}}" (click)="onChange(i)" class="card-img-top" alt="..." height="400px"
- width="100%">
- <div class="card-body">
- <h5 class="card-title">{{product.productName}}</h5>
- <!-- <p class="card-text">{{product.productDescription}}</p> -->
- <p class="card-text">
- <strong>₹ {{product.productCost}}</strong>
- </p>
- </div>
- </div>
- </div>
- </div>
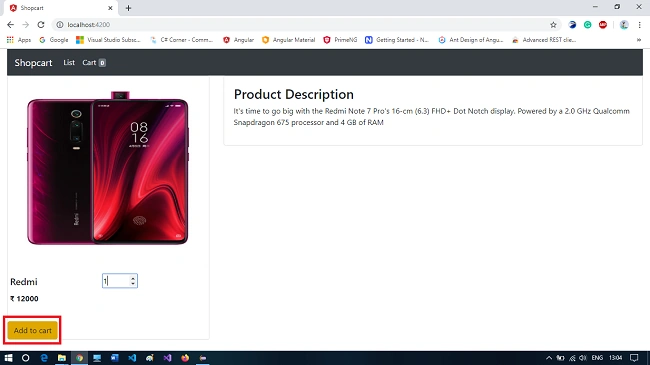
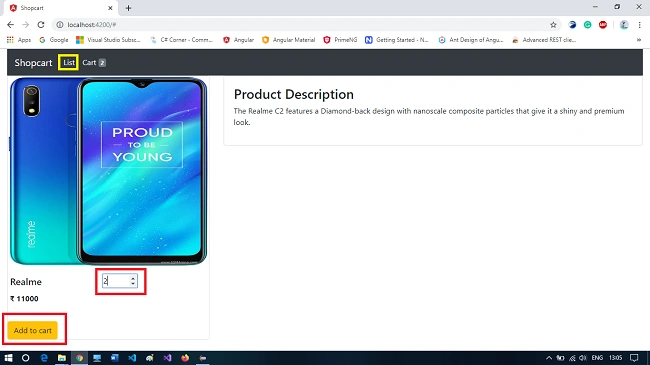
- <div class="row" *ngIf="(showblock == 'description')">
- <div class="col-sm-4 mb-3">
- <div class="card card-block">
- <img src="{{description.productImage}}" class="card-img-top" alt="..." height="400px" width="100%">
- <div class="row">
- <div class="card-body col-sm-4">
- <h5 class="card-title">{{description.productName}}</h5>
- <!-- <p class="card-text">{{description.productDescription}}</p> -->
- <p class="card-text">
- <strong>₹ {{description.productCost}}</strong>
- </p>
- </div>
- <form (ngSubmit)="onSubmit()" #qty>
- <div class="ml-5 mt-3 col-sm-4">
- <input type="number" id="txtqty" #quantity name="quantity" min="1" max="100" step="1" value="1">
- </div>
- </form>
- <div class="col mt-3 col-sm-4">
- <button class="btn btn-warning" (click)="addCart(description.productId, currentIndex)">Add to cart</button>
- </div>
- </div>
- </div>
- </div>
- <div class="col-sm-8 mb-3">
- <div class="card card-block">
- <div class="card-body">
- <h3>Product Description</h3>
- <p>{{description.productDescription}}</p>
- </div>
- </div>
- </div>
- </div>
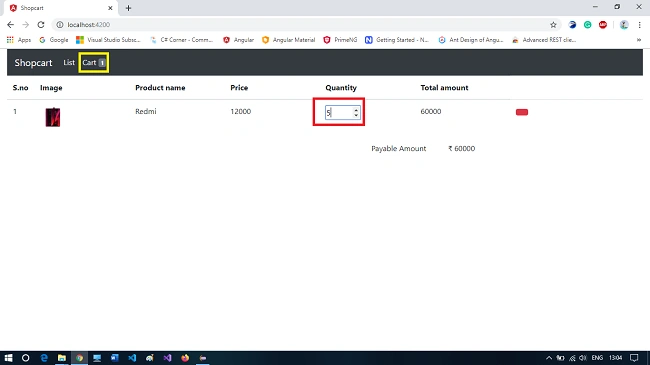
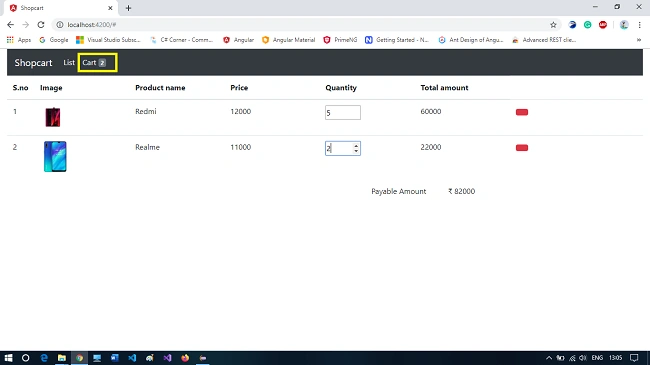
- <div class="row" *ngIf="(showblock == 'cart')">
- <div class="col-sm-12">
- <table class="table table-hover">
- <thead>
- <th>S.no</th>
- <th>Image</th>
- <th>Product name</th>
- <th>Price</th>
- <th>Quantity</th>
- <th>Total amount</th>
- </thead>
- <tbody>
- <tr *ngFor="let cList of addToCart; let i = index">
- <td width = "1%">{{i+1}}</td>
- <td width = "15%">
- <img src="{{cList.productImage}}" class="ml-2" alt="..." height="10%">
- </td>
- <td width = "15%">{{cList.productName}}</td>
- <td width = "15%">{{cList.productCost}}</td>
- <td width = "15%">
- <input type="number" #qty name="quantity" (keyup)="onKey($event, i)" [value] = "cList.quantity" min="1" max="500" step="1" value="1">
- </td>
- <td width = "15%">{{cList.quantity*cList.productCost}}</td>
- <td>
- <button class="btn btn-danger" (click) = "remove(i)"></button>
- </td>
- </tr>
- </tbody>
- </table>
- <div class="row">
- <div class="col-sm-8">
- <p class="float-right">Payable Amount</p>
- </div>
- <div class="col-sm-4">
- <p class="ml-3">₹ {{totalamt}}</p>
- </div>
- </div>
- </div>
- </div>
Sourav Kumar DasPosted Nov 20, 2019, 10:36 PM
Awesome Article Sir.