

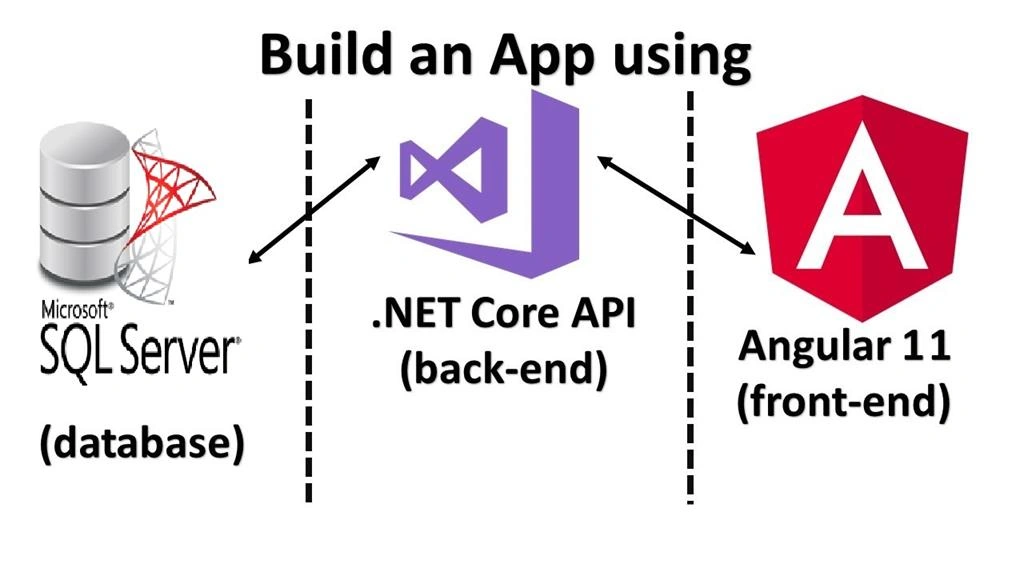
In this article, we’ll implement Asp.Net Core 5.0 Web API CRUD Operations with Angular 11.
Step 1
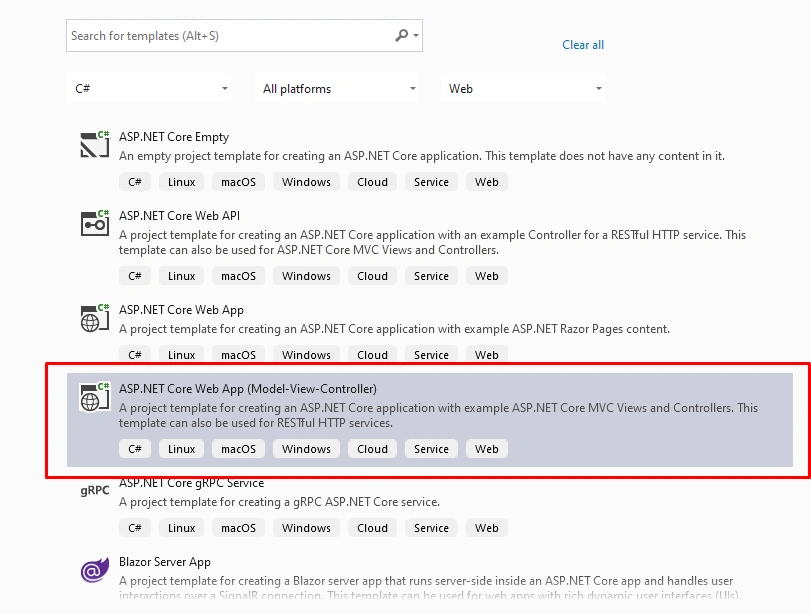
Let's first open Visual Studio 2019 and from the new project window, select Asp.Net Core Web Application as shown below.
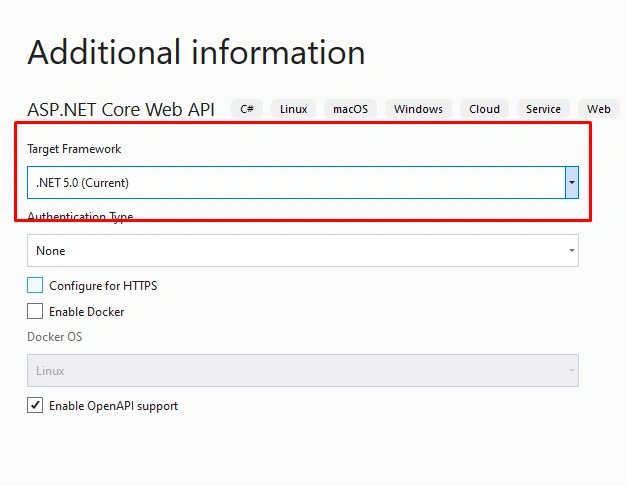
After providing the project name and location a new window will be opened as follows, Select Target Framework. The above steps will create a brand new ASP.NET Core Web API project
Step 2
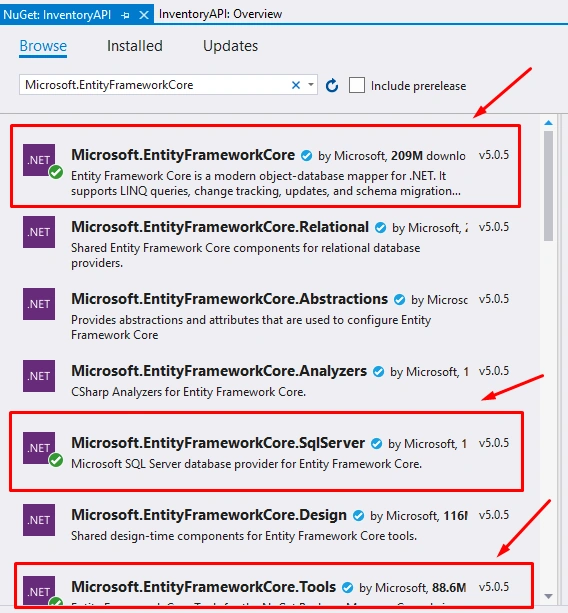
Let's install Entity Framework Core NuGet packages to interact with the database
Step 3
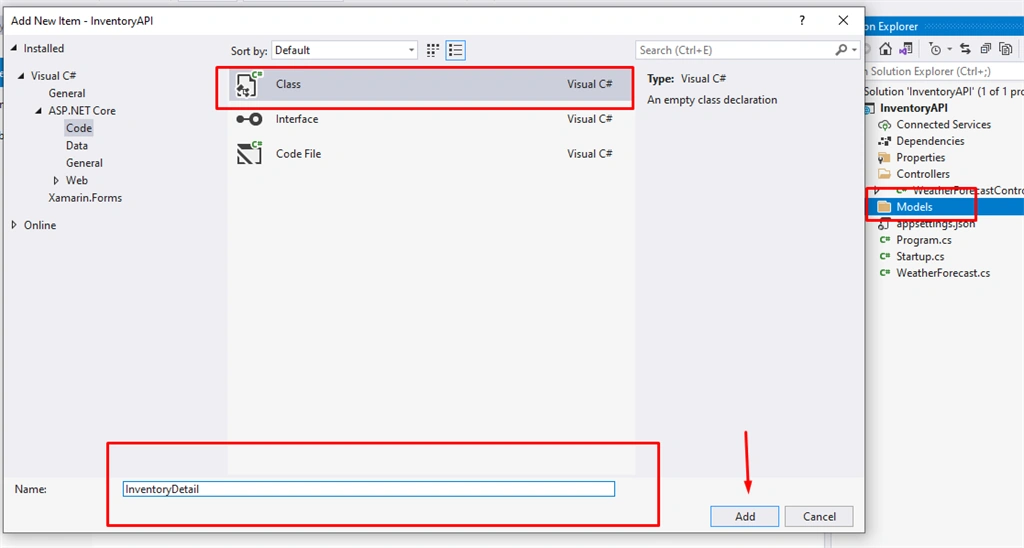
Create Folder Models and let's add DB model class file,
- using System;
- using System.Collections.Generic;
- using System.ComponentModel.DataAnnotations;
- using System.ComponentModel.DataAnnotations.Schema;
- using System.Linq;
- using System.Threading.Tasks;
- namespace InventoryAPI.Models
- {
- public class InventoryDetail
- {
- [Key]
- public int InventoryDetailId { get; set; }
- [Column(TypeName = "nvarchar(100)")]
- public string ProductName { get; set; }
- [Column(TypeName = "nvarchar(12)")]
- public string SKU { get; set; }
- [Column(TypeName = "nvarchar(5)")]
- public string ExpirationDate { get; set; }
- [Column(TypeName = "nvarchar(3)")]
- public string Quantity { get; set; }
- }
- }
- using Microsoft.EntityFrameworkCore;
- using System;
- using System.Collections.Generic;
- using System.Linq;
- using System.Threading.Tasks;
- namespace InventoryAPI.Models
- {
- public class InventoryDetailContext:DbContext
- {
- public InventoryDetailContext(DbContextOptions<InventoryDetailContext> options) : base(options)
- {
- }
- public DbSet<InventoryDetail> InventoryDetails { get; set; }
- }
- }
DB Migration will be done with this InventoryDetailContext. So we have added the DbSet property for the Detail Model class, after migration PaymentDetails table will be created in SQL Server Database.
Into this model class constructor parameter- options, we have to pass which DbProvider (SQL Server, MySQL, PostgreSQL, etc) to use and corresponding DB connection string also. For that, we’ll be using dependency injection in ASP.NET Core with Startup. cs file as below.
Into this model class constructor parameter- options, we have to pass which DbProvider (SQL Server, MySQL, PostgreSQL, etc) to use and corresponding DB connection string also. For that, we’ll be using dependency injection in ASP.NET Core with Startup. cs file as below.
- using Microsoft.AspNetCore.Builder;
- using Microsoft.AspNetCore.Hosting;
- using Microsoft.AspNetCore.Mvc;
- using Microsoft.EntityFrameworkCore;
- using Microsoft.Extensions.Configuration;
- using Microsoft.Extensions.DependencyInjection;
- using Microsoft.Extensions.Hosting;
- using Microsoft.Extensions.Logging;
- using Microsoft.OpenApi.Models;
- using InventoryAPI.Models;
- using System;
- using System.Collections.Generic;
- using System.Linq;
- using System.Threading.Tasks;
- namespace InventoryAPI
- {
- public class Startup
- {
- public Startup(IConfiguration configuration)
- {
- Configuration = configuration;
- }
- public IConfiguration Configuration { get; }
- // This method gets called by the runtime. Use this method to add services to the container.
- public void ConfigureServices(IServiceCollection services)
- {
- services.AddControllers();
- services.AddSwaggerGen(c =>
- {
- c.SwaggerDoc("v1", new OpenApiInfo { Title = "InventoryAPI", Version = "v1" });
- });
- services.AddDbContext<InventoryDetailContext>(options =>
- options.UseSqlServer(Configuration.GetConnectionString("DevConnection")));
- services.AddCors();
- }
- // This method gets called by the runtime. Use this method to configure the HTTP request pipeline.
- public void Configure(IApplicationBuilder app, IWebHostEnvironment env)
- {
- app.UseCors(options =>
- options.WithOrigins("http://localhost:4200")
- .AllowAnyMethod()
- .AllowAnyHeader());
- if (env.IsDevelopment())
- {
- app.UseDeveloperExceptionPage();
- app.UseSwagger();
- app.UseSwaggerUI(c => c.SwaggerEndpoint("/swagger/v1/swagger.json", "PaymentAPI v1"));
- }
- app.UseRouting();
- app.UseAuthorization();
- app.UseEndpoints(endpoints =>
- {
- endpoints.MapControllers();
- });
- }
- }
- }
Step 4
Let's make use of dependency injection for DbContext class, through which SQL Server is set as a DbProvider with a connection string, Now save the connection string in the appsettings.json file using the UATConnection key as follows.
- {
- "Logging": {
- "LogLevel": {
- "Default": "Information",
- "Microsoft": "Warning",
- "Microsoft.Hosting.Lifetime": "Information"
- }
- },
- "AllowedHosts": "*",
- "ConnectionStrings": {
- "UATConnection": "Server=.;Database=InventoryDetailDB;Trusted_Connection=True;MultipleActiveResultSets=True;"
- }
- }
Step 5
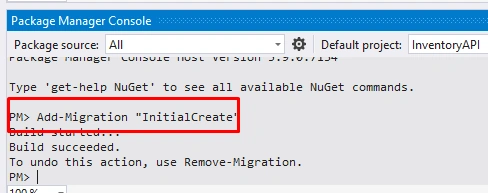
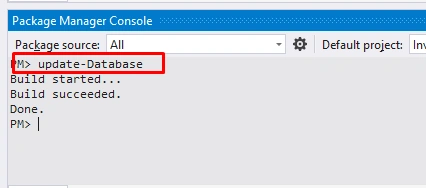
Select the project from solution explorer, then go to Tools > NuGet Package Manager > Package Manager Console. Then execute the following commands one by one.
- Add-Migration "InitialCreate"
- Update-Database
Step 6
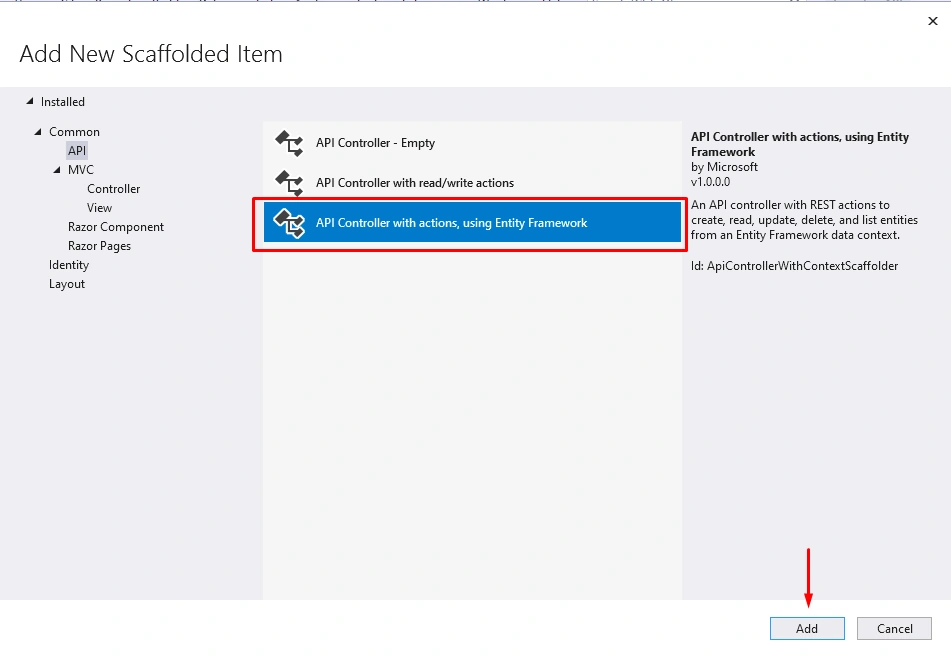
Now let's create API controller right-click on Controllers folder Add > Controller, Select API Controller with actions, using Entity Framework.
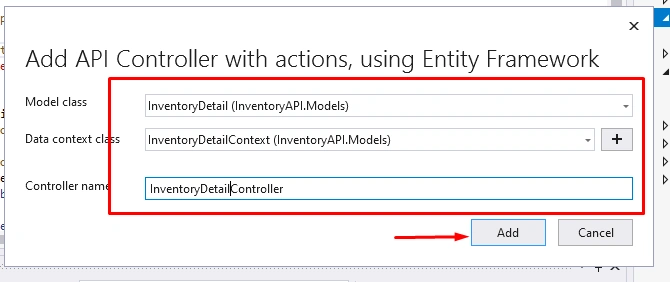
- using System;
- using System.Collections.Generic;
- using System.Linq;
- using System.Threading.Tasks;
- using Microsoft.AspNetCore.Http;
- using Microsoft.AspNetCore.Mvc;
- using Microsoft.EntityFrameworkCore;
- using InventoryAPI.Models;
- namespace InventoryAPI.Controllers
- {
- [Route("api/[controller]")]
- [ApiController]
- public class InventoryDetailController : ControllerBase
- {
- private readonly InventoryDetailContext _context;
- public InventoryDetailController(InventoryDetailContext context)
- {
- _context = context;
- }
- // GET: api/InventoryDetail
- [HttpGet]
- public async Task<ActionResult<IEnumerable<InventoryDetail>>> GetInventoryDetails()
- {
- return await _context.InventoryDetails.ToListAsync();
- }
- // GET: api/InventoryDetail/5
- [HttpGet("{id}")]
- public async Task<ActionResult<InventoryDetail>> GetInventoryDetail(int id)
- {
- var inventoryDetail = await _context.InventoryDetails.FindAsync(id);
- if (inventoryDetail == null)
- {
- return NotFound();
- }
- return inventoryDetail;
- }
- // PUT: api/InventoryDetail/5
- // To protect from overposting attacks, see https://go.microsoft.com/fwlink/?linkid=2123754
- [HttpPut("{id}")]
- public async Task<IActionResult> PutInventoryDetail(int id, InventoryDetail inventoryDetail)
- {
- if (id != inventoryDetail.InventoryDetailId)
- {
- return BadRequest();
- }
- _context.Entry(inventoryDetail).State = EntityState.Modified;
- try
- {
- await _context.SaveChangesAsync();
- }
- catch (DbUpdateConcurrencyException)
- {
- if (!InventoryDetailExists(id))
- {
- return NotFound();
- }
- else
- {
- throw;
- }
- }
- return NoContent();
- }
- // POST: api/InventoryDetail
- // To protect from overposting attacks, see https://go.microsoft.com/fwlink/?linkid=2123754
- [HttpPost]
- public async Task<ActionResult<InventoryDetail>> PostInventoryDetail(InventoryDetail inventoryDetail)
- {
- _context.InventoryDetails.Add(inventoryDetail);
- await _context.SaveChangesAsync();
- return CreatedAtAction("GetInventoryDetail", new { id = inventoryDetail.InventoryDetailId }, inventoryDetail);
- }
- // DELETE: api/InventoryDetail/5
- [HttpDelete("{id}")]
- public async Task<IActionResult> DeleteInventoryDetail(int id)
- {
- var inventoryDetail = await _context.InventoryDetails.FindAsync(id);
- if (inventoryDetail == null)
- {
- return NotFound();
- }
- _context.InventoryDetails.Remove(inventoryDetail);
- await _context.SaveChangesAsync();
- return NoContent();
- }
- private bool InventoryDetailExists(int id)
- {
- return _context.InventoryDetails.Any(e => e.InventoryDetailId == id);
- }
- }
- }
Now we have web methods POST, GET, PUT and DELETE for Create, Retrieve, Update and Delete operations respectively. As a constructor parameter we’ve context of the type InventoryDetailContext. The instance/value for this parameter will be passed from dependency injection from StartUp class.
Step 7
Now let's create Angular Project for front-end client-side app
- ng new app_name
- # after project creation.
- # navigate inside project folder
- cd app_name
- # open in vs code
- code .
- # from vs code terminal
- # command to open the app in default web browser
- ng serve --o
Now we have two components, inventroy-details component to show the list of records and it has a child component inventory-detail-form, a form for insert and update operation can be designed.
To create these 2 components, Lets'execute the below commands.
- ng g c inventory-details -s --skipTests
- ng g c inventory-details/payment-detail-form -s --skipTests
- <!-- Add following stylesheets to <head> tag -->
- <link rel="preload" href="https://stackpath.bootstrapcdn.com/bootstrap/4.5.2/css/bootstrap.min.css" data-rocket-async="style" as="style" onload="this.onload=null;this.rel='stylesheet'" integrity="sha384-JcKb8q3iqJ61gNV9KGb8thSsNjpSL0n8PARn9HuZOnIxN0hoP+VmmDGMN5t9UJ0Z" crossorigin="anonymous">
- <link rel="preload" href="https://cdnjs.cloudflare.com/ajax/libs/font-awesome/5.14.0/css/all.min.css" data-rocket-async="style" as="style" onload="this.onload=null;this.rel='stylesheet'" integrity="sha512-1PKOgIY59xJ8Co8+NE6FZ+LOAZKjy+KY8iq0G4B3CyeY6wYHN3yt9PW0XpSriVlkMXe40PTKnXrLnZ9+fkDaog==" crossorigin="anonymous" />
Step 8
Let's create a modal class for Inventory Details
- ng g class shared/inventory-detail --type=model --skipTests
- export class InventoryDetail {
- InventoryDetailId: number=0;
- ProductName: string='';
- SKU: string='';
- ExpirationDate: string='';
- Quantity: string='';
- }
Step 9
Create service class as below
- ng g s shared/inventory-detail --skipTests
- import { Injectable } from '@angular/core';
- import { InventoryDetail } from './inventory-detail.model';
- import { HttpClient } from "@angular/common/http";
- @Injectable({
- providedIn: 'root'
- })
- export class InventoryDetailService {
- constructor(private http: HttpClient) { }
- readonly baseURL = 'http://localhost:61236/api/InventoryDetail';
- formData: InventoryDetail= new InventoryDetail();
- list : InventoryDetail[];
- postnventoryDetail() {
- return this.http.post(this.baseURL, this.formData);
- }
- putInventoryDetail() {
- return this.http.put(`${this.baseURL}/${this.formData.InventoryDetailId}`, this.formData);
- }
- deleteinventoryDetail(id: number) {
- return this.http.delete(`${this.baseURL}/${id}`);
- }
- refreshList() {
- this.http.get(this.baseURL)
- .toPromise()
- .then(res =>this.list = res as InventoryDetail[]);
- }
- }
Lets import HttpClient Module in app.Module.ts file
- import { BrowserModule } from '@angular/platform-browser';
- import { NgModule } from '@angular/core';
- import { FormsModule } from "@angular/forms";
- import { BrowserAnimationsModule } from '@angular/platform-browser/animations';
- import { ToastrModule } from 'ngx-toastr';
- import { AppComponent } from './app.component';
- import { InventoryDetailsComponent } from './inventory-details/inventory-details.component';
- import { InventoryDetailFormComponent } from './inventory-details/inventory-detail-form/inventory-detail-form.component';
- import { HttpClientModule } from '@angular/common/http';
- @NgModule({
- declarations: [
- AppComponent,
- InventoryDetailsComponent,
- InventoryDetailFormComponent
- ],
- imports: [
- BrowserModule,
- FormsModule,
- HttpClientModule,
- BrowserAnimationsModule,
- ToastrModule.forRoot()
- ],
- providers: [],
- bootstrap: [AppComponent]
- })
- export class AppModule { }
Step 10
Create a form for all crud operations inventory-detail-form.component.html
- <form novalidate autocomplete="off" #form="ngForm" (submit)="onSubmit(form)">
- <input type="hidden" name="inventoryDetailId" [value]="service.formData.inventoryDetailId" />
- <div class="form-group">
- <label>Product NAME</label>
- <input class="form-control form-control-lg" placeholder="Full Name" name="ProductName"
- #cardOwnerName="ngModel" [(ngModel)]="service.formData.ProductName"
- required [class.invalid]="ProductName.invalid && ProductName.touched">
- </div>
- <div class="form-group">
- <label>SKU</label>
- <input class="form-control form-control-lg" placeholder="12 Digit SKU Number" name="SKU"
- #cardNumber="ngModel" [(ngModel)]="service.formData.SKU"
- required maxlength="12" minlength="16" [class.invalid]="SKU.invalid && SKU.touched">
- </div>
- <div class="form-row">
- <div class="form-group col-md-6">
- <label>QUANTITY</label>
- <input type="password" class="form-control form-control-lg" placeholder="QUANTITY" name="Quantity"
- #securityCode="ngModel" [(ngModel)]="service.formData.Quantity"
- required maxlength="3" minlength="3" [class.invalid]="Quantity.invalid && Quantity.touched">
- </div>
- <div class="form-group col-md-6">
- <label>Expiry Date</label>
- <input class="form-control form-control-lg" placeholder="MM/YY" name="ExpirationDate"
- #expirationDate="ngModel" [(ngModel)]="service.formData.ExpirationDate"
- required maxlength="5" minlength="5" [class.invalid]="ExpirationDate.invalid && ExpirationDate.touched">
- </div>
- </div>
- <div class="form-group">
- <button class="btn btn-info btn-lg btn-block" type="submit" [disabled]="form.invalid">SUBMIT</button>
- </div>
- </form>
Conclusion
In this article, we discussed how to build an application using .Net core angular 11 and SQL server. I hope you all enjoyed reading this and learned from it. For better understanding download the source code and find all the form validations and CSS.
jose loraPosted Oct 22, 2021, 2:09 PM
Excelent article
Sakhile MsibiPosted Sep 13, 2021, 5:15 AM
Hi, Thank you for a great tutorial. However there are missing files. I was able to continue from what you have done and complete the tutorial. Thank you again. My git repo for the API is: https://github.com/Sakhile-Msibi/InventoryAPI and for the angular frontend is: https://github.com/Sakhile-Msibi/InventoryAPP