


In the current application development era, Single Page Application (SPA) is a great feature to develop modern web-based applications. In these SPA applications, we tend to move the data level dependency from the server side to browser level as much as possible to improve the application performance. So as much as the application-level functionality moves to the browser level, the amount of the data and ways to manage the data are also increased. Modern SPA application frameworks like Angular, React use component-based architecture that divides our application into small sections. Each component contains its own HTML page, stylesheet, and its own state (data). This approach is very efficient because it divides our application into small sections that we can manage very easily and also, we can reuse these components into our application.
The component-based architecture is very feasible if the size of our application is not very large. When the size of our application is increased, it becomes very difficult to maintain the state of each component. Let’s focus on some downsides of the component-based architecture.
- Data Passing Approach using Properties
In Angular, we use the input properties to pass the data in component tree. Suppose, we have a component in component tree and we want to pass some data to its grand children component; First of all, we have to pass this data to its child component that is parent component of the “grand children” components, then further, the “parent” component passes that data to its own children components (grandchildren) using the “input” property.
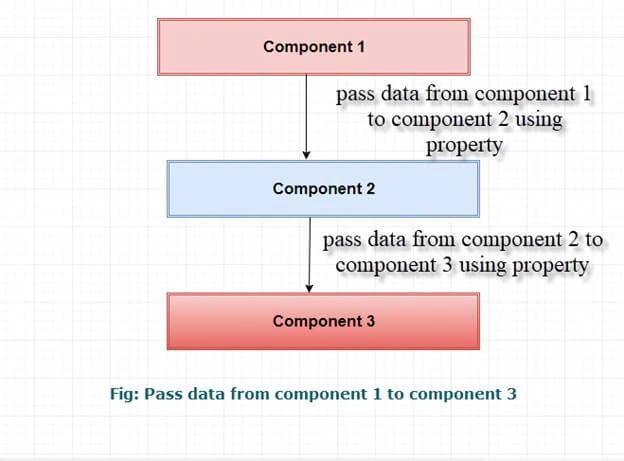
It is clear that in the above process, the parent component doesn’t use this data but if we want to pass the data to the grandchildren components, we must have to use this intermediate component. In a component-based architecture, we have many intermediate components for passing the data but not actually using that data. So, this approach is not very efficient.
- Inflexible Components
Using this property of passing the data b/w components, make the components inflexible and we can’t reuse them because we will have to pass several input values, which makes it difficult to understand the assignment of a component.
- Maintenance of data Synchronously
If multiple components are using the same states and state changes within one component, then it is necessary to notify all the other components to update their state too. That is very difficult and expensive task.
- State of Application
If each component contains its own state, then it becomes very difficult to take a screenshot of the state of whole application because we have divided the state at the component level.
- Redundant Data
If we have multiple components and each component contains its own copy of data (state), then there are huge chances that some duplicate data is present in multiple components.
All the above shortcoming can lead an application to inconsistent state application and makes it difficult to manage the state of the whole application. To overcome all these shortcomings, we need a new way, using which, we can manage the state of our application.
Redux is a predictable state container for the JavaScript apps. It is an open-source JavaScript library developed to maintain the state of the application. Redux works on the centralized data mechanism that means instead of storing the state at the component level, we store the state in a centralized location and all the components can access this store. Sometimes, the data architecture becomes a complex topic for the application but the advantage of Redux is that it makes the data architecture very easy.
Redux Architecture
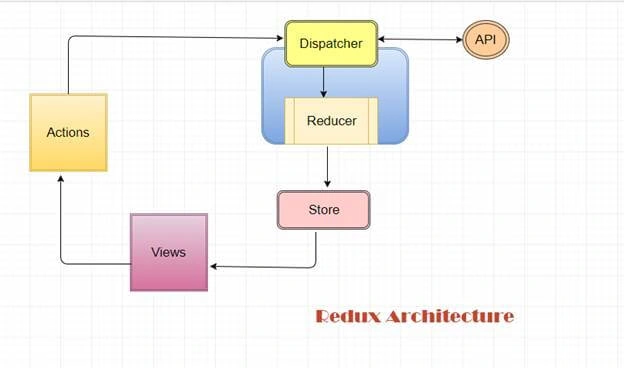
Redux works on following key points.
- Maintain the whole application data into a single state and we can access the state from the store of application.
- This store doesn't mutate directly.
- Action is used to trigger the change in the state of the application.
- Action calls the dispatcher.
- Dispatcher calls the Reducer that takes the previous state and new data as input and generates a new state and now, all the components use this new state.
Building Blocks of Redux
Before starting the development with Redux, we must have the basic knowledge of the building blocks or working blocks of the Redux architecture. Let’s understand them.
Store
Store is a simple JavaScript object that contains the state of the whole application. We can update the state of the application using the “dispatch(action, payload)” method. Dispatcher updates the previous state o the application and generates a new state every time.
Actions
Actions are payloads of the information that are sent from our application to our store. Actions are the source to send the data to the store using the “Store.dispatch()” method. We can compare the action to events that indicate the reducer what to perform with this new data and the previous state.
Reducers
Action tells the Reducer to what to perform but doesn’t tell how to perform the task. Reducers are the functions that specify how the state will change. Reducer is a pure function; that means, we get the same output with same input in all the conditions and circumstances. Reducer takes the action name and previous state and always returns a new state to contain the data with modification included.
API
APIs are the ways to interact with the external environment. API is used to get the data from server side and also update the data to server side.
I think the above intro is enough to start working with Redux and we will cover the remaining topic later in this article. If you want to read more about Redux, then go to the official website of Redux here.
Create Bug Todo List Application with Angular and Redux
Now, let us start developing the bug todo list application using the Angular 4 and use the Redux to maintain the state of our application. Actually the “bug todo” app will be a demo of the bug management system, where we can add the news bugs, check the status of the bugs and also add the functionality to change the status of the bugs.
To create a new Angular 4 application, we will use the Angular CLI. Open a new command line terminal and run the “ng new Bug-TodoApp” this command create a new Angular 4 template for the project.
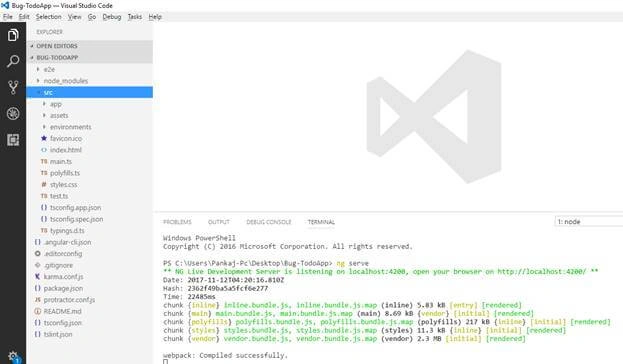
Now open this project into any Code Editor here I am using the “Visual Studio Code”. Move to the root directory of the project and run the “ng serve” command this command build and run our project at 4200 port with live reloading features. If your using the “Visual Studio Code” then you can also use the “integrated Terminal” from View menu to run the commands.
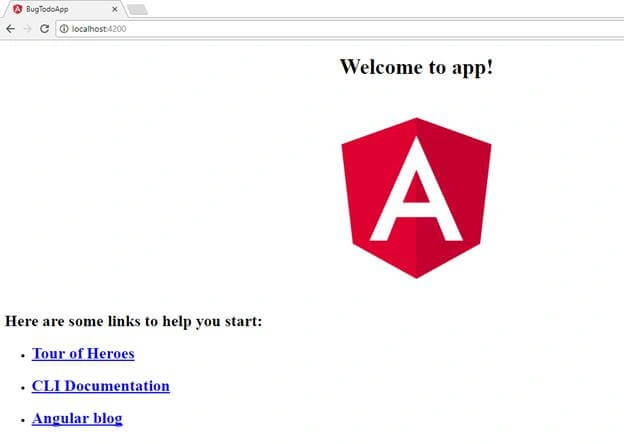
Now open the given URL into any browser and you will find the below screen.
Install Redux Packages
After successfully creating the Angular template now we need to install the “redux” packages for our application. So run the “npm install redux @angular-redux/store --save” command to install the required packages. Now you go to the “package.json” file you will find both packages have been added to our project. After installing the Redux package now we create building blocks like Store, Action and Reducer for our application.
Create IBugModel Model
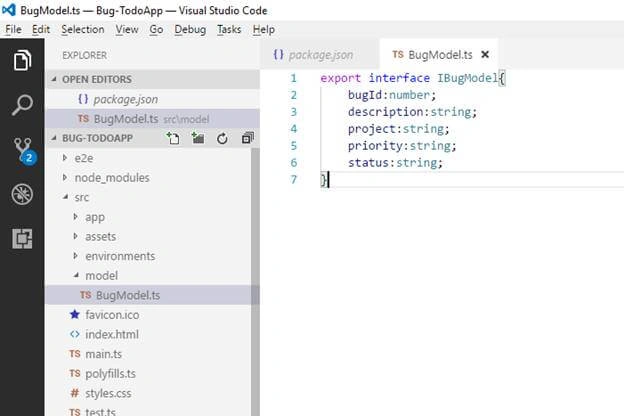
Now we create a model for our bugtodo project. For this we create an Interface with some property. First of all create a “model” folder into “src” directory and add “BugModel.ts” file into this directory. After adding the TypeScript file now paste the following code into this file.
- export interface IBugModel{
- bugId:number;
- description:string;
- project:string;
- priority:string;
- status:string;
- }
Create Store
Add a folder into “Src” directory and named this folder as “store”, now in this folder add a typescript file and named this field as “BugStore.ts”. After creating this file now paste following code into this file.
- import { IBugModel } from "../model/BugModel";
- export interface IBugState {
- bugList:IBugModel[],
- totalBug:number,
- unassigned:number,
- assignedBug:number,
- pendingBug:number,
- completed:number,
- reopenBug:number,
- bugId:number
- }
- export const INITIAL_STATE:IBugState={
- bugList:[],
- totalBug:0,
- unassigned:0,
- assignedBug:0,
- pendingBug:0,
- completed:0,
- reopenBug:0,
- bugId:0
- }
In the above lines of code we create an “IBugStore” interface and this interface will work as the store of the our application state .
The “bugList” property will contain the list of all bug and “unassigned”, “assigned”, “pending”, “completed” and “reopenBug” property indicate the numbers of unassigned, assigned, pending, completed and reopen bugs.
We also create an “INITIAL_STATE” constant of type “IBugState” this variable indicate the initial state of the application whenever our application run the first time. If we are creating a state for the application then we also need to define the initial state of the application that will load when application runs the first time.
Create Action
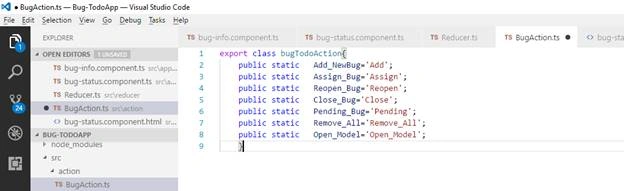
As Redux document describes that “Actions” are used to indicate to the reducer what type of task it will perform with the payload. Now we create a file that will define all possible “Action” types. So create an “action” folder into “src” directory, after creating the folder now create a “BugAction.ts” file into this folder and paste the following code into this file.
- export class bugTodoAction{
- public static Add_NewBug='Add';
- public static Assign_Bug='Assign';
- public static Reopen_Bug='Reopen';
- public static Close_Bug='Close';
- public static Pending_Bug='Pending';
- public static Remove_All='Remove_All';
- public static Open_Model='Open_Model';
- }
Create Reducer
Reducer is the heart of the “Redux” pattern, each reducer function takes two parameters, the first parameter contains the previous state of the application and the second parameter contains the action type and new data payload for the state change. Now create a “reducer” folder into “src” directory and create a “Reducer.ts” file and paste the following code into this file.
- import {bugTodoAction} from "../action/BugAction";
- export function rootReducre(state,action){
- switch(action.type){
- case bugTodoAction.Add_NewBug:
- action.todo.bugId=state.bugList.length+1;
- action.todo.status="Unassigned";
- return Object.assign({},state,{
- bugList:state.bugList.concat(Object.assign({},action.todo)),
- totalBug:state.bugList.length+1,
- unassigned:state.unassigned+1,
- assignedBug:state.assignedBug,
- pendingBug:state.pendingBug,
- completed:state.completed,
- reopenBug:state.completed
- });
- case bugTodoAction.Assign_Bug:
- var bug=state.bugList.find(x=>x.bugId==action.bugNo);
- var currentStatus=bug.status;
- var index =state.bugList.indexOf(bug);
- if(bug.status=="Unassigned"){
- state.unassigned--;
- }
- else if(bug.status=="Reopen"){
- state.reopenBug--;
- }
- else if(bug.status=="Close"){
- state.completed--;
- }
- else if(bug.status=="Pending"){
- state.pendingBug--;
- }
- if(bug.status!="Assign"){
- state.assignedBug++;
- }
- bug.status=bugTodoAction.Assign_Bug;
- return Object.assign({},state,{
- bugList:[
- ...state.bugList.slice(0,index),
- Object.assign({},bug),
- ...state.bugList.slice(index+1)
- ]
- });
- case bugTodoAction.Close_Bug:
- var bug=state.bugList.find(x=>x.bugId==action.bugNo);
- var currentStatus=bug.status;
- var index =state.bugList.indexOf(bug);
- if(bug.status=='Assign'){
- state.assignedBug--;
- }
- else if(bug.status=="Unassigned"){
- state.unassigned--;
- }
- else if(bug.status=="Reopen"){
- state.reopenBug--;
- }
- else if(bug.status=="Pending"){
- state.pendingBug--;
- }
- if(bug.status!="Close"){
- state.completed++;
- }
- bug.status=bugTodoAction.Close_Bug;
- return Object.assign({},state,{
- bugList:[
- ...state.bugList.slice(0,index),
- Object.assign({},bug),
- ...state.bugList.slice(index+1)
- ],
- lastUpdate:new Date()
- });
- case bugTodoAction.Pending_Bug:
- var bug=state.bugList.find(x=>x.bugId==action.bugNo);
- var currentStatus=bug.status;
- var index =state.bugList.indexOf(bug);
- if(bug.status=='Assign'){
- state.assignedBug--;
- }
- else if(bug.status=="Unassigned"){
- state.unassigned--;
- }
- else if(bug.status=="Reopen"){
- state.reopenBug--;
- }
- else if(bug.status=="Close"){
- state.completed--;
- }
- if(bug.status!="Pending"){
- state.pendingBug++;
- }
- bug.status=bugTodoAction.Pending_Bug;
- return Object.assign({},state,{
- bugList:[
- ...state.bugList.slice(0,index),
- Object.assign({},bug),
- ...state.bugList.slice(index+1)
- ],
- lastUpdate:new Date()
- });
- case bugTodoAction.Remove_All:
- return Object.assign({},state,{
- bugList:[],
- totalBug:0,
- unassigned:0,
- assignedBug:0,
- pendingBug:0,
- completed:0,
- reopenBug:0
- });
- case bugTodoAction.Reopen_Bug:
- var bug=state.bugList.find(x=>x.bugId==action.bugNo);
- var currentStatus=bug.status;
- var index =state.bugList.indexOf(bug);
- if(bug.status=='Assign'){
- state.assignedBug--;
- }
- else if(bug.status=="Unassigned"){
- state.unassigned--;
- }
- else if(bug.status=="Pending"){
- state.pendingBug--;
- }
- else if(bug.status=="Close"){
- state.completed--;
- }
- if(bug.status!="Reopen"){
- state.reopenBug++;
- }
- bug.status=bugTodoAction.Reopen_Bug;
- return Object.assign({},state,{
- bugList:[
- ...state.bugList.slice(0,index),
- Object.assign({},bug),
- ...state.bugList.slice(index+1)
- ],
- lastUpdate:new Date()
- });
- case bugTodoAction.Open_Model:
- return Object.assign({},state,{
- bugId:action.bugId
- });
- }
- return state;
- }
We create a “rootRedcuer” function that takes the two parameter and using the switch statement we define all the action blocks that are defined into “bugTodoAction.ts” file. I know it is a little bit difficult to understand the above code but don’t worry we will cover all these methods and their functionalities into upcoming part of the article. If your application is small then you can create a single reducer and define all the action into this single reducer function but if application is very large then you can create multiple reducer function and later combine all the reducer function into a single unit. Here we will use a single reducer method.
So far we have configured all the building block(Action, Store, Reducer) of the “Redux” pattern let’s implement this Redux pattern into application.
Open the “app.module.ts” file and replace the code with below lines of code.
- import { BrowserModule } from '@angular/platform-browser';
- import { NgModule } from '@angular/core';
- import { AppComponent } from './app.component';
- import {FormsModule} from "@angular/forms";
- import {NgRedux,NgReduxModule} from "@angular-redux/store";
- import { IBugState, INITIAL_STATE } from '../store/BugStore';
- import { rootReducre } from '../reducer/Reducer';
- @NgModule({
- declarations: [
- AppComponent
- ],
- imports: [
- BrowserModule,
- FormsModule,
- NgReduxModule
- ],
- providers: [],
- bootstrap: [AppComponent]
- })
- export class AppModule {
- constructor(ngRedux:NgRedux<IBugState>){
- ngRedux.configureStore(rootReducre,INITIAL_STATE);
- }
- }
In the above line of code we import some “modules” and add the “NgReduxModule” into imports array. In constructor function we configure the state for the application using the “NgRedux” and also configure the “reducer” function that will handle all the actions. In “configureStore” function of “ngRedux” class we pass the reducer function name and the initial state of the application.
Define the Layout for application
So far we have configured all the Redux configuration blocks, define the state and reducer function for the state into “AppModule.ts” file, I think all major tasks have been completed, now we only need to define the view of our application and perform the required action.
Add Bootstrap 4 Configuration
We will use the “Bootstrap 4” for design purposes so open the “index.html” file and paste the following links into title section.
- <link rel="stylesheet" href="https://maxcdn.bootstrapcdn.com/bootstrap/4.0.0-beta.2/css/bootstrap.min.css" integrity="sha384-PsH8R72JQ3SOdhVi3uxftmaW6Vc51MKb0q5P2rRUpPvrszuE4W1povHYgTpBfshb" crossorigin="anonymous">
- <script src="https://code.jquery.com/jquery-3.2.1.slim.min.js" integrity="sha384-KJ3o2DKtIkvYIK3UENzmM7KCkRr/rE9/Qpg6aAZGJwFDMVNA/GpGFF93hXpG5KkN" crossorigin="anonymous"></script>
- <script src="https://cdnjs.cloudflare.com/ajax/libs/popper.js/1.12.3/umd/popper.min.js" integrity="sha384-vFJXuSJphROIrBnz7yo7oB41mKfc8JzQZiCq4NCceLEaO4IHwicKwpJf9c9IpFgh" crossorigin="anonymous"></script>
- <script src="https://maxcdn.bootstrapcdn.com/bootstrap/4.0.0-beta.2/js/bootstrap.min.js" integrity="sha384-alpBpkh1PFOepccYVYDB4do5UnbKysX5WZXm3XxPqe5iKTfUKjNkCk9SaVuEZflJ" crossorigin="anonymous"></script>
If you are new to Bootstrap 4 or want to read more about the Bootstrap 4 then you can go to the official website of the bootstrap, following is the link here.
Add Required Component
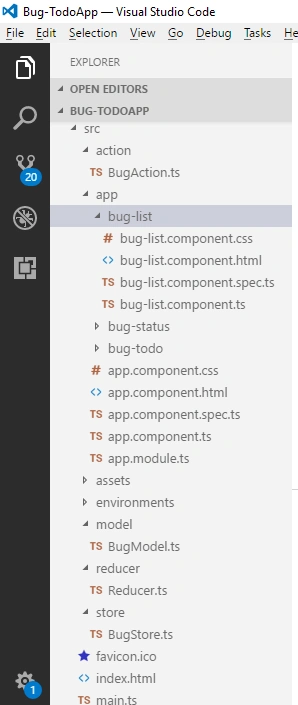
Open the command line terminal and run the “ng g c bugTodo” command; this command adds a new component in your project. In this component we will write the code to add a new bug or clear all bug lists. After adding this component now we add an another component, so run the “ng g c bugStatus” command, this command adds a new component and name this component as “bug-status.component.ts”. We will use this component to show the status of the bugs. We also show the list of all bugs that are generated so far. To add another component run the “ng g c bugList” command. This command adds a component as “bug-list.component.ts” in our project. After generating all three components following will be the structure of the project.
Design Layout of the application
After creating the all the required components now we design the layout of the application. Open the “app.component.html” file replace the code with following code.
App.component.html
- <main role="main" class="container">
- <div class="row row-offcanvas row-offcanvas-right">
- <div class="col-12 col-md-9">
- <app-bug-todo></app-bug-todo>
- <app-bug-list></app-bug-list>
- </div>
- <div class="col-6 col-md-3 sidebar-offcanvas" id="sidebar">
- <app-bug-status></app-bug-status>
- </div>
- </div>
- <hr>
- </main>
In the same way replace the code of all the remaining components,
bug-todo.component.html
- <div class="card">
- <h4 class="card-header">Bug Dashboard</h4>
- <div class="card-body">
- <h4 class="card-title">Add new bug</h4>
- <form >
- <div class="form-row">
- <div class="col-auto">
- <input
- type="text" class="form-control"
- placeholder="Description" id="description"
- name="description"
- />
- </div>
- <div class="col-auto">
- <select
- type="text" class="form-control"
- placeholder="Priority" id="reprioritysponsible"
- name="priority"
- >
- <option value="Bike">Bike</option>
- <option value="Car">Car</option>
- <option value="Health">Health</option>
- <option value="Home">Home</option>
- <option value="ProHealth">ProHealth</option>
- </select>
- </div>
- <div class="col-auto">
- <select
- type="text" class="form-control"
- placeholder="Priority" id="reprioritysponsible"
- name="priority"
- >
- <option value="Low">Low</option>
- <option value="Medium">Medium</option>
- <option value="High">High</option>
- </select>
- </div>
- <div class="col-auto">
- <button type="submit" class="btn btn-info">Add Bug</button>
- </div>
- </div>
- </form>
- <br/>
- <a href="#" class="btn btn-danger">Clear List</a>
- </div>
- </div>
bug-status.component.html
- <ul class="list-group">
- <li class="list-group-item active">Bug Status</li>
- <li class="list-group-item d-flex justify-content-between align-items-center">
- Total Bugs
- <span class="badge badge-primary badge-pill">14</span>
- </li>
- <li class="list-group-item d-flex justify-content-between align-items-center">
- Assigned Bugs
- <span class="badge badge-secondary badge-pill">2</span>
- </li>
- <li class="list-group-item d-flex justify-content-between align-items-center">
- Unassigned Bugs
- <span class="badge badge-primary badge-pill">2</span>
- </li>
- <li class="list-group-item d-flex justify-content-between align-items-center">
- Pending Bugs
- <span class="badge badge-warning badge-pill">2</span>
- </li>
- <li class="list-group-item d-flex justify-content-between align-items-center">
- Reopen Bug
- <span class="badge badge-danger badge-pill">1</span>
- </li>
- <li class="list-group-item d-flex justify-content-between align-items-center">
- Completed Bug
- <span class="badge badge-success badge-pill">1</span>
- </li>
- </ul>
bug-list.component.html
- <h4>Bug List</h4>
- <table class="table table-bordered">
- <thead>
- <tr>
- <th scope="col">BugId</th>
- <th scope="col">Project</th>
- <th scope="col">Description</th>
- <th scope="col">Status</th>
- <th scope="col">Priority</th>
- </tr>
- </thead>
- <tbody>
- <tr>
- <th scope="row">1</th>
- <td>Health</td>
- <td>Mark</td>
- <td>Otto</td>
- <td>@mdo</td>
- </tr>
- <tr>
- <th scope="row">2</th>
- <td>Health</td>
- <td>Mark</td>
- <td>Otto</td>
- <td>@TwBootstrap</td>
- </tr>
- <tr>
- <th scope="row">3</th>
- <td>Health</td>
- <td>Jacob</td>
- <td>Thornton</td>
- <td>@fat</td>
- </tr>
- <tr>
- <th scope="row">4</th>
- <td>Health</td>
- <td >Larry the Bird</td>
- <td>Thornton</td>
- <td>@twitter</td>
- </tr>
- </tbody>
- </table>
Now save all the changes and refresh your browser, after making all the changes the following will be the design of our application.
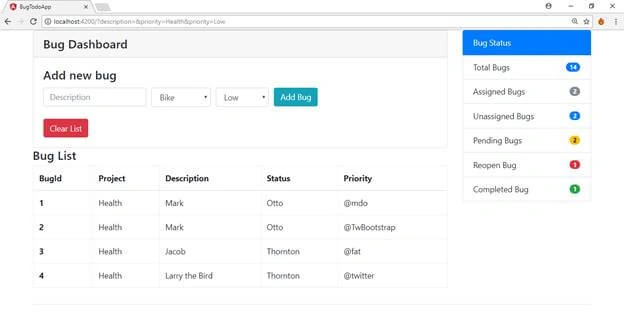
If you get the above screen without any error message into console that means every thing is configured very well. Ok now our Redux structure is ready, design is also ready so let’s use the “Redux” mechanism and bind the components with application state.
Add New Bug
Now we write the program to add a new bug into bug list, so open the “bug-todo.component.ts” file and paste the following code into this file.
- import { Component, OnInit } from '@angular/core';
- import {NgRedux,select} from "@angular-redux/store";
- import {bugTodoAction} from "../../action/BugAction";
- import {IBugState} from "../../store/BugStore";
- import {IBugModel} from "../../model/BugModel";
- @Component({
- selector: 'app-bug-todo',
- templateUrl: './bug-todo.component.html',
- styleUrls: ['./bug-todo.component.css']
- })
- export class BugTodoComponent implements OnInit {
- bugObject:IBugModel={
- bugId:0,
- description:"",
- project:"Car",
- priority:"Low",
- status:""
- }
- constructor(private ngRedux:NgRedux<IBugState>) {
- }
- ngOnInit() {
- }
- submitForm=()=>{
- this.ngRedux.dispatch({type:bugTodoAction.Add_NewBug,todo:this.bugObject});
- }
- clearList=()=>{
- this.ngRedux.dispatch({type:bugTodoAction.Remove_All,todo:this.bugObject});
- }
- }
In above line of code first of all we imported all the required modules into our project like “IBugState”, ”IBugModel” and “bugTodoAction”. We also imported the “ngRedux” and “select” modules. We created an object “bugObject” of IBugModel type. We will use this object as model for the form and also pass this object along with action payload to update the state for “submitForm” and “clearForm” method. We create the “submitForm” method that will be called when form will submit. In this method we call the “dispatch” method of the Store instance in this method we pass the payload and this payload contains the action type and data for creating a new bug. We also create the “clearList” method, we will use this method to clear the bug list.
bug-todo.component.html
We will use the template driven approach to create the html from so replace the code of this file with the following code.
- <div class="card">
- <h4 class="card-header">Bug Dashboard</h4>
- <div class="card-body">
- <h4 class="card-title">Add new bug</h4>
- <form (ngSubmit)="submitForm()" #form="ngForm">
- <div class="form-row">
- <div class="col-md-6 col-sm-12">
- <textarea
- type="text" class="form-control"
- rows="3"
- placeholder="Description" id="description"
- [(ngModel)]="bugObject.description"
- name="description"
- ></textarea>
- </div>
- </div>
- <br/>
- <div class="form-row">
- <div class="col-auto">
- <select
- type="text" class="form-control"
- placeholder="Project" id="project"
- name="project"
- [(ngModel)]="bugObject.project"
- >
- <option value="Bike">Bike</option>
- <option value="Car">Car</option>
- <option value="Health">Health</option>
- <option value="Home">Home</option>
- <option value="ProHealth">ProHealth</option>
- </select>
- </div>
- <div class="col-auto">
- <select
- type="text" class="form-control"
- placeholder="Priority" id="priority"
- name="priority"
- [(ngModel)]="bugObject.priority"
- >
- <option value="Low">Low</option>
- <option value="Medium">Medium</option>
- <option value="High">High</option>
- </select>
- </div>
- <div class="col-auto">
- <button type="submit" class="btn btn-info">Add Bug</button>
- </div>
- </div>
- </form>
- <br/>
- <button type="button" class="btn btn-danger" (click)="clearList()">Clear List</button>
- </div>
- </div>
When we click on the “Add Bug” button the “submitForm” method will call, in this method we invoke the “dispatch” method of store. This method calls the reducer that we configured into “app.modulet.ts” class’s constructor function.

Point to notice that in dispatch method we assigned the action type parameter of “bugTodoAction” so reducer will identify the method type and execute the code that's written for this action type. In the same way for “clearList” function we call the reducer function of the store and assign the type parameter of “Remove_All” type .

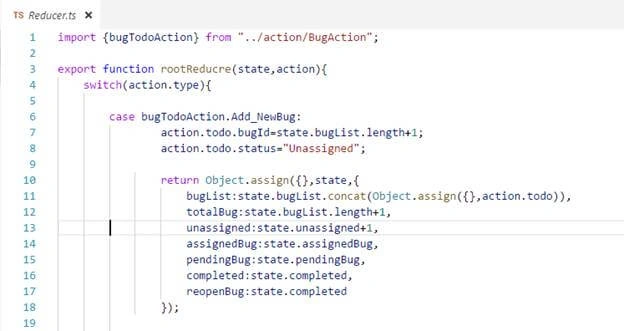
The “rootReducer” function takes two parameters; the first parameter define the previous state of the application and second parameter contains the payload of the action. If action type is the “Add_NewBug” then we take the previous state and add a new bug into “bugList” property and also update the remaining property and return this new state to the application.
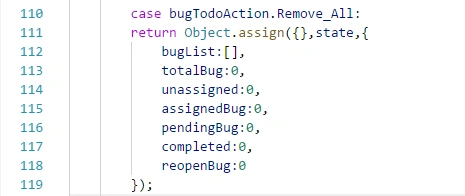
If action type is “Remove_All” then we empty the “bugList” and set all remaining property to 0 and return this new state to the application.
Bug-status.component.ts
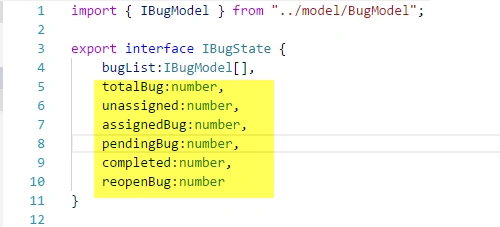
In Bug-status component we will show the status of the bugs, the property of “IBugStore” contain these required information. So we need to access these property into our component and display into html page.
Bug-status.component.html
- <ul class="list-group">
- <li class="list-group-item active">Bug Status</li>
- <li class="list-group-item d-flex justify-content-between align-items-center">
- Total Bugs
- <span class="badge badge-primary badge-pill">{{totalBug | async}}</span>
- </li>
- <li class="list-group-item d-flex justify-content-between align-items-center">
- Assigned Bugs
- <span class="badge badge-secondary badge-pill">{{assignBug | async}}</span>
- </li>
- <li class="list-group-item d-flex justify-content-between align-items-center">
- Unassigned Bugs
- <span class="badge badge-primary badge-pill">{{unassignedBug | async}}</span>
- </li>
- <li class="list-group-item d-flex justify-content-between align-items-center">
- Pending Bugs
- <span class="badge badge-warning badge-pill">{{pendingBug | async}}</span>
- </li>
- <li class="list-group-item d-flex justify-content-between align-items-center">
- Reopen Bug
- <span class="badge badge-danger badge-pill">{{reopenBug | async}}</span>
- </li>
- <li class="list-group-item d-flex justify-content-between align-items-center">
- Completed Bug
- <span class="badge badge-success badge-pill">{{completedBug | async}}</span>
- </li>
- </ul>
Bug-status.component.ts
- import { Component, OnInit } from '@angular/core';
- import {NgRedux,select} from "@angular-redux/store";
- import {bugTodoAction} from "../../action/BugAction";
- import {IBugState} from "../../store/BugStore";
- import {IBugModel} from "../../model/BugModel";
- import { Observable } from 'rxjs/Observable';
- @Component({
- selector: 'app-bug-status',
- templateUrl: './bug-status.component.html',
- styleUrls: ['./bug-status.component.css']
- })
- export class BugStatusComponent implements OnInit {
- @select('totalBug') totalBug;
- @select('assignedBug') assignBug;
- @select('unassigned') unassignedBug;
- @select('pendingBug') pendingBug;
- @select('reopenBug') reopenBug;
- @select('completed') completedBug;
- constructor(private ngRedux:NgRedux<IBugState>) {
- }
- ngOnInit() {
- }
- }
In this component we only need to access the flag properties of the “IBugStore” state, so we use the “@select” decorator. The “@select” decorators are the observable types that bind a variable to the property of the state. So “@select('totalBug') totalBug” line of code bind the “totalBug” variable to the “totalBug” property of the “IBugStore”. If the value of state property changes then this variable also changes. In the same way using the “@select” decorator we access the all remaining property of the “IBugStore” state and display into the “.html” page.
Now save all the changes and try to make some entry into form. In starting we don’t have any bug into “bugList” property so all the bug statuses are zero.
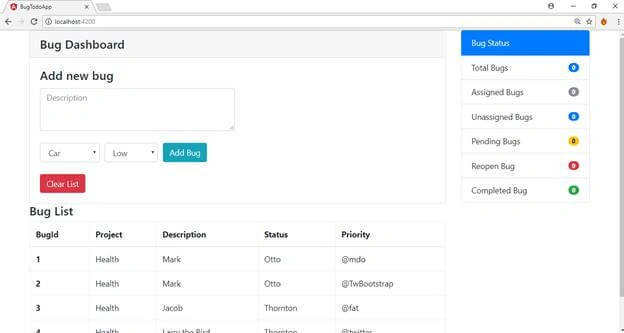
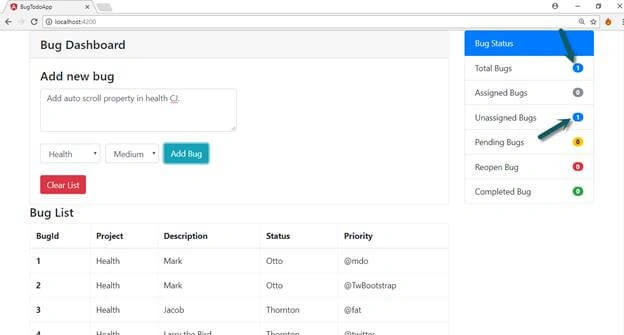
Now add some entry and see the changes. As you click on “Add Bug” button a new entry will insert into “bugList” and Bug Status flags will update. When you add a new bug, you will find that “Total Bug” and “Unassigned Bug” flags value are updated.
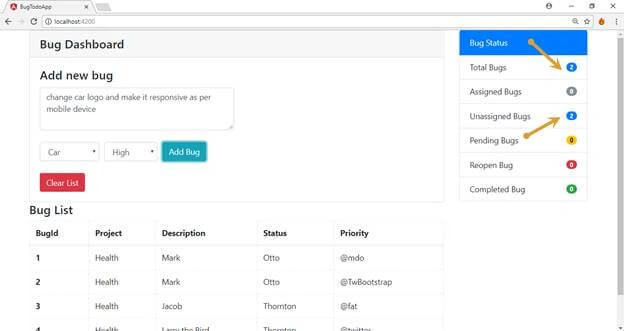
Add another bug and you get that “Total Bug” and “Unassigned Bug” status has been updated again.
Display the Bug List
Up to now we successfully completed the work of adding the new bugs into buglist and displayed the count of all bug status. Our next task will be to show all these added bugs into a list and add a popup in which we can see the all details of a bug and can change the status of the particular bug. We open this popup model on click of the bug id.
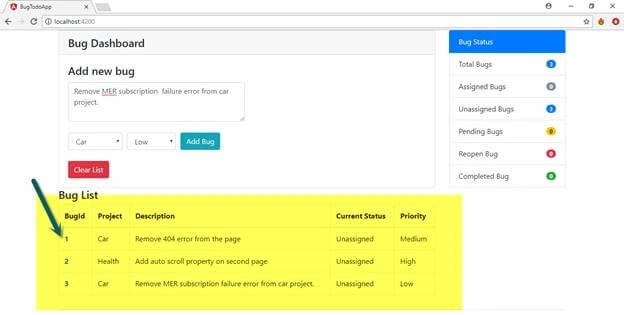
First of all we need to add an another component in which we will show the details of the bug and add the functionality to change the status of the bug. We will show this component into bootstrap popup model.
Run “ng g c BugInfo” command into your command line terminal, this command adds a new component and we named this component as “BugInfo”.
After successfully adding the component now paste the following code into “bug-list.component.html” file.
Bug-list.component.html
- <h4>Bug List</h4>
- <table class="table table-bordered">
- <thead>
- <tr>
- <th scope="col">BugId</th>
- <th scope="col">Project</th>
- <th scope="col">Description</th>
- <th scope="col">Current Status</th>
- <th scope="col">Priority</th>
- </tr>
- </thead>
- <tbody>
- <tr *ngFor="let data of bugList | async">
- <th scope="row">
- <a href="" data-toggle="modal" (click)="openPopupModel(data.bugId)"
- data-target="#exampleModal"> {{data.bugId}}</a>
- </th>
- <td >{{data.project}}</td>
- <td>{{data.description}}</td>
- <td>{{data.status}}</td>
- <td>{{data.priority}}</td>
- </tr>
- </tbody>
- </table>
- <div class="modal fade" id="exampleModal" tabindex="-1" role="dialog" aria-labelledby="exampleModalLabel" aria-hidden="true">
- <div class="modal-dialog" role="document">
- <div class="modal-content">
- <div class="modal-header">
- <h5 class="modal-title" id="exampleModalLabel">Bug Description</h5>
- <button type="button" class="close" data-dismiss="modal" aria-label="Close">
- <span aria-hidden="true">×</span>
- </button>
- </div>
- <div class="modal-body">
- <app-bug-info></app-bug-info>
- </div>
- <div class="modal-footer">
- <button type="button" class="btn btn-secondary" data-dismiss="modal">Close</button>
- </div>
- </div>
- </div>
- </div>
Now open the bug-list.component.ts” file and paste the following code into this file.
Bug-list.component.ts
- import { Component, OnInit } from '@angular/core';
- import { NgRedux, select } from '@angular-redux/store';
- import { IBugState } from '../../store/BugStore';
- import { bugTodoAction } from '../../action/BugAction';
- @Component({
- selector: 'app-bug-list',
- templateUrl: './bug-list.component.html',
- styleUrls: ['./bug-list.component.css']
- })
- export class BugListComponent implements OnInit {
- @select('bugList') bugList;
- constructor(private ngRedux:NgRedux<IBugState>) {
- }
- ngOnInit() {
- }
- openPopupModel=(bugId)=>{
- this.ngRedux.dispatch({type:bugTodoAction.Open_Model,bugId:bugId})
- }
- }
In the above line of code we inject the “NgRedux” dependency into constructor function and access the “bugList” property of our application state using the “@select” decorator, this property contain the list of all bugs. As I earlier explained that “@select” decorator is observable type and allows use access to the property of application state. To get the bug list we need to subscribe this variable into our html page that we will perform using the “async” pipe and show the list. For each bug we also add the functionality to open the popup model. When we click on any bug id a popup model will open and in this popup model we will show the “bugInfo” component.

If you go through the code of anchor tag you will find that on the click action we perform two tasks. On click action we call the “openPopupModel” method of component and open a popup model.

In “openPopupModel” method we execute the “dispatch” method of reducer. In form of payload for the reducer method we pass the “Open_Model” as action type and bugId.

In reducer function if action type is “Open_Model” then we fetch out the “bugId” from the payload and update the “budId” property of the state. We update this “bugId” property because we needs this “bugId” when we open the “popup” model to access the information about a particular bug and perform the further action for that bug. So we will use this “bugId” property in our “bugInfo” component.
Bug-info.component.ts
- import { Component, OnInit } from '@angular/core';
- import { select, NgRedux } from '@angular-redux/store';
- import { IBugState } from '../../store/BugStore';
- import { IBugModel } from '../../model/BugModel';
- import { bugTodoAction } from '../../action/BugAction';
- @Component({
- selector: 'app-bug-info',
- templateUrl: './bug-info.component.html',
- styleUrls: ['./bug-info.component.css']
- })
- export class BugInfoComponent implements OnInit {
- @select('bugId') bugId;
- @select('bugList') bugList;
- bugNumber:number;
- bugInfo:IBugModel;
- status:string="Assign";
- constructor(private ngRedux:NgRedux<IBugState>) {
- this.bugId.subscribe(data=>{
- this.bugList.subscribe(data1=>{
- this.bugNumber=data;
- this.bugInfo=data1.filter(x=>x.bugId==data)[0]
- });
- });
- }
- ngOnInit() {
- }
- submit=()=>{
- this.ngRedux.dispatch({type:this.status,bugNo:this.bugNumber});
- }
- ChangeStatus=()=>{
- }
- }
In above line of code we inject the “NgRedux” dependency into constructor function. We also create two observable “bugId” and “bugList” using the “@select” decorator. In constructor function we subscribe both observable to get the “bugId” and bug data from the “bugList” property of the store.
At the last line of the code we create “submit” method. We call this method from our html page and in this function we pass the new status of bug and “bugId” as payload to the reducer function and at reducer end we update the status of bug that matches this particular “bugId” send in payload.
Bug-info.component.html
- <div class="card" style="width:400px">
- <div class="card-body">
- <h4 class="card-title">Bug Number: {{(bugNumber)}}</h4>
- <div class="card-blockquote">
- <span style="font-weight: bold;">Priority: {{bugInfo?.priority}}</span>
- <span style="float: right;font-weight: bold;">Status: {{bugInfo?.status}}</span>
- <br/>
- <span style="font-weight: bold;">Project: {{bugInfo?.project}}</span>
- </div>
- <br/>
- <p class="card-text">{{bugInfo?.description}}</p>
- <div>
- <select
- type="text" class="form-control"
- [(ngModel)]="status"
- (change)="ChangeStatus()"
- >
- <option value="Assign">Assign</option>
- <option value="Pending">Pending</option>
- <option value="Close">Close</option>
- <option value="Reopen">Reopen</option>
- </select>
- </div>
- <br/>
- <input type="button" value="Submit" (click)="submit()" class="btn btn-primary"/>
- </div>
- </div>
- <br>
In the following lines of the code we simply show the current information of the bug and we also create a select list to change the bug status. On submit button click we send the “changed” status code to the reducer and at reducer end we update the status of code. After making all these changes now our project is completely ready to run.
Let’s take a complete scenario of our project.
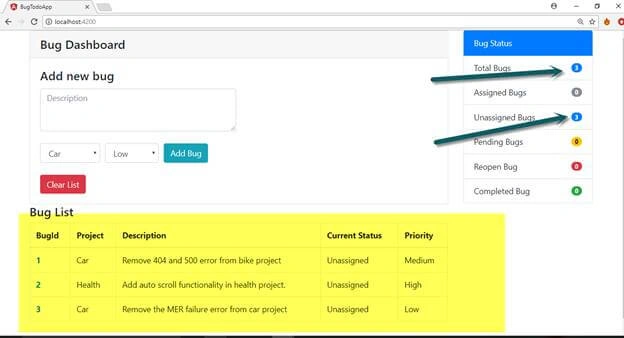
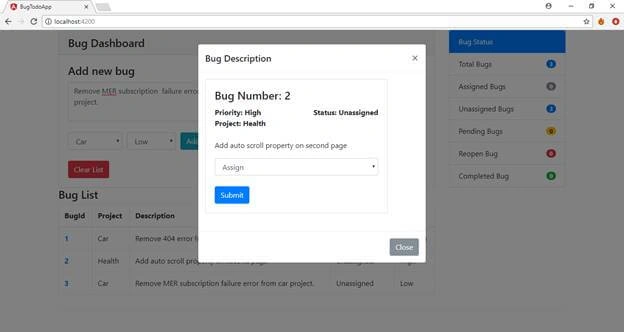
In current we have three bugs in our “bugList” and all these bugs go into “unassigned;” now click on any “BugId” here I clicked on bugId 2. When we click on any bugId a popup model we open that which contains the display the bug information and provide the functionality to update the status of the bug.
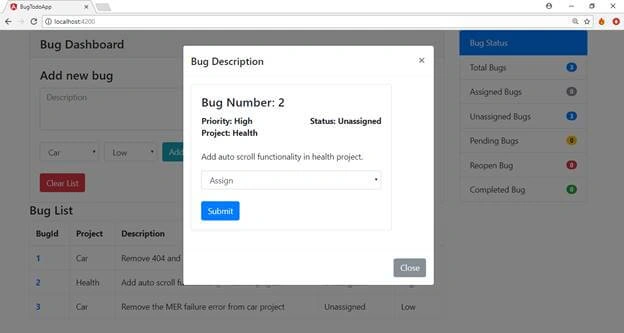
Now change the status of bug to “Assign”.
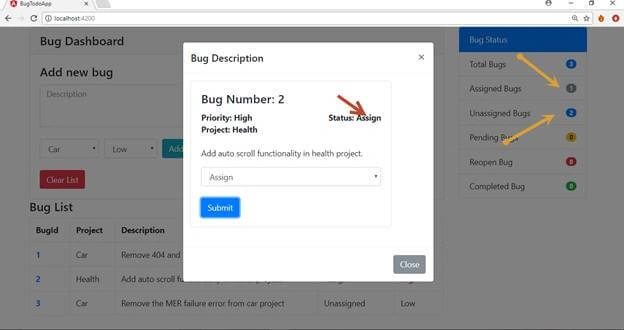
When you click on “submit” button you will find that status of bug has been changed and count of “unassigned” and “assigned” bug has been changed. When you close the popup model you will find that bug list is also changed.
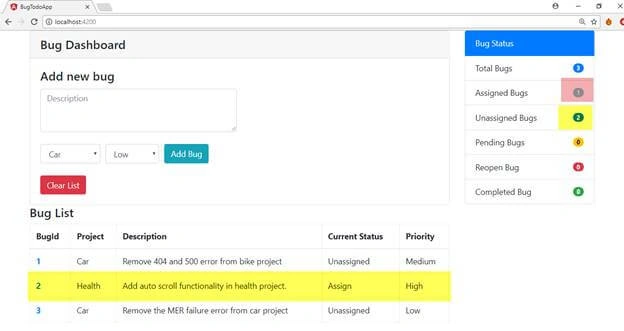
Let’s understand the “reducer” function and how it updates the status of bug.
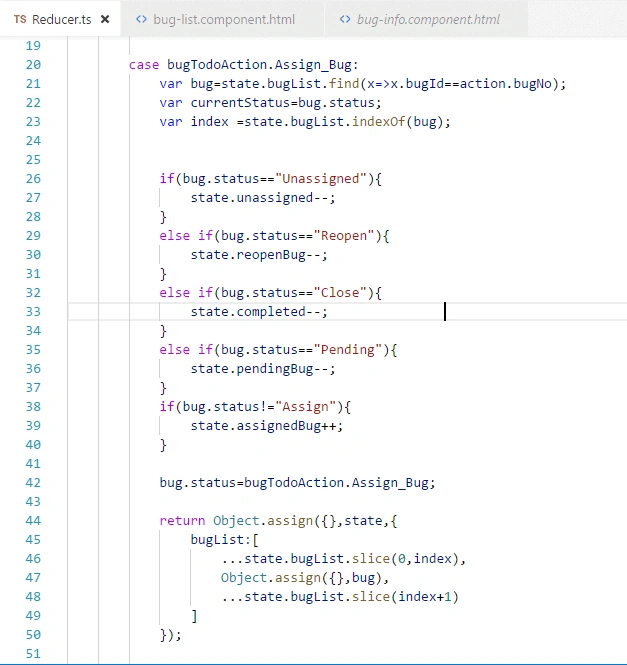
If the new status type for the bug is “Assigned” then we get that particular bug from the “bugList” and update the status of this bug. We also check the previous status of the bug and reduce the “-1” from the previous status count and update the state. For current bug status we increase the “assigned” counts by 1 for the state properties. For example if previous state of the bug is “unassigned” then we reduce the “unassigned” count by 1 and if new status is “assigned” then update the “assignedBug” count by 1. We performed similar functionality for all other status codes.
Conclusion
When you run this project and go through the various steps of the project like add a new bug, clear the list of bugs and change the status of bug, you will find that “bug-list” component, “bug-status” and “bug-info” components remains in synchronized state. A change in any components reflects the changes into all three components and we are not passing any data b/w all these components. We achieve this functionality because our application state is centralized and all components of the application are using this state. If any components make any change into state then this update also listens to other components and these components can also make their changes.
Final conclusion is that if we are going to create a bigger application in Angular then it will be better to use a state management architecture that can manage the state of our application. This state management technique will definitely increase the performance of our application. But if our application is not large then it is not a good idea to use any state management technique and the implementation of any such kind of functionality can reduce the performance of our application. If you have any ideas regarding this article then you can mention it in the comments section.
You can download this article from the below github repository.
Thanks for reading this article.
Hadshana KamalanathanPosted Jul 15, 2018, 12:39 PM
Thank you for sharing