

Introduction
To perform database binding we consume the WebAPI in Windows 8 apps, but first we have to create the webapi so that we can consume it. To create the Webapi use the following steps.
Step 1
First open the Visual Studio 2012 RC, then click on File -> New -> Project. A window is shown; in this select web from the Visual C# installed pane and then "ASP.Net MVC 4 Web Application" from the center pane. Give the name of the project as "EmployeeWebApi" and click ok.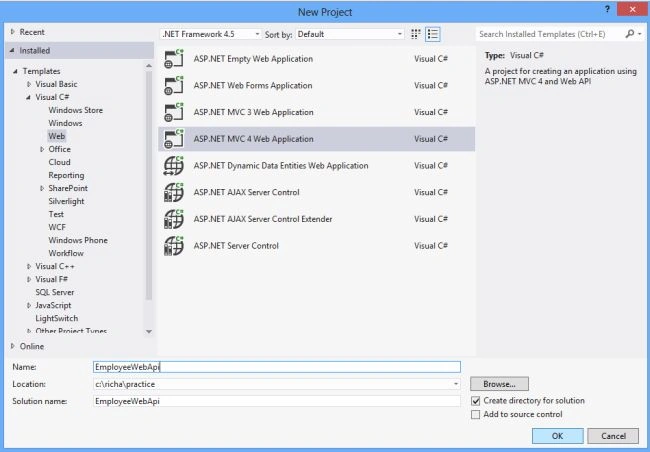
Step 2
Then a new Project ASP.Net MVC 4 window is opened. In this select web API and click ok.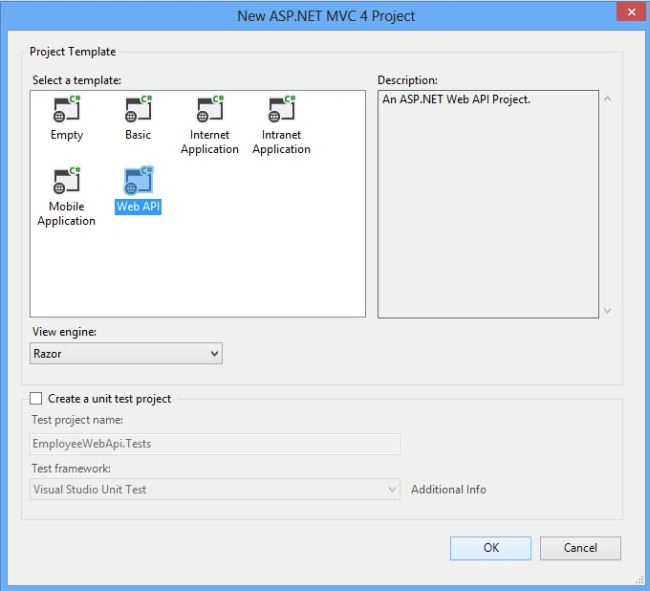
Step 3
Now to create the webapi first add a model class by right-clicking on the Model folder which resides in the Solution Explorer at the right hand side and then click add then class as: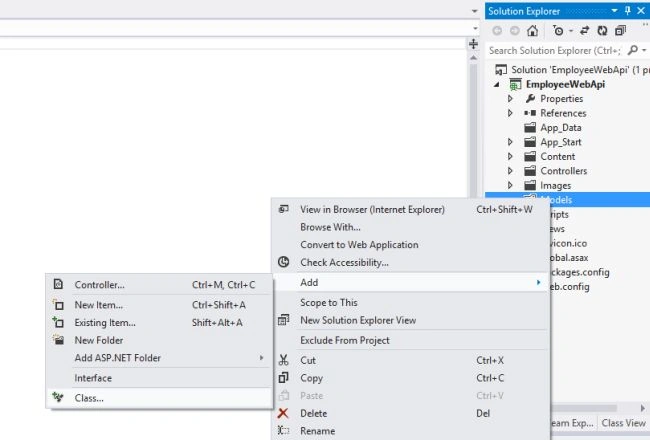
Step 4
A window is shown; in this select class and give the name of the class as "employee.cs" then click ok.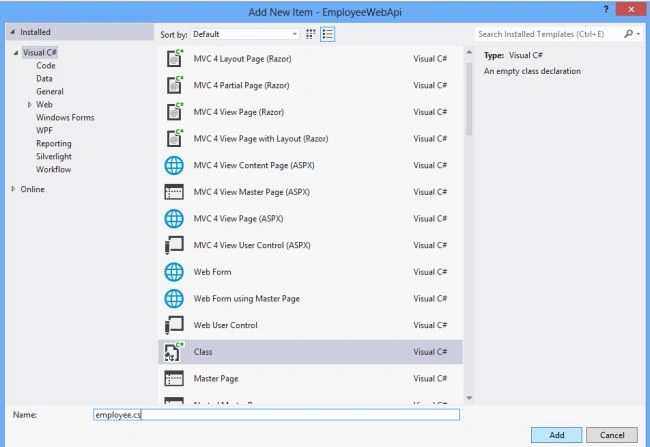
Step 5
Now add the code in the employee.cs file as:
namespace EmployeeWebApi.Models
{
public class employee
{
public int Employee_Id { get; set; }
public string Employee_Name { get; set; }
public string Employee_Address { get; set; }
public long Employee_Contact { get; set; }
public long Employee_Salary { get; set; }
}
}
Step 6
Add a controller by right-clicking on the controller folder which is created in the Solution Explorer and click add then controller as: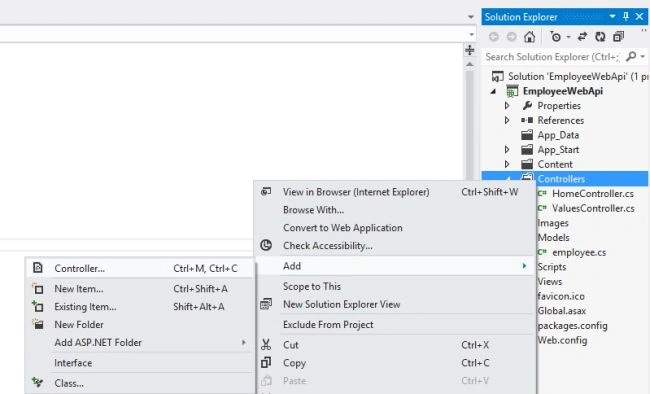
Step 7
An add controller window is sahown; in this give the name of the controller as EmployeeController and select Empty API Controller from the available templates and then click ok as: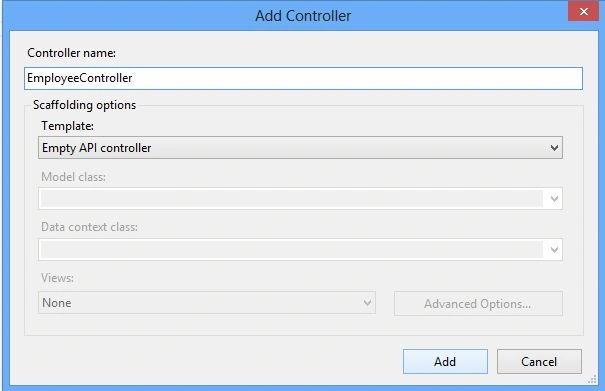
Step 8
Now add the code in the controller as:
using EmployeeWebApi.Models;
namespace EmployeeWebApi.Controllers
{
public class EmployeeController : ApiController
{
employee[] employee = new employee[]
{
new employee{Employee_Id=1,Employee_Name="Richa",Employee_Address="Noida",Employee_Contact=12567,Employee_Salary=5000},
new employee{Employee_Id=2,Employee_Name="Megha",Employee_Address="Delhi",Employee_Contact=98754,Employee_Salary=5435},
new employee{Employee_Id=3,Employee_Name="Gaurav",Employee_Address="Noida",Employee_Contact=33333,Employee_Salary=4233},
new employee{Employee_Id=4,Employee_Name="Suyash",Employee_Address="Delhi",Employee_Contact=5555,Employee_Salary=2342},
new employee{Employee_Id=5,Employee_Name="Manish",Employee_Address="Noida",Employee_Contact=84576,Employee_Salary=4555},
new employee{Employee_Id=6,Employee_Name="Manish",Employee_Address="Noida",Employee_Contact=84576,Employee_Salary=4555},
new employee{Employee_Id=7,Employee_Name="Ram",Employee_Address="Delhi",Employee_Contact=6456,Employee_Salary=4555},
new employee{Employee_Id=8,Employee_Name="Rajesh",Employee_Address="Gaziyabad",Employee_Contact=8865,Employee_Salary=4555},
new employee{Employee_Id=9,Employee_Name="Deepak",Employee_Address="Hapur",Employee_Contact=34242,Employee_Salary=4555},
new employee{Employee_Id=10,Employee_Name="Naveen",Employee_Address="Gaziyabad",Employee_Contact=86756,Employee_Salary=4555},
new employee{Employee_Id=11,Employee_Name="Rakesh",Employee_Address="Noida",Employee_Contact=8564,Employee_Salary=4555}
};
public IEnumerable<employee> GetAllEmployee()
{
return employee;
}
}
}
Step 9
Now run your application by pressing F5; the output will look like: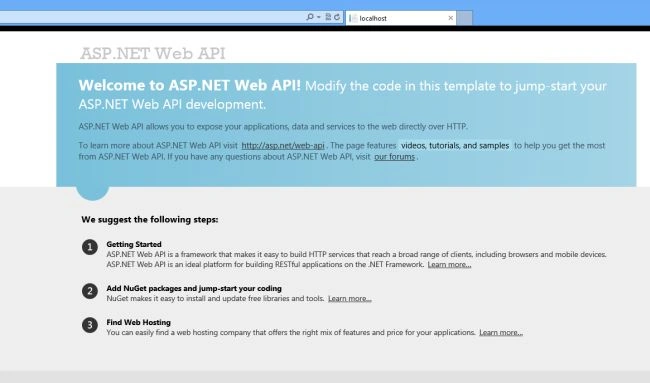
This shows that our API is loaded successfully. Now to view our API, paste the URL as:
http://localhost:1191/api/employee
The output is displayed in JSON format as: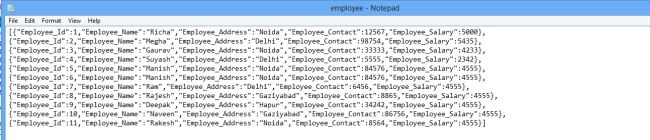
Step 10
Now to consume this web API in Windows Store apps first close this project and open a new project by clicking File -> New -> Project. In the window that appears select Windows Store from the Visual C# installed pane and select blank page from the center pane then give the name of the project as "EmployeeDetail" and click ok.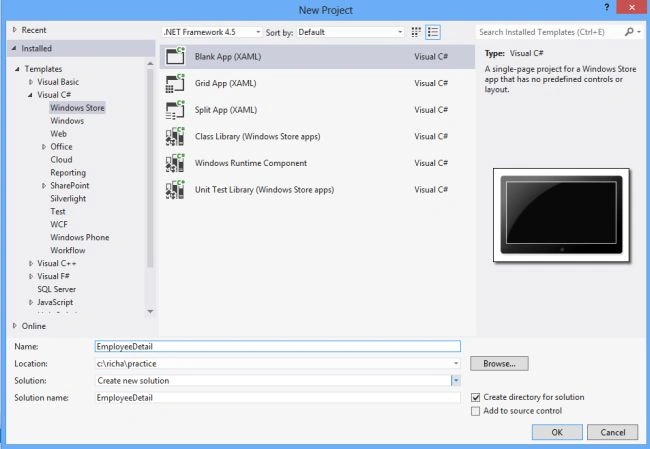
Step 11
Add the class by right-clicking on the project in the Solution Explorer and click Add -> Class as: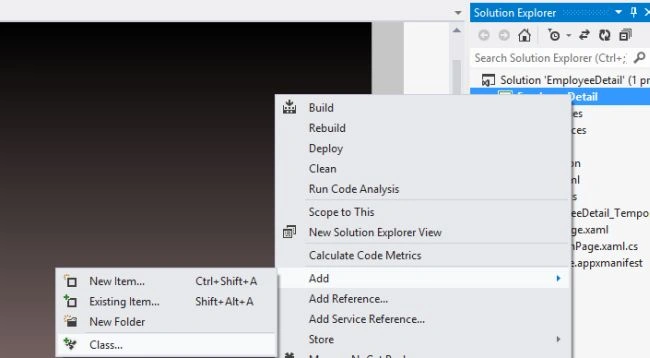
Step 12
A window is shown. In this select class and give the name of the class that you want to give then click add as: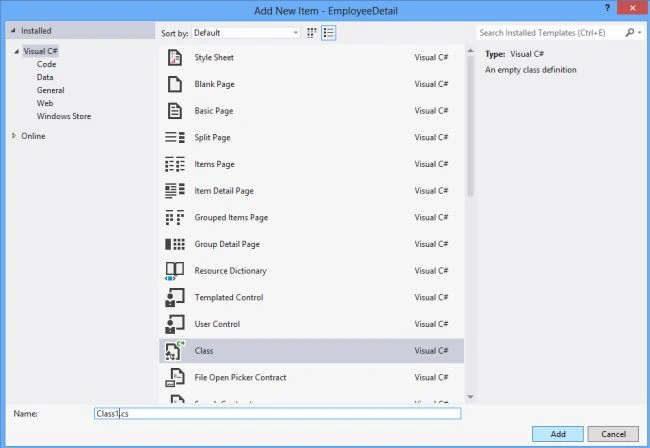
Step 13
Add the code in the class1.cs file as:
{
class Class1
{
public int Emp_Id { get; set; }
public string Emp_Name { get; set; }
public string Emp_Address { get; set; }
public long Emp_Contact { get; set; }
public long Emp_Salary { get; set; }
}
}
Step 14
Write the code in the MainPage.xaml file as:
<Page
x:Class="EmployeeDetail.MainPage"
xmlns="http://schemas.microsoft.com/winfx/2006/xaml/presentation"
xmlns:x="http://schemas.microsoft.com/winfx/2006/xaml"
xmlns:local="using:EmployeeDetail"
xmlns:d="http://schemas.microsoft.com/expression/blend/2008"
xmlns:mc="http://schemas.openxmlformats.org/markup-compatibility/2006"
mc:Ignorable="d">
<Grid>
<Grid.Background>
<LinearGradientBrush EndPoint="0.5,1" StartPoint="0.5,0">
<GradientStop Color="Black"/>
<GradientStop Color="#FFF3CDCD" Offset="1"/>
</LinearGradientBrush>
</Grid.Background>
<TextBlock Text="Employees Details Consume From Web API" FontSize="25" Height="50" Width="550" HorizontalAlignment="Center" VerticalAlignment="Top"/>
<GridView Name="employee_details" ItemsSource="{Binding}" Margin="50,150,0,0">
<GridView.ItemTemplate>
<DataTemplate>
<StackPanel Width="250" Height="150" Margin="10" Background="#FF161C8F">
<TextBlock Text="{Binding Emp_Id}" Padding="10" />
<TextBlock Margin="10,0">
<Run Text="{Binding Emp_Name}" FontSize="20" />
</TextBlock>
<TextBlock Margin="10,0">
<Run Text="{Binding Emp_Address}"/>, <Run Text="{Binding Emp_Contact}"/>
</TextBlock>
<TextBlock Margin="10,0">
<Run Text="{Binding Emp_Salary}"/>
</TextBlock>
</StackPanel>
</DataTemplate>
</GridView.ItemTemplate>
</GridView>
</Grid>
</Page>
Step 15
Write the code in the MainPage.xaml.cs file as:
{
public sealed partial class MainPage : Page
{
private HttpClient httpClient;
public MainPage()
{
this.InitializeComponent();
httpClient = new HttpClient();
httpClient.BaseAddress = new Uri("http://localhost:1191/");
httpClient.DefaultRequestHeaders.Accept.Add(new MediaTypeWithQualityHeaderValue("application/json"));
// Limit the max buffer size for the response so we don't get overwhelmed
httpClient.MaxResponseContentBufferSize = 266000;
}
protected override void OnNavigatedTo(NavigationEventArgs e)
{
GetEmployee();
}
private async void GetEmployee()
{
var response = await httpClient.GetAsync("api/employee");
if (response.IsSuccessStatusCode)
{
var employee = await response.Content.ReadAsStringAsync();
var emp = JsonArray.Parse(employee);
var qry = from m in emp
select new
{
Emp_Id = m.GetObject()["Employee_Id"].GetNumber(),
Emp_Name = m.GetObject()["Employee_Name"].GetString(),
Emp_Address = m.GetObject()["Employee_Address"].GetString(),
Emp_Contact = m.GetObject()["Employee_Contact"].GetNumber(),
Emp_Salary = m.GetObject()["Employee_Salary"].GetNumber()
};
employee_details.DataContext = qry;
}
}
}
}
Step 16
Now run the application by pressing F5; a screen is displayed which contains the information that is consumed from the Web API.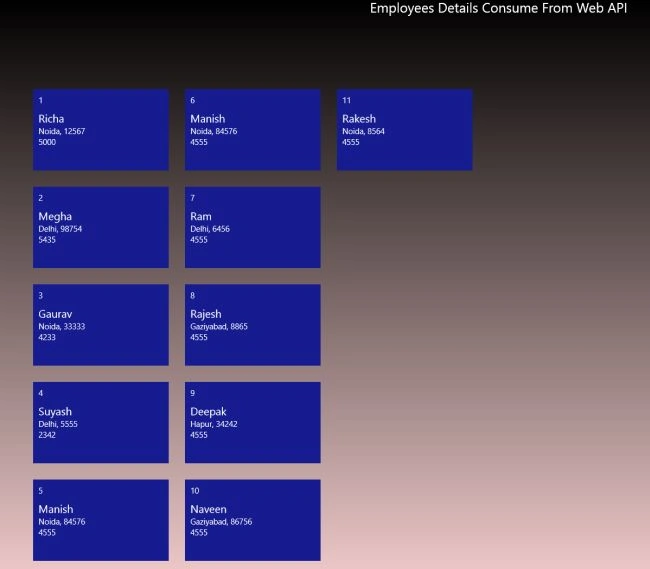
Summary
In this article I explained how to create the web API in .Net 4.5 and how we consume it in Windows 8 apps and display the information in a GridView.
Student ArtesisPosted Mar 13, 2013, 9:46 AM
Great article, very helpful, i want to use a web api to communicate with the database in azure, where can i get the source code for this article? thnx