

Introduction
Requirements
- Android Studio version 2.3.3
- Little bit XML and JAVA knowledge.
- Android Emulator (or) Android mobile
- Download link (Android Studio)
Steps to be followed
Follow these steps to create a native Email Android application using Android Studio. I have attached the source code too with this article.
Step 1
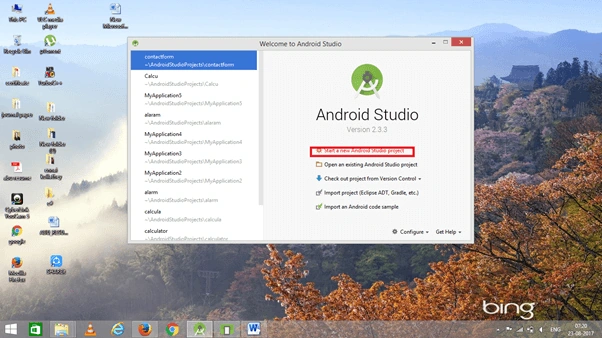
Open Android Studio and start a new Android Studio project.
Step 2
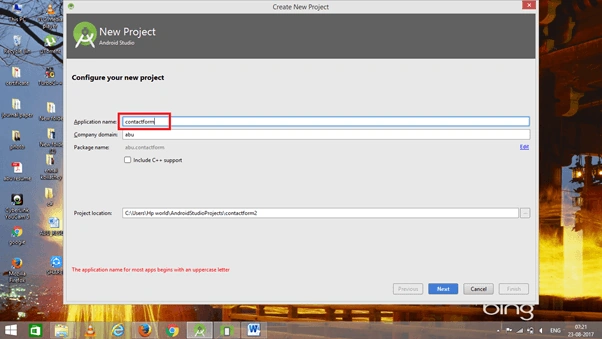
Choose your application name and choose where your project is stored at the location. If you wish to use C++ for coding the project, mark the "Include C++ support" checkbox, and click the "Next" button.
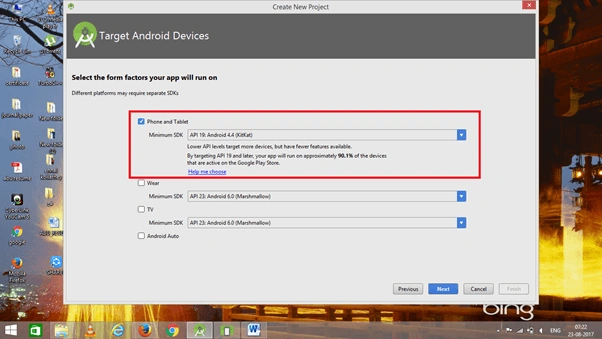
 Now, select the version of Android and select the target Android devices.
Step 3
Now, add an Empty Activity and click the "Next" button.
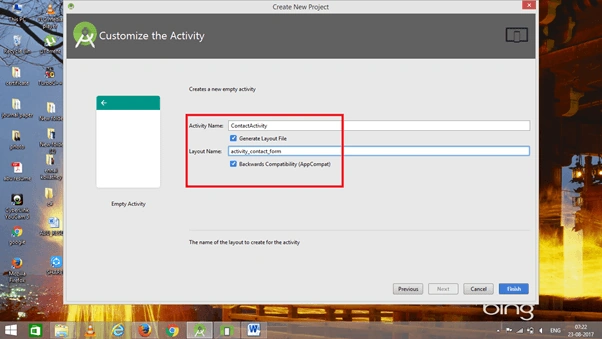
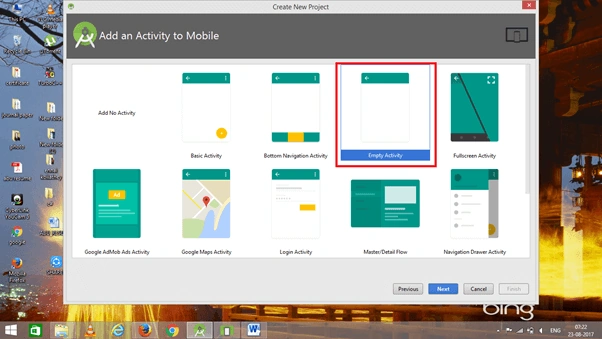 Add the Activity name and click "Finish".
Step 4
Go to activity_contact_form.xml. This XML file contains the designing code for an Android app.
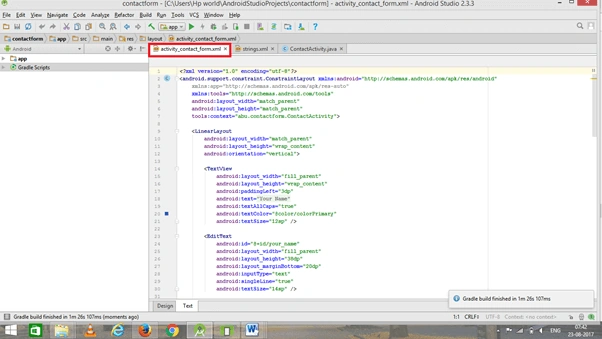 The XML code is given below.
- <?xml version="1.0" encoding="utf-8"?>
- <android.support.constraint.ConstraintLayout xmlns:android="http://schemas.android.com/apk/res/android"
- xmlns:app="http://schemas.android.com/apk/res-auto"
- xmlns:tools="http://schemas.android.com/tools"
- android:layout_width="match_parent"
- android:layout_height="match_parent"
- tools:context="abu.contactform.ContactActivity">
- <LinearLayout
- android:layout_width="match_parent"
- android:layout_height="wrap_content"
- android:orientation="vertical">
- <TextView
- android:layout_width="fill_parent"
- android:layout_height="wrap_content"
- android:paddingLeft="3dp"
- android:text="@string/contact_form_name"
- android:textAllCaps="true"
- android:textColor="@color/colorPrimary"
- android:textSize="12sp" />
- <EditText
- android:id="@+id/your_name"
- android:layout_width="fill_parent"
- android:layout_height="38dp"
- android:layout_marginBottom="20dp"
- android:inputType="text"
- android:singleLine="true"
- android:textSize="14sp" />
- <TextView
- android:layout_width="fill_parent"
- android:layout_height="wrap_content"
- android:paddingLeft="3dp"
- android:text="@string/contact_form_email"
- android:textAllCaps="true"
- android:textColor="@color/colorPrimary"
- android:textSize="12sp" />
- <EditText
- android:id="@+id/your_email"
- android:layout_width="fill_parent"
- android:layout_height="38dp"
- android:layout_marginBottom="20dp"
- android:inputType="textEmailAddress"
- android:singleLine="true"
- android:textSize="14sp" />
- <TextView
- android:layout_width="fill_parent"
- android:layout_height="wrap_content"
- android:paddingLeft="3dp"
- android:text="@string/contact_form_subject"
- android:textAllCaps="true"
- android:textColor="@color/colorPrimary"
- android:textSize="12sp" />
- <EditText
- android:id="@+id/your_subject"
- android:layout_width="fill_parent"
- android:layout_height="38dp"
- android:layout_marginBottom="20dp"
- android:inputType="text"
- android:singleLine="true"
- android:textSize="14sp" />
- <TextView
- android:layout_width="fill_parent"
- android:layout_height="32dp"
- android:paddingLeft="3dp"
- android:text="@string/contact_form_message"
- android:textAllCaps="true"
- android:textColor="@color/colorPrimary"
- android:textSize="12sp" />
- <EditText
- android:id="@+id/your_message"
- android:layout_width="fill_parent"
- android:layout_height="wrap_content"
- android:layout_marginBottom="20dp"
- android:height="180dp"
- android:gravity="top"
- android:inputType="textMultiLine"
- android:textSize="14sp" />
- <Button
- android:id="@+id/post_message"
- android:layout_width="wrap_content"
- android:layout_height="32dp"
- android:layout_gravity="center"
- android:background="@color/colorPrimary"
- android:paddingBottom="1dp"
- android:paddingLeft="15dp"
- android:paddingRight="15dp"
- android:paddingTop="1dp"
- android:text="@string/contact_form_button"
- android:textAllCaps="true"
- android:textColor="@android:color/white"
- android:textSize="13sp" />
- </LinearLayout>
- </android.support.constraint.ConstraintLayout>
Step 5
Go to App ⇒ Res ⇒values⇒String.xml.
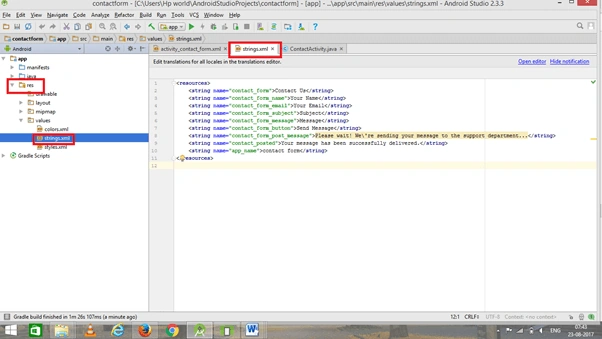 The string XML code
- <resources>
- <string name="contact_form">Contact Us</string>
- <string name="contact_form_name">Your Name</string>
- <string name="contact_form_email">Your Email</string>
- <string name="contact_form_subject">Subject</string>
- <string name="contact_form_message">Message</string>
- <string name="contact_form_button">Send Message</string>
- <string name="contact_form_post_message">Please wait! We\'re sending your message to the support department...</string>
- <string name="contact_posted">Your message has been successfully delivered.</string>
- <string name="app_name">contact form</string>
- </resources>
Step 6
Go to MainActivity.java. This Java program is that of Android. Add the following code.
- package abu.contactform;
- import android.app.Activity;
- import android.content.Intent;
- import android.os.Bundle;
- import android.support.v7.app.AppCompatActivity;
- import android.text.TextUtils;
- import android.view.View;
- import android.widget.Button;
- import android.widget.EditText;
- import abu.contactform.R;
- import java.util.regex.Matcher;
- import java.util.regex.Pattern;
- public class ContactActivity extends AppCompatActivity {
- private Activity activity;
- @Override
- protected void onCreate(Bundle savedInstanceState) {
- super.onCreate(savedInstanceState);
- setContentView(R.layout.activity_contact_form);
- final EditText your_name = (EditText) findViewById(R.id.your_name);
- final EditText your_email = (EditText) findViewById(R.id.your_email);
- final EditText your_subject = (EditText) findViewById(R.id.your_subject);
- final EditText your_message = (EditText) findViewById(R.id.your_message);
- Button email = (Button) findViewById(R.id.post_message);
- email.setOnClickListener(new View.OnClickListener() {
- @Override
- public void onClick(View v) {
- String name = your_name.getText().toString();
- String email = your_email.getText().toString();
- String subject = your_subject.getText().toString();
- String message = your_message.getText().toString();
- if (TextUtils.isEmpty(name)) {
- your_name.setError("Enter Your Name");
- your_name.requestFocus();
- return;
- }
- Boolean onError = false;
- if (!isValidEmail(email)) {
- onError = true;
- your_email.setError("Invalid Email");
- return;
- }
- if (TextUtils.isEmpty(subject)) {
- your_subject.setError("Enter Your Subject");
- your_subject.requestFocus();
- return;
- }
- if (TextUtils.isEmpty(message)) {
- your_message.setError("Enter Your Message");
- your_message.requestFocus();
- return;
- }
- Intent sendEmail = new Intent(android.content.Intent.ACTION_SEND);
- /* Fill it with Data */
- sendEmail.setType("plain/text");
- sendEmail.putExtra(android.content.Intent.EXTRA_EMAIL, new String[] {
- "[email protected]"
- });
- sendEmail.putExtra(android.content.Intent.EXTRA_SUBJECT, subject);
- sendEmail.putExtra(android.content.Intent.EXTRA_TEXT,
- "name:" + name + '\n' + "Email ID:" + email + '\n' + "Message:" + '\n' + message);
- /* Send it off to the Activity-Chooser */
- startActivity(Intent.createChooser(sendEmail, "Send mail..."));
- }
- });
- }
- @Override
- public void onResume() {
- super.onResume();
- //Get a Tracker (should auto-report)
- }
- @Override
- protected void onStart() {
- super.onStart();
- }
- @Override
- protected void onStop() {
- super.onStop();
- }
- // validating email id
- private boolean isValidEmail(String email) {
- String EMAIL_PATTERN = "^[_A-Za-z0-9-\\+]+(\\.[_A-Za-z0-9-]+)*@" +
- "[A-Za-z0-9-]+(\\.[A-Za-z0-9]+)*(\\.[A-Za-z]{2,})$";
- Pattern pattern = Pattern.compile(EMAIL_PATTERN);
- Matcher matcher = pattern.matcher(email);
- return matcher.matches();
- }
- }
Step 6
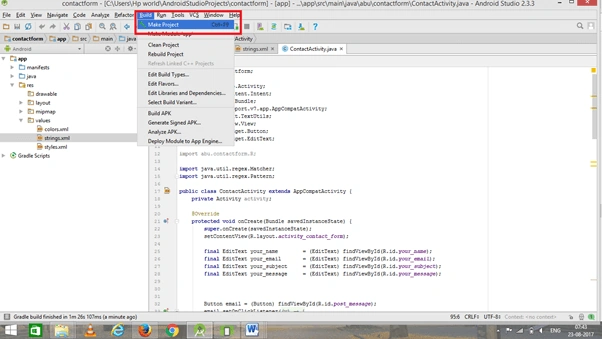
Now, either go to the menu bar and click "Make a project" or press ctrl+f9 to debug the error.
Step 7
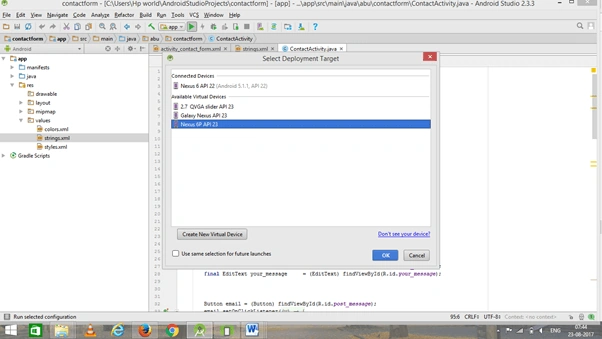
Then, click the "Run" button or press shift+f10 to run the project. Select the "Virtual Machine" option and click OK.
Conclusion
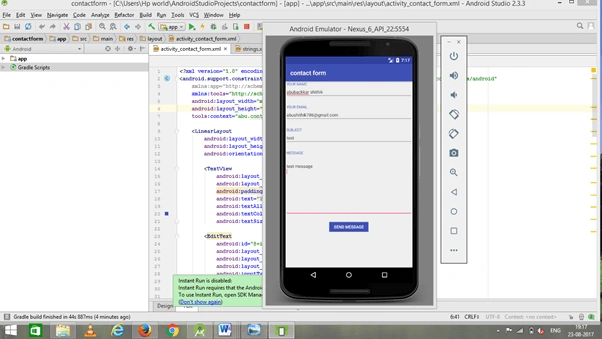
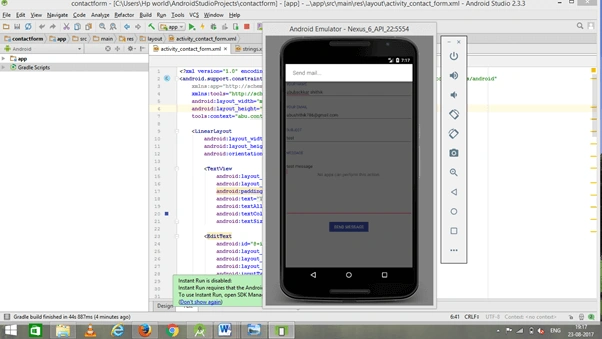
We have successfully created an Email app for Android using Android Studio.
Join the conversation! Your thoughts help the community grow.