

Introduction
In this article, we will learn how to create Babel for React scratch setup with Webpack.
Steps
We’ll start with a React project.
Step 1
Now that we have Node and npm installed, we will create a new folder for our project, newreact.
Step 2
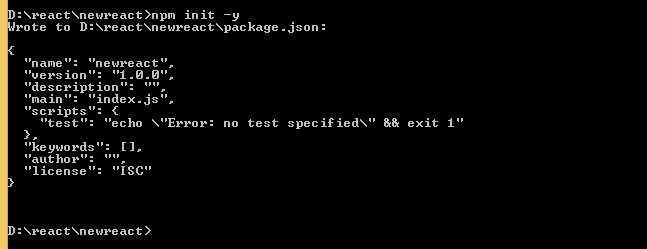
Initialize it as an Npm project
npm init -y
Step 3 - Installing Dependencies using NPM
Run the below command in the terminal:
npm i webpack webpack-cli --save-dev

Webpack is a tool that will bundle your code and its dependencies into a single
.js file.Let's install the Babel dependencies:
npm i @babel/core babel-loader @babel/preset-env @babel/preset-react --save-dev

What is Babel?
Babel is a toolchain mainly used to convert ECMAScript 2015+ code into a backward-compatible version of JavaScript in current and older browsers or environments.
Step 4 - Create Project Folder structure
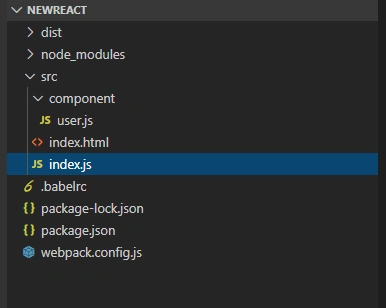
Now, we will config the Babel. Let’s create a new file, (.babelrc)

- babel preset env for compiling modern Javascript down to ES5
- babel preset react for compiling JSX and other stuff down to Javascript.
npm i react react-dom
installing the HTML webpack plugin
npm i html-webpack-plugin html-loader --save-dev

Then update the webpack's configuration file:
- const HtmlWebPackPlugin = require("html-webpack-plugin");
- module.exports = {
- module: {
- rules: [{
- test: /\.(js|jsx)$/,
- exclude: /node_modules/,
- use: {
- loader: "babel-loader"
- }
- }, {
- test: /\.html$/,
- use: [{
- loader: "html-loader"
- }]
- }]
- },
- plugins: [
- new HtmlWebPackPlugin({
- template: "./src/index.html",
- filename: "./index.html"
- })
- ]
- };
Now, create an HTML file in src/index.html,
- <!DOCTYPE html>
- <html lang="en">
- <head>
- <meta charset="utf-8">
- <title>Welcome React</title>
- </head>
- <body>
- <div id="id"></div>
- </body>
- </html>
Then, create src/component folder user.js
- import React, {
- Component
- } from "react";
- import ReactDOM from "react-dom";
- class userForm extends Component {
- constructor() {
- super();
- this.state = {
- value: ""
- };
- this.handleChange = this.handleChange.bind(this);
- }
- handleChange(event) {
- const {
- value
- } = event.target;
- this.setState(() => {
- return {
- value
- };
- });
- }
- render() {
- return ( < form > < input type = "text"
- value = {
- this.state.value
- }
- onChange = {
- this.handleChange
- }
- /> < /form>);
- }
- }
- export default userForm;
- const iscontain = document.getElementById("id");
- iscontain ? ReactDOM.render( < userForm / > , iscontain) : false;
Step 5
Please check the below screen:
Now, we will run the build:
npm run build

Step 5
To install and setup the Webpack dev server, install the package with:
npm i webpack-dev-server --save-dev
Open package.json file and add scripts:
- "scripts": {
- "start": "webpack-dev-server --open --mode development",
- "build": "webpack --mode production"
- },
Step 7
Finally, run the application.
npm start
Conclusion
In this article, we learned how to install and configure React, Webpack, the Webpack dev server, and Babel.
Join the conversation! Your thoughts help the community grow.