

Introduction
In this article we will see how we can create a Setup and Deployment of WPF Application. I would guide you step by step so that you don't miss anything.
Crating WPF Application Project
Fire up Visual Studio 2008 and Create a WPF Application and name the project as MyApplication.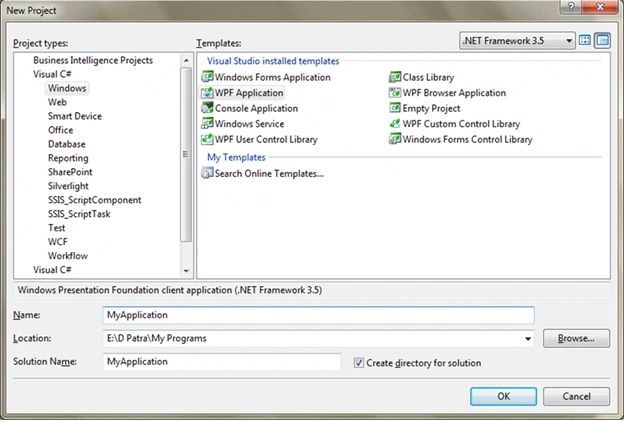
We would add another WPF User Control Library so that you get the complexity of more than one project and their dependencies. So add a New Project to the Solution and name it as WPFHelper.
Let's make this simple. When you add a WPF User Control Library it comes with a UserControl1.xaml, delete the file and add a class and name it as Employee.cs
Have the following structure for simplicity.
namespace WPFHelper
public class Employee
{
public string Name { get; set; }
}
}
Now your Solution structure would look like as follows:
Now add reference of this WPFHelper to MyApplication.
Now go back to our main application "MyApplication" and and some controls so that it would have dependecies on the Assembly of WPFHelper project.
Now I have added a ComboBox that would contain the Employee names.
Write the below code to bind to some sample data.
XAML
<Window x:Class="MyApplication.Window1"
xmlns="http://schemas.microsoft.com/winfx/2006/xaml/presentation"
xmlns:x="http://schemas.microsoft.com/winfx/2006/xaml"
xmlns:local="clr-namespace:WPFHelper;assembly=WPFHelper"
Title="Window1" Height="300" Width="300">
<Grid>
<ComboBox x:Name="cmbEmployeeNames" Height="23" Margin="21,29,98,0" VerticalAlignment="Top" ItemsSource="{Binding}">
<ComboBox.ItemTemplate>
<DataTemplate>
<TextBlock Text="{Binding Name}"/>
</DataTemplate>
</ComboBox.ItemTemplate>
</ComboBox>
</Grid>
</Window>
C#
public partial class Window1 : Window
{
public Window1()
{
InitializeComponent();
List<Employee> myList = new List<Employee>
{
new Employee{ Name="Some 1"},
new Employee{ Name="Some 2"},
new Employee{ Name="Some 3"},
new Employee{ Name="Some 4"},
new Employee{ Name="Some 5"}
};
cmbEmployeeNames.ItemsSource = myList;
}
}
Now run the application to test the application.
Yes, we are going good.
Now comes the most important part where we would go step by step.
Step 1
Add a Setup and Deployment project to the Solution and name it as MyApplicationSetup.
As soon as you add the project it opens the File Explorer view.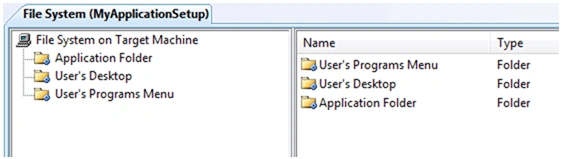
The solution structure would be like as follows:
In the left pane you see the System Folders and the right pane is for the content of the Folder.
If you see above we have 3 System Folders. You can add other System Folders based on your requirement.
The following list is shown when you right click on the root and select Add Special Folder.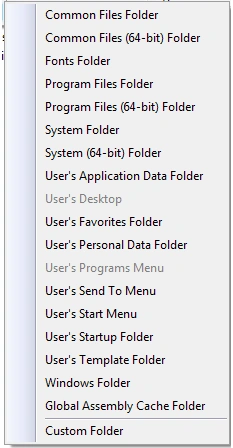
Step 2
We would add Program File's Folder to our Setup project.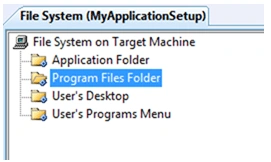
Here is the way how you should add contents to the folders.
-
Application Folder
a. It should contain the Primary output and the dependencies.
-
Program Files Folder
a. It should contain the Folder where your Primary output would be copied while installation and the necessary files [Resource file such as icons, config, etc..].
-
User's Desktop
a. It should contain the Shortcut of your application
-
User's Program Menu
a. It should contain the Shortcut of your application.
Step 3
Now we would add Primary output and other dependencies to Application Folder.
Select as displayed above.
You would see the projects available in the solution to add. As MyApplication is the Startup Project select it and press OK. You would see the change in the folder as follows.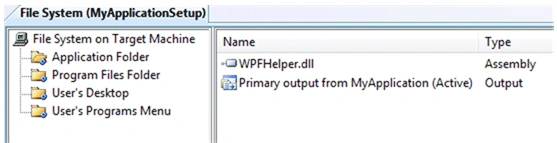
Step 4
Now we would add A folder to the Program Files Folder.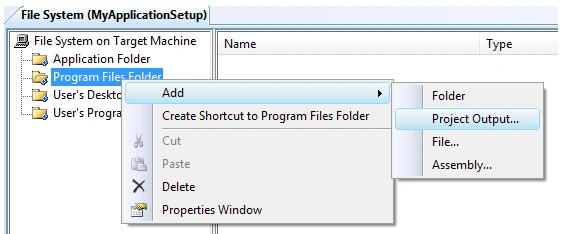
Step 5
Name the folder as My Application.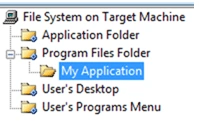
Step 6
Now add the same as you did for the Application Folder.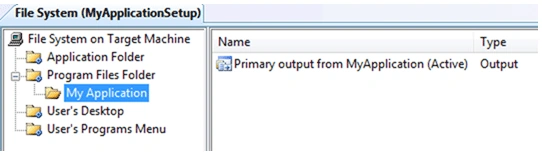
But you would see the dependecy DLL are not added. Here you can add required files for the Application to run such as Icons and all.
Step 7
Now we would add a Shortcut to User's Desktop.
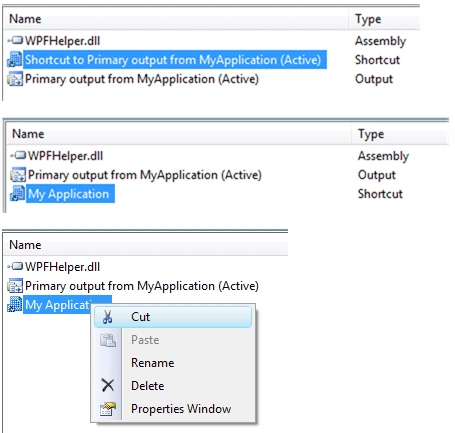
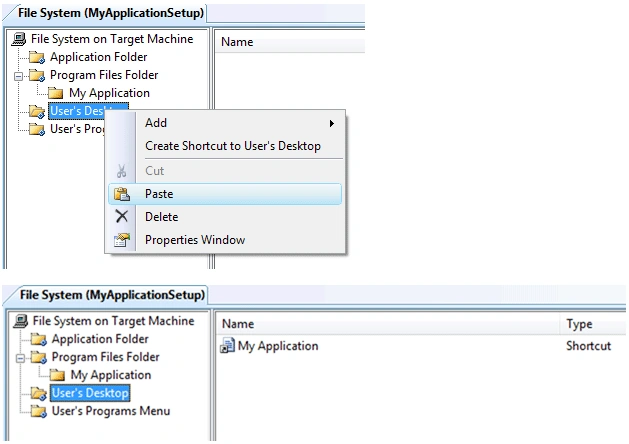
Here is the Trick go to your Application folder and Create a shortcut of your Primary output and rename it as required. And then move the file from there to User's Desktop. The following screens would help you doing this.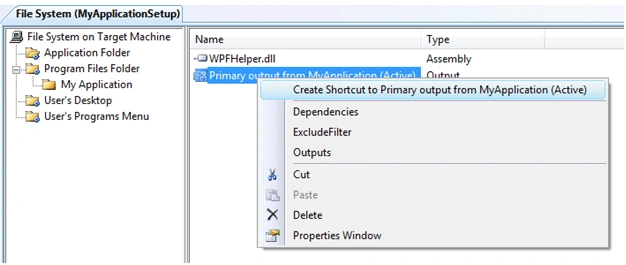
Step 8
Now do the same procedure as above for User's Program Menu. As it requires the same.
We have to do a last round of work for all the folders and files we have added. That is a property called AlwaysCreate to True. By default it is False.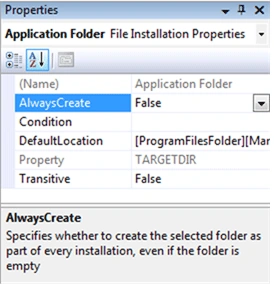
Step 9
Change all folders and files setting as AlwaysCreate = True.
Changing the Default Location of Application Folder.
By default it is: [ProgramFilesFolder][Manufacturer]\[ProductName]
If you don't want to change it's fine. But if you give [Manufacture] in the attribute then it would create folder as Microsoft in Program Files and then your folder.
I prefer to remove the attribute so that your application would be directly under Program Files.
Change the Default Location to [ProgramFilesFolder] \[ProductName]
Now our Setup project is ready. Rebuild the Solution and then rebuild the Setup project.
Go to the Debug directory of the Setup project. There you would find your setup files as .msi and .exe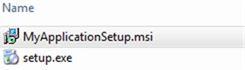
The first one is for distribution.
That's it you have successfully created a Setup for your WPF application.
Hope this article helps.
Bhagyashri JattePosted Mar 29, 2018, 2:00 PM
Hi, I have tried your step. its helpful. I am able to install it. But I am using local database. I want to Add DB in setup, can u please help me to make DB available with setup.
salman lonePosted Dec 20, 2017, 1:18 PM
I have followed all of your steps but when i install application, nothing happens. The application setup for installation is working fine and i can see the application installed in control panel and program files. do not know what is the problem. please help.
Srinivasan K KPosted Jan 31, 2015, 8:22 AM
@Diptimaya, Thanks for an Quick reference for Deployment in visual studio.
Santosh YadavPosted Apr 5, 2013, 8:58 AM
Thanks ... very helpful article.
tarun tripathiPosted Aug 22, 2012, 8:26 AM
Thanks... this is a great help for beginners like me.. Tarun
triPosted Jul 14, 2012, 12:56 AM
This is a very nice article Thank You !!!
Pramod PatelPosted Feb 1, 2011, 11:17 PM
Thank's This very nice Article
udhaya kuamrPosted Jul 14, 2010, 9:05 AM
hi, it is very fine and solve my problem. but I would like to know how to update my set up file. like whenever I change the code in application or change the design layout, did I have to delete all and again doing all the steps which you mentioned. because rebuilding after a change does not affect the setup file. please help me on this. Udhaya
surineni surineniPosted May 19, 2010, 6:06 AM
How to create a web application in wpf , can you please guide me in creating this , As am creating wpf browser application in vs2008 , its creating windows application but not web based , can you please advise me in this . Thanks, Shanthi
WilsonPosted Jan 13, 2010, 7:01 PM
Hi Diptimaya, Great example on building a WPF library and app. I follow your steps and keep getting error CS0246: The type or namespace name 'Employee' could not be found (are you missing a using directive or an assembly reference?) There compile errors are from: List<Employee> myList = new List<Employee> { new Employee{ Name="Some 1"}, new Employee{ Name="Some 2"}, new Employee{ Name="Some 3"}, new Employee{ Name="Some 4"}, new Employee{ Name="Some 5"} }; Is there any namespace reference I need to add to Window1.xaml.cs? Thanks.