

Introduction
In this article, we will delve into designing a Tree component that provides a nested view of data, allowing users to effortlessly expand and collapse different levels to reveal or hide details. This functionality is especially valuable when managing data with parent-child relationships. It is the best form to represent hierarchical data.
By the end of the article, you'll be able to implement an interactive Tree component as shown below for your applications.
Please note that this is a two-part series, and my upcoming article focuses on the seamless integration of the Tree and DataGrid components. Next chapter: "Tree and DataGrid Components: Exploring the Perfect Blend"

Tree component in Blazor
We'll be building a Tree component which needs 4 essential elements to bring it to life.
- PhoneService: This class encapsulates the dummy data and implements an associated interface, "IPhoneService".
- Tree. razor: The core of our Tree component; this is where we define the structure of the tree.
- Tree. razor.cs: The C# code-behind file of the Tree component responsible for the behavior and data manipulation of the component.
- Tree.razor.css: This CSS file to make Tree, this houses styles for toggle buttons, nodes, and nested levels.
Step 1. Phone service
To begin, let's establish a dedicated space for managing data-related constructs. Create a directory named "Data" within your project. We need a contract interface, a model class, and a service class. Let's begin with an interface.
Defining the Interface "IPhoneService"
Our first step involves creating an interface that outlines the contract for data retrieval. Within the "Data" folder, define "IPhoneService" as follows.
public interface IPhoneService
{
    List<Phone> GetPhones();
}
Code Snippet 1: interface IPhoneService
Crafting the Model
Now, let's create a model that represents the data. Create a class "Phone" under the "Data" folder as follows.
public class Phone
{
    public string Manufacturer { get; set; }
    public string Name { get; set; }
    public decimal Cost { get; set; }
    public string Type { get; set; }
    public string OS { get; set; }
}
Code Snippet 2: class Phone
Adding a dummy Data
Now, let's populate our service with some dummy data. Implement "GetPhones()" method adhering to the "IPhoneService" interface.
public class PhoneService : IPhoneService
{
    public List<Phone> GetPhones()
    {
        return new List<Phone>
        {
            new Phone { Manufacturer = "Apple", Name = "iPhone 14", Cost = 699, Type = "Smartphone", OS = "iOS 15" },
            new Phone { Manufacturer = "Apple", Name = "iPhone 14 Pro", Cost = 999, Type = "Smartphone", OS = "iOS 15"  },
            new Phone { Manufacturer = "Apple", Name = "iPhone 14 Pro Max", Cost = 1599, Type = "Smartphone", OS = "iOS 16"  },
            new Phone { Manufacturer = "Samsung", Name = "Galaxy Z Fold", Cost = 1999, Type = "Smartphone", OS = "Android 11"  },
            new Phone { Manufacturer = "Samsung", Name = "Galazy S23", Cost = 1499, Type = "Smartphone", OS = "Android 12"  },
            new Phone { Manufacturer = "Google", Name = "Pixel 7", Cost = 699, Type = "Smartphone", OS = "Android 11"  },
            new Phone { Manufacturer = "Google", Name = "Pixel 7 Pro", Cost = 849, Type = "Smartphone", OS = "Android 12"  }
        };
    }
}
Code Snippet 3: class PhoneService
Registering a service
Go to "program.cs" and add the following line from code snippet 4. This ensures that our "PhoneService" is readily available throughout your app.
builder.Services.AddSingleton<IPhoneService, PhoneService>();
Code Snippet 4: Adding singleton in the program.cs
Step 2. Tree.razor component
In the following code snippet 5, we have added a new component, "Tree.razor" under "Pages" folder. Here, we are looping through manufacturers, then OS, and finally through phones. we have toggles button [+] and [-] which expands and collapse the level below. The first node is the manufacturer. Upon clicking the [+] button, it will expand lower level where the list is divided by the version of OS. and at the leaf node, we have name of the phones.
@page "/tree"
@using System.Collections.Generic
@using TreeAndDataGridComponents.Data
@inject IPhoneService phoneService;
@inject IJSRuntime jsRuntime;
<h3>Tree Component</h3>

<!-- Tree.razor -->
<ul class="tree">
    <!-- Loop through manufacturers -->
    @foreach (var manufacturer in GetDistinctManufacturers())
    {
        <li>
            <!-- Top level: Manufacturer -->
            <span class="toggle"
                  @onclick="() => ToggleManufacturer(manufacturer)">
                  @(IsManufacturerExpanded(manufacturer) ? "[-]" : "[+]")
            </span>
            <span>@manufacturer</span>

            <ul class="nested"
                style="display: @(IsManufacturerExpanded(manufacturer) ? "block" : "none")">

                <!-- Loop through OS -->
                @foreach (var os in GetDistinctOS(manufacturer))
                {
                    <li>
                        <!-- Nested level: OS -->
                        <span class="toggle"
                              @onclick="() => ToggleOS(manufacturer, os)">
                              @(IsOSExpanded($"{manufacturer}/{os}") ? "[-]" : "[+]")
                        </span>
                        <span>@os</span>

                        <ul class="nested"
                        style="display: @(IsOSExpanded($"{manufacturer}/{os}") ? "block" : "none")">
                            <!-- Loop through phones -->
                            @foreach (var phone in GetPhonesByManufacturerAndOS(manufacturer, os))
                            {
                                <!-- Last level: Phone -->
                                <li>@phone.Name</li>
                            }
                        </ul>
                    </li>
                }
            </ul>
        </li>
    }
</ul>
Code Snippet 5: Tree.razor
Step 3. Tree.razor.cs
Here, we dive into the heart of the action, This is where we define the essential methods and properties that drive the functionality of our component. We have 3 fields and 8 methods in this class.
Fields
- phones: This field holds a list of phones, which aligns with the model class defined in code snippet 2.
- expandedManufacturers: This is a dictionary that keeps track of nodes that are open and closed at the manufacturer level.
- expandedOS: This dictionary does the same as above but for the operating system.
Methods
- OnInitialized(): This method takes center stage as we populate our Tree with dummy data from code snippet 3.
- GetDistinctManufacturers(): With this method, we group the list by the manufacturer at the first level.
- GetDistinctOS(string manufacturer): Building on the previous method, this one takes on the task of filtering the list even further by OS for the second level.
- GetPhonesByManufacturerAndOS(string manufacturer, string os): This method narrows down the list by manufacturer and OS.
- IsManufacturerExpanded(string manufacturer): This method checks if a manufacturer's node is expanded or collapsed.
- IsOSExpanded(string osKey): Similar to its previous method, this one checks if the node is expanded or collapsed for the selected OS.
- ToggleManufacturer(string manufacturer): This method is responsible to toggle nodes for selected manufacturers.
- ToggleOS(string manufacturer, string os): Toggles second-level nodes for selected manufacturer and OS.
Below is the partial class Tree.razor.cs which encapsulates everything mentioned above.
using TreeAndDataGridComponents.Data;

namespace TreeAndDataGridComponents.Pages
{
    public partial class Tree
    {
        #region [Properties/Fields]
        List<Phone> phones = new();
        Dictionary<string, bool> expandedManufacturers = new();
        Dictionary<string, bool> expandedOS = new();
        #endregion

        #region [Methods]
        protected override void OnInitialized()
        {
            phones = phoneService.GetPhones();
        }

        List<string> GetDistinctManufacturers() =>
            phones.Select(p => p.Manufacturer).Distinct().ToList();

        List<string> GetDistinctOS(string manufacturer) =>
            phones.Where(p => p.Manufacturer == manufacturer).Select(p => p.OS).Distinct().ToList();

        List<Phone> GetPhonesByManufacturerAndOS(string manufacturer, string os) =>
            phones.Where(p => p.Manufacturer == manufacturer && p.OS == os).ToList();

        bool IsManufacturerExpanded(string manufacturer) =>
            expandedManufacturers.ContainsKey(manufacturer) && expandedManufacturers[manufacturer];

        bool IsOSExpanded(string osKey) =>
            expandedOS.ContainsKey(osKey) && expandedOS[osKey];

        void ToggleManufacturer(string manufacturer)
        {
            if (!expandedManufacturers.ContainsKey(manufacturer))
            {
                expandedManufacturers[manufacturer] = true;
            }
            else
            {
                expandedManufacturers[manufacturer] = !expandedManufacturers[manufacturer];
            }
            foreach (var os in GetDistinctOS(manufacturer))
            {
                expandedOS[$"{manufacturer}/{os}"] = false;
            }
        }

        void ToggleOS(string manufacturer, string os)
        {
            expandedOS[$"{manufacturer}/{os}"] = !expandedOS.ContainsKey($"{manufacturer}/{os}") || !expandedOS[$"{manufacturer}/{os}"];
        }
        #endregion
    }
}
Code Snippet 6: Tree.razor.cs
Step 4. Tree.razor.css
This is the component-specific CSS file. To add this file, right-click on the "Pages" folder, click on "Add" then select "StyleSheet". Name your file "Tree.razor.css". This way, Blazor will assign this style sheet to the "Tree.razor" component. Here, we add arrows, colors to the nodes, and also style the "<li>" and "<ul>" elements.
/* Tree component styles */

/* General tree styling */
.tree {
    list-style: none;
    padding-left: 0;
}

.tree > li {
    margin: 0;
    padding: 0;
    position: relative;
    line-height: 1.6;
}

/* Toggle button styling */
.tree > li > span.toggle {
    margin-right: 0.5em;
    cursor: pointer;
    color: #007bff;
}

.tree > li > span.toggle:hover {
    text-decoration: underline;
}

.tree > li > span.toggle::before {
    content: "\25B6"; /* Right-pointing triangle */
}

/* Nested list styling */
.tree ul {
    list-style: none;
    padding-left: 1em;
    margin: 0;
}

.tree ul li {
    margin: 0;
    padding: 0;
    position: relative;
    line-height: 1.6;
}

/* Nested toggle button styling */
.tree ul li > span.toggle {
    margin-right: 0.5em;
    cursor: pointer;
    color: #007bff;
}

.tree ul li > span.toggle:hover {
    text-decoration: underline;
}

.tree ul li > span.toggle::before {
    content: "\25B6"; /* Right-pointing triangle */
}

/* Nested list within list styling */
.tree ul li > ul.nested {
    display: none;
    padding-left: 1em;
}

/* Toggle button states */
.tree ul li > span.toggle.collapsed::before {
    content: "\25B8"; /* Right-pointing triangle, rotated 90 degrees */
}

.tree ul li > span.toggle.expanded::before {
    content: "\25BE"; /* Down-pointing triangle */
}

/* Display nested list when expanded */
.tree ul li.expanded > ul.nested {
    display: block;
}

/* Text styles */
.tree > li > span,
.tree ul li > span {
    font-size: 16px;
    font-weight: bold;
    color: #AD1457; /* Custom color for header nodes */
}

.tree ul li > ul.nested {
    font-size: 14px;
    font-weight: normal;
    color: #FF3D00; /* Custom color for nested nodes */
    margin-left: 45px; /* Adjusted margin for nested nodes */
}
Code Snippet 7: Tree.razor.css
Now if you run the application, you should be able to see output like following figure.
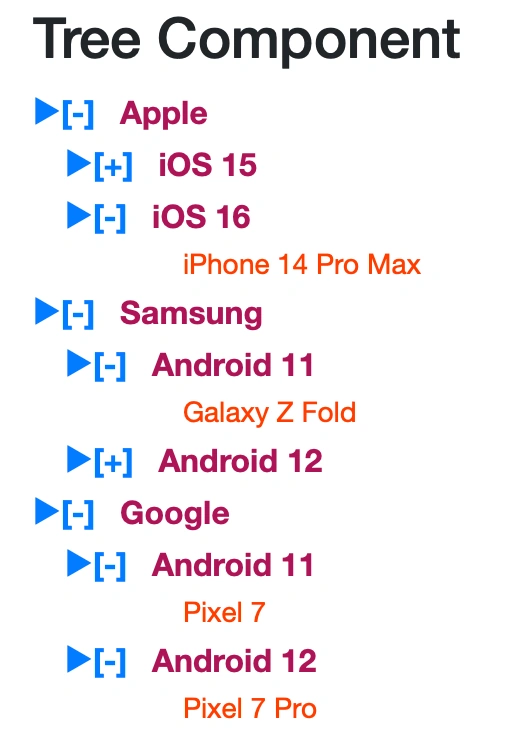
Tree component
Conclusion
We've explored the step-by-step process of crafting a Tree component in Blazor. This component allows you to present data in a hierarchical manner, enabling users to navigate through different levels. By following the provided code snippets and guidelines, you can create dynamic and visually appealing Tree components tailored to your application's needs. In the next article, we will learn to create a DataGrid, which will receive data from this tree component.
Looking to dive deeper into Blazor and unlock its full potential? Check out my comprehensive guide "[Blazor Simplified]". Whether you're a beginner or an experienced developer, this book offers practical insights, expert tips, and real-world examples to master Blazor. Take your skills to the next level and elevate your web development projects with the power of Blazor! That's not all! You can also explore the [Official GitHub repository] of the book, where you'll find code samples, supplementary materials, and a community of fellow Blazor enthusiasts. Let's embark on a journey to master Blazor together!
Join the conversation! Your thoughts help the community grow.