

Introduction
Referring to my previous article, we already set up the development environment for Django but I have this feeling of being at the beach with my feet still dry. So let’s get to the fun part and create our first project.
Before actually creating our first project let me introduce you to the boss of Django, “django-admin”. The reason I’m calling it a boss is because this command-line utility is at the heart of Django's project management facilities. You’ll need this utility to perform a bunch of administrative tasks including:
- Creating a new project.
- Starting the development web server.
- Creating and managing the project's database.
- Validating the current project and testing for errors.
Now, let’s get started.
Creating a new project
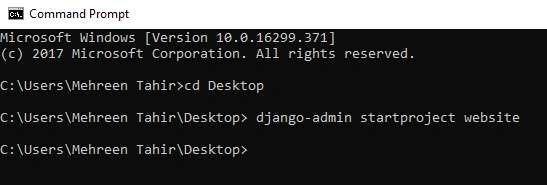
To create your project, open command prompt and navigate to the location on your drive where you want to create the project. Now, type the following command and hit enter.
- django-admin startproject website
- # website is the name of project. You can choose any name for your project.
What this command does is, it will make a folder name ‘website’ in the current directory. This folder also contains an initial directory structure for our project inside it.
Now that our project is created, before exploring the content of this folder; let’s take a moment and talk about the IDEs.
Python is a simple language and a plain text editor such as Vim, Emacs, or Sublime Text work fine but they simply focus on the editing of a single file which is lean-and-mean but when it comes to developing complex applications then it’s quite frightening for me to even think about text editors. (Ok, I never ever used a text editor. Not a fan.). Whereas the Integrated Development Environment (IDE) has a broad vision. They look at the whole project at once and unify all coding related activities. IDEs also have plus points like Auto-completion, quick syntax error fixes, code navigation and even smart assistance addressing the semantics of your code.
There are a bunch of IDEs to choose from. Some of the most commonly used IDEs are,
- PyCharm by JetBrains
- Visual Studio Code by Microsoft
- PyDev for Eclipse
Personally, I’ve been using PyCharm and I love it. It seems friendlier to me, easy to install and use. For the rest of the article, I’ll be working with PyCharm. Things are not so different for any IDE you choose so no worries, pal.
Project Exploration
Let’s continue where we left, open your newly created project. The first file you’ll come across is manage.py.
manage.py
This file would be created automatically every time you create a project. It can be thought of performing the same thing as django-admin but just for this project. If you open this file with any text editor or IDE, the code just looks something like this.
- #!/usr/bin/env python
- import os
- import sys
- if __name__ == "__main__": os.environ.setdefault("DJANGO_SETTINGS_MODULE", "website.settings")
- try: from django.core.management
- import execute_from_command_line
- except ImportError as exc: raise ImportError("Couldn't import Django. Are you sure it's installed and "
- "available on your PYTHONPATH environment variable? Did you "
- "forget to activate a virtual environment?") from exc
- execute_from_command_line(sys.argv)
Next, open the subfolder with the same name that of your project. Let’s go through each file one by one.
__init__.py
Assuming you have the basic knowledge of python, don’t merely think of this special __init__ method to be the constructor for python. If you open it you’ll see that IT DOESN’T CONTAIN ANY CODE but its presence tells python that this whole folder is to be treated as a package. Technically, Django projects are no more than python packages.
setting.py
This is the main configuration file of your project; generally speaking; including all the settings needed for your project to run successfully. Let’s go through the sections of this file one by one.
- '''''
- Django settings for a website project.
- Generated by 'django-admin startproject' using Django 2.0.4.
- For more information on this file, see
- https://docs.djangoproject.com/en/2.0/topics/settings/
- For the full list of settings and their values, see
- https://docs.djangoproject.com/en/2.0/ref/settings/
- '''
- import os
- # Build paths inside the project like this: os.path.join(BASE_DIR, ...)
- BASE_DIR = os.path.dirname(os.path.dirname(os.path.abspath(__file__)))
In the above part of your settings.py, BASE_DIR is pointing to the absolute path of the parent directory.
- # Quick-start development settings - unsuitable for production
- # See https://docs.djangoproject.com/en/2.0/howto/deployment/checklist/
- # SECURITY WARNING: keep the secret key used in production secret!
- SECRET_KEY = //long string of some characters
The above part specifies the security key for your project. Django provides you a cryptographic signing API to any app for cryptographically-secure signatures on vales and this security-key is used to makes hashes. It is also used to manage user session, password reset requests, messages, CookieStorage or FallbackStorage. It is important to keep this key secret or attackers could use it to generate their own signed values.
- # SECURITY WARNING: don't run with debug turned on in production!
- DEBUG = True
By default, Django leaves the DEBUG = True. If your app raises an exception when DEBUG is True, Django will display a detailed traceback, including a lot of metadata about your environment, such as all the currently defined Django settings (from settings.py). But here’s a catch. NEVER DEPLOY A SITE INTO PRODUCTION WITH DEBUG TURNED ON. It’s a gaping hole for security, plus it will rapidly consume memory on a production server.
- ALLOWED_HOSTS = []
When DEBUG = False, Django doesn’t work at all unless you populate ALLOWED_HOSTS with a suitable value. This setting is required to prevent an attacker from poisoning caches and password reset emails with links to malicious hosts by submitting requests with a fake HTTP Host header. So Django will only allow access to the hosts that are allowed in this section. If you’re working with tutorials or just building with DEBUG=False, you can specify it to the localhost and everything will work fine.
- ALLOWED_HOSTS = ['localhost', '127.0.0.1']
- # Application definition
- INSTALLED_APPS = [
- 'django.contrib.admin',
- 'django.contrib.auth',
- 'django.contrib.contenttypes',
- 'django.contrib.sessions',
- 'django.contrib.messages',
- 'django.contrib.staticfiles',
- ]
This section lists all the applications that are enabled in this Django installation. Next, whenever we’ll create an app for our project, we would have to add it to this list to let the Django know and allow our app to run.
- MIDDLEWARE = [
- 'django.middleware.security.SecurityMiddleware',
- 'django.contrib.sessions.middleware.SessionMiddleware',
- 'django.middleware.common.CommonMiddleware',
- 'django.middleware.csrf.CsrfViewMiddleware',
- 'django.contrib.auth.middleware.AuthenticationMiddleware',
- 'django.contrib.messages.middleware.MessageMiddleware',
- 'django.middleware.clickjacking.XFrameOptionsMiddleware',
- ]
It lists all the active middleware in your project. Middleware is a framework of hooks into Django’s request/response processing. Each middleware listed above is responsible for doing some specific task.
- ROOT_URLCONF = 'website.urls'
The above setting imports path to your root URLconf of your project. It can be overridden on a per-request basis and more paths can be specified.
- TEMPLATES = [{
- 'BACKEND': 'django.template.backends.django.DjangoTemplates',
- 'DIRS': [],
- 'APP_DIRS': True,
- 'OPTIONS': {
- 'context_processors': ['django.template.context_processors.debug', 'django.template.context_processors.request', 'django.contrib.auth.context_processors.auth', 'django.contrib.messages.context_processors.messages', ],
- },
- }, ]
Being a web framework, Django needs a convenient way to generate HTML dynamically and the most common approach for it is templates. The above settings list the configurations for each engine. BACKEND is the path to the template engine class implementing Django’s template backend API. DIRS defines the list of directories where engine should look for template source files. APP_DIRS tells the engine whether it should look for templates inside the application. OPTIONS contains backend-specific settings.
- WSGI_APPLICATION = 'website.wsgi.application'
- # website is the name of your project
It points to the application callable on website/wsgi.py. We’ll talk about the wsgi.py later in the article.
- # Database
- # https://docs.djangoproject.com/en/2.0/ref/settings/#databases
- DATABASES = {
- 'default': {
- 'ENGINE': 'django.db.backends.sqlite3',
- 'NAME': os.path.join(BASE_DIR, 'db.sqlite3'),
- }
- }
By default, Django comes with built in database, sqlite. The section above contains the settings for databases. You can also add other database engines like Mysql, sql server etc
- #Password validation# https: //docs.djangoproject.com/en/2.0/ref/settings/#auth-password-validators
- AUTH_PASSWORD_VALIDATORS = [{
- 'NAME': 'django.contrib.auth.password_validation.UserAttributeSimilarityValidator',
- }, {
- 'NAME': 'django.contrib.auth.password_validation.MinimumLengthValidator',
- }, {
- 'NAME': 'django.contrib.auth.password_validation.CommonPasswordValidator',
- }, {
- 'NAME': 'django.contrib.auth.password_validation.NumericPasswordValidator',
- }, ]
These settings apply some password validations to check for the user-entered password. These validations include if the two passwords match, minimum length, common password (By default, it compares to an included list of 1000 common passwords) and all numerics. The cool thing about Django is that it has the password, user attributes validators so you don’t need to worry about it. Besides this it also lets you write your own validators. Pretty cool.
- # Internationalization
- # https://docs.djangoproject.com/en/2.0/topics/i18n/
- LANGUAGE_CODE = 'en-us'
- TIME_ZONE = 'UTC'
- USE_I18N = True
- USE_L10N = True
- USE_TZ = True
Another cool feature of Django is internationalization. This feature enables your project to be presented in different time zones and different geographical locations. The above part of the settings is merely doing that. You can specify any language or time zone.
- # Static files (CSS, JavaScript, Images)
- # https://docs.djangoproject.com/en/2.0/howto/static-files/
- STATIC_URL = '/static/'
Templates enable you to embed HTML code in your app but what about the formatting? These settings allow you to include any CSS files, images or JS files in your app. STATIC_URL tells Django where to look for these static files in the directory.
For now, you have a basic overview of the settings. Let’s move on and explore the urls.py.
urls.py
This file is actually the mapping python functions with their URLs. The code generated by python is given below.
- '''''website URL Configuration
- The `urlpatterns` list routes URLs to views. For more information please see:
- https://docs.djangoproject.com/en/2.0/topics/http/urls/
- Examples:
- Function views
- 1. Add an import: from my_app import views
- 2. Add a URL to urlpatterns: path('', views.home, name='home')
- Class-based views
- 1. Add an import: from other_app.views import Home
- 2. Add a URL to urlpatterns: path('', Home.as_view(), name='home')
- Including another URLconf
- 1. Import the include() function: from django.urls import include, path
- 2. Add a URL to urlpatterns: path('blog/', include('blog.urls'))
- '''
- from django.contrib import admin
- from django.urls import path
- urlpatterns = [
- path('admin/', admin.site.urls),
- ]
Django comes with a built-in admin panel. The above urlpatterns is mapping that panel to the URL. Whenever you create another view or template or add some other functionality to your project, you need to specify its URL in the above file.
wsgi.py
This file acts as the entry point for the WSGI-compatible web server to serve the project.
- '''''
- WSGI config for a website project.
- It exposes the WSGI callable as a module-level variable named ``application``.
- For more information on this file, see
- https://docs.djangoproject.com/en/2.0/howto/deployment/wsgi/
- '''
- import os
- from django.core.wsgi import get_wsgi_application
- os.environ.setdefault("DJANGO_SETTINGS_MODULE", "website.settings")
- application = get_wsgi_application()
Django’s primary deployment platform is WSGI, the Python standard for web servers and applications, so it sets up a simple default WSGI configuration for you. This file contains the application callable that the application server uses to communicate with your code. Django uses the DJANGO_SETTINGS_MODULE environment variable to locate the appropriate settings module. If this variable isn’t set then wsgi.py will set it to website.settings. That’s how the server discovers the default settings file by default.
By far, we have a pretty good understanding of the project files that we created now let’s move on and start our development server.
Starting the development server:
We need a webserver to run our project but no worries. One of the coolest things about Django is that it comes with a pre-configured, lightweight web server for developing and testing applications. Django also supports other famous web server but for the sake of simplicity, we’ll be using the built-in server.
To start the server, enter the following command:
- python manage.py run server
Remember! You should be in the current project directory. You should see the following screen afterward.
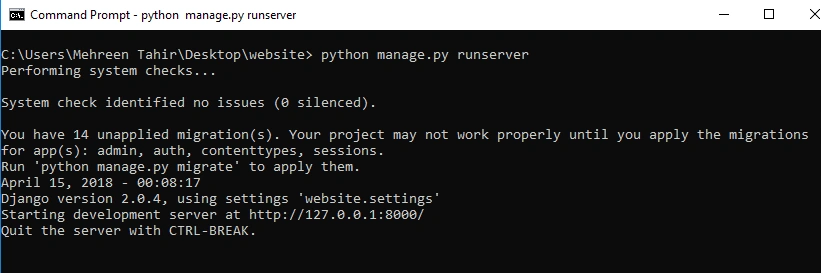
Next, open your web browser and navigate to http://127.0.0.1:8000/ as specified in the above screen.
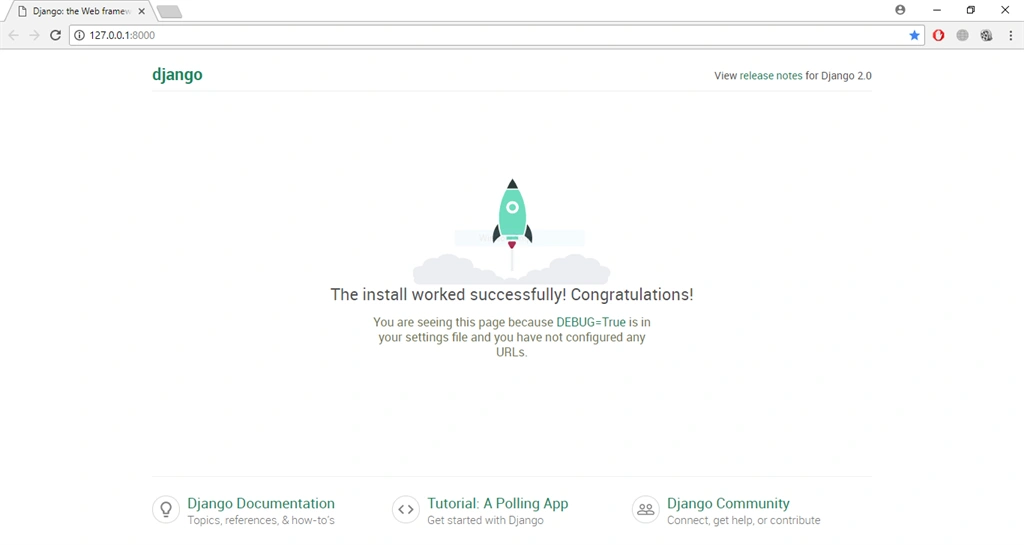
Congratulations!! Everything worked out perfectly.
Changing Port
You might have noticed 8000 at the end of the URL. This actually is the default port for our server. If you want to change this port, just pass it as the command line argument. Like this:
- python manage.py runserver 8080
- # where 8080 is the new port specified to run the server.
Treat yourself. You just created your first project in Django. Although this project is a dummy for the moment a good start indeed. We’ll be adding functionality to our project in the next article.
Join the conversation! Your thoughts help the community grow.