

Welcome back to an article about creating another Windows Server Machine on Virtual Network and working with Load Balancing. Here, in this article, we will be working with the Virtual Network and we will be creating a Load Balancer on it.
Note
Please go back to my previous article to create a Virtual Network and also to create a Virtual Machine.
Let’s understand a few basic things about Load Balancer!
Load Balancer on Azure
Azure Load Balancer is a scalable Software Load Balancer. There are two versions the External for Internet based traffic and the Internal for Private Traffic. Load Balancer can balance upto 100 virtual machines. It supports TCP or UDP protocols and comes up with Health Probes of TCP and HTTP.
Functions of Load Balancer
- Front End IP Pool
To associate the IP addresses with the Load Balancer. The front-end IP pool is a list of IP’s that can be used for the Load Balancer on External and Internal. - Inbound NAT Rules
Used for port mapping with the individual Virtual Machines. The inbound NAT rules list what traffic is allowed in and where it will be directed. - Load Balancer Rules
Used for port mapping with multiple Virtual Machines. The NAT rules are used to move traffic from the front of the load balancer to the backend devices such as your webservers. - Health Probes
It's based out of TCP or UDP. The Load Balancer probes are used to ensure that traffic in only directed to Back end devices that are “up” and “functioning”. - Back end pool
Used to list out network interfaces to forward traffic. Load-balanced endpoints can be configured with health probes for an additional layer of high availability. If the load balancer does not receive a reply in response to two probes, then traffic is no longer sent to the virtual machine. The load balancer does continue polling, looking for the response, so when the virtual machine is healthy again, it will automatically be put back in the rotation.
Start creating a Virtual Machine using the below steps
Step 1
Start creating a Virtual Machine of Windows Server 2012 R2 Datacenter. Look for my previous articles to learn about the "Basics" blade of creating a Virtual Machine.
Step 2
Select the size for the Virtual Machine which has to be created.
Step 3
On the "Settings" blade, configure for the storage account.
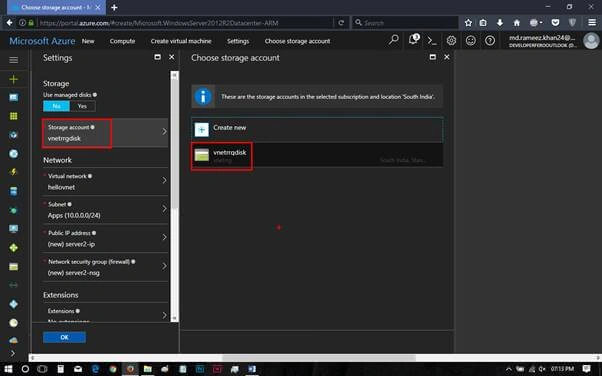
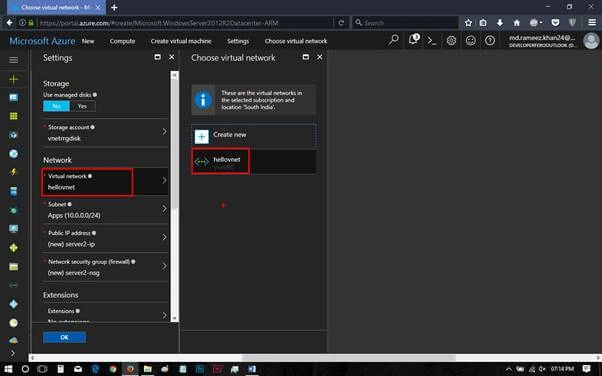
Select the Virtual Network of one which was created in the previous demo.
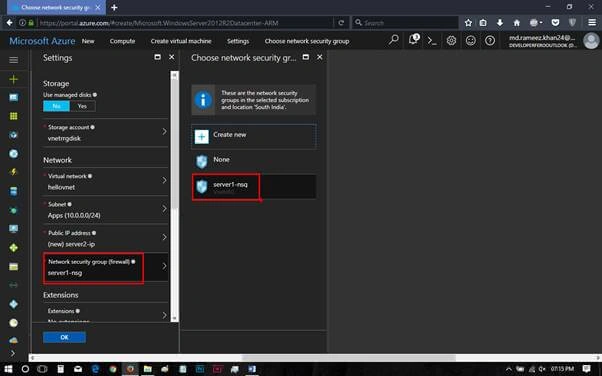
Configure the Network Security Group (NSG), select the NSG which was created in the previous demo.
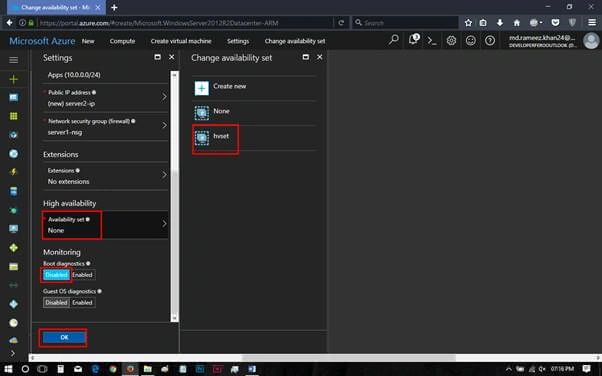
Enable "Guest monitoring" and click on OK to pass for the next blade.
Pass the "Summary" blade and purchase the new Virtual Machine of Windows Server.
Step 4
Click on "Connect" to connect with the Virtual Machine now.
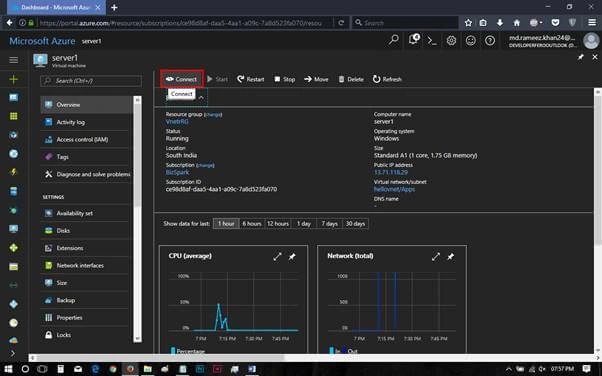
Save the downloadable RDP file and open it with the help of Remote Desktop Connection.
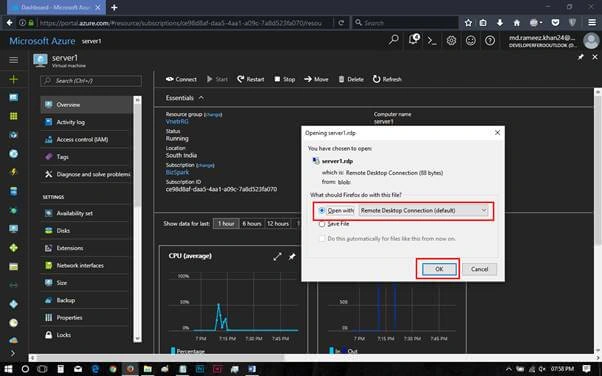
Click on "Connect" again in the RDP popup box and connect with the Virtual Machine.
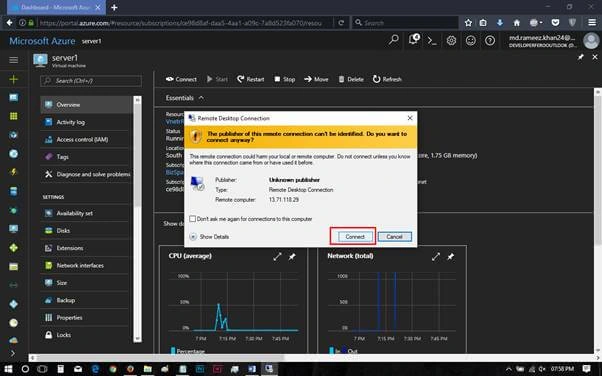
Enter the credentials for the Virtual Machine to get connected.
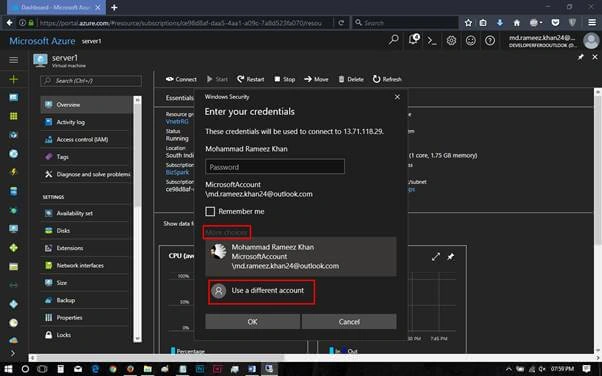
Step 5
Connect with both the Server machines and install IIS using the below Powershell commands using Powershell.
Add-windowsfeature –name “web-server”
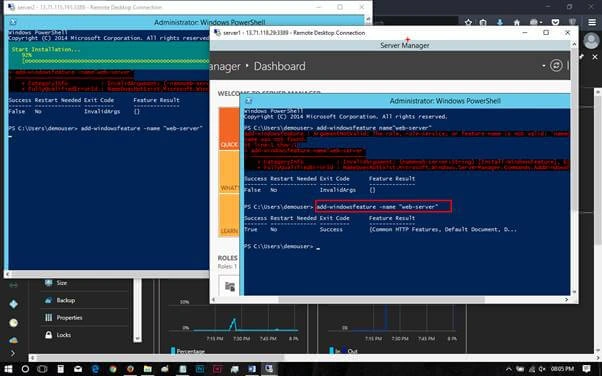
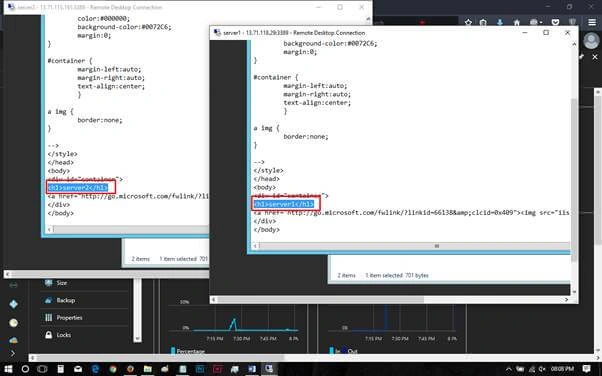
Open the IIS HTML file from your C drive’s program files of both the Virtual Machine and add some lines on HTML file to represent the difference.
Location of HTML file could be – c/inetpub/wwwroot.iis.html
Save the HTML file on both of the Virtual Machine which has been created and close the same.
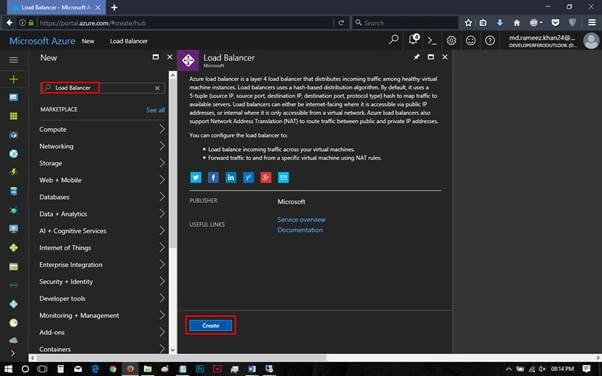
Creating a Load Balancer to connect with the Server Machine.
Step 6
Move to the Azure portal and search for Load Balancer on it. Click on "Create".
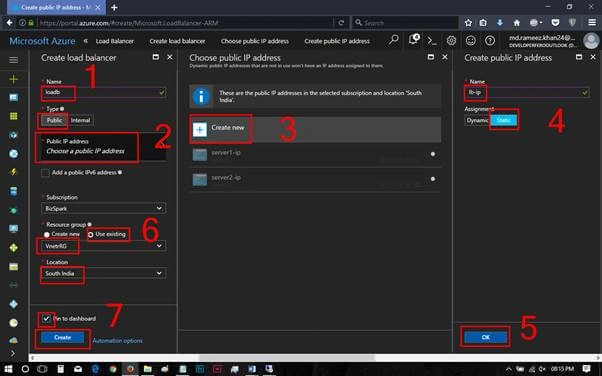
- Name the Load Balancer here.
- Specify the type of Load Balancer either as a Public one or an internal one as such.
- Set the Public IP Address for the load balancer, supposed to be a static one and it should be named after it.
- Select the Subscription and specify the Resource Group of an existing one where the V-Net is present.
- Select the Location of where the Load Balancer has to be deployed.
- Click on "Create" to create the Load Balancer now.
Step 7
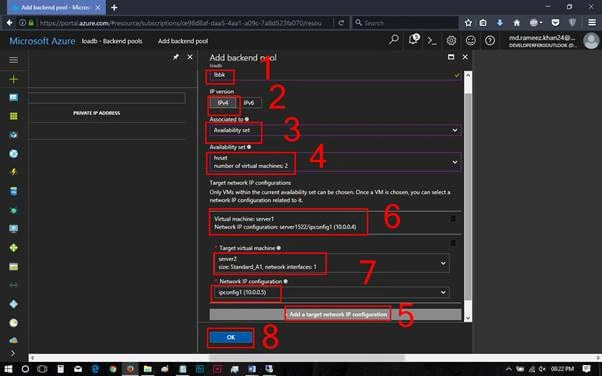
Add a back-end pool towards the Load Balancer which has been created.
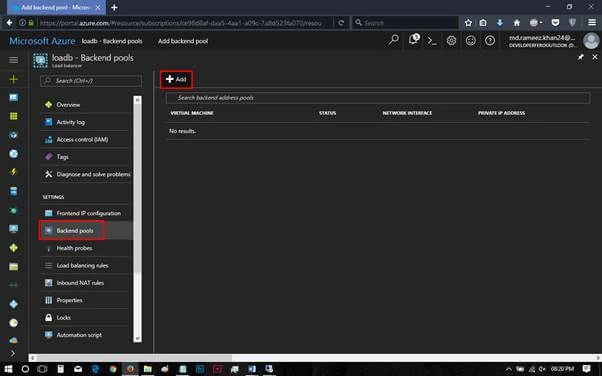
- Name the back-end pool.
- Select the IP version of the backend pool for IPV4.
- Associated to the Availability Set which was configured on the previous demo.
- Specify the availability sets over here.
- Add another target IP network configuration.
- Select the new Virtual Machine for target.
- Specify the Network IP configuration.
- Click on "OK" to add the Back-end pool.
Step 8
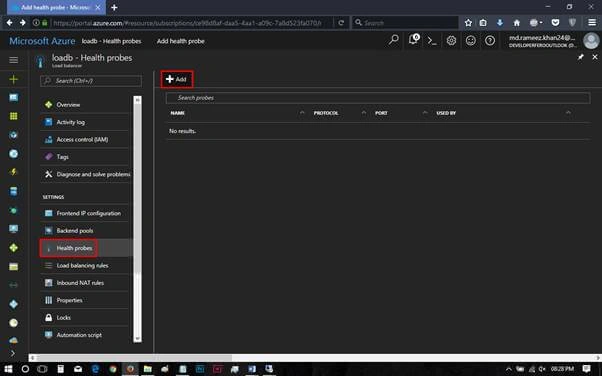
Add Health Probes over here. Click on "Add" to add the health probes.
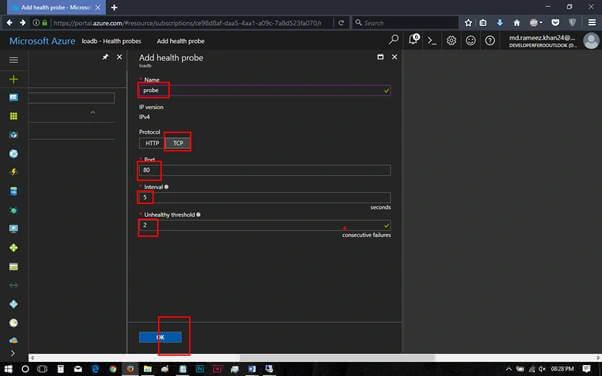
- Name the Health Probe.
- Select the Protocol as TCP.
- Set the port number for 80.
- Set interval timing for 5 seconds.
- Set unhealthy threshold for 2
- Click on OK to add the Health Probes.
Step 9
Adding Load Balancer Rules.
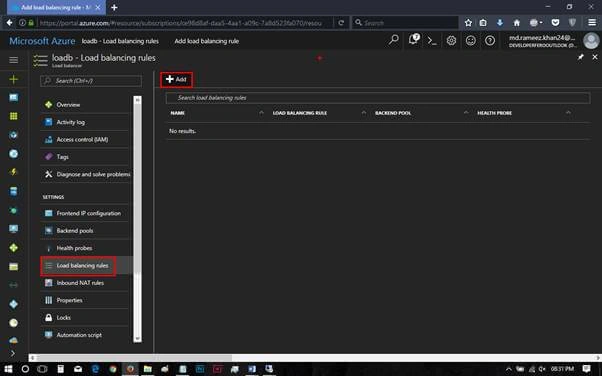
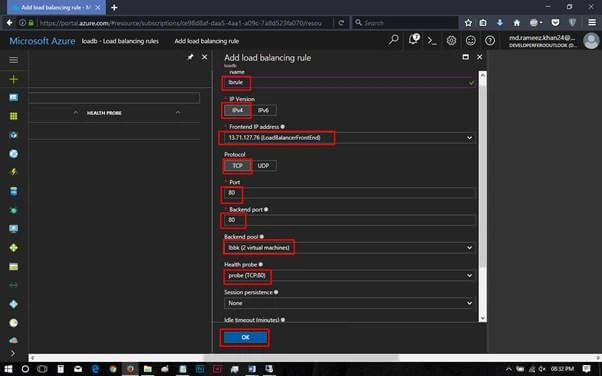
- Name the load balancer.
- Set IP Version as IPv4.
- Specify the Frontend IP address.
- Protocol for TCP.
- Port as 80.
- Backend port for 80.
- Backend pool of which was created in previous step.
- Health Probe again which was created in the previous step.
- Now, click on "OK" to add the Load Balancing Rules.
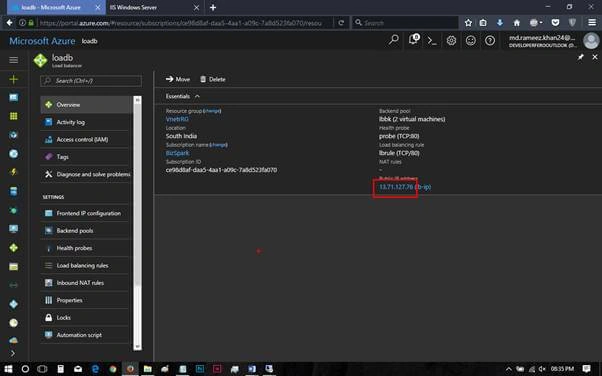
Now, here we will be getting a Public IP address on the Overview blade.
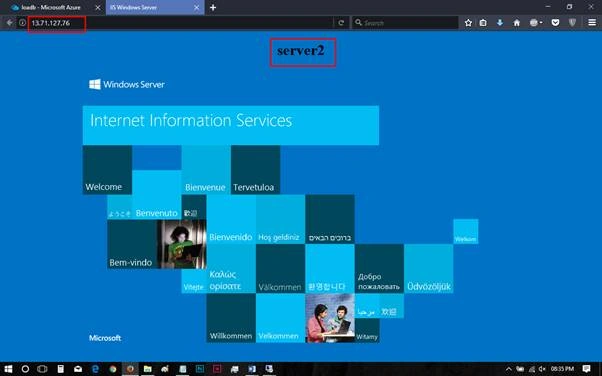
Click on the Public IP address or either copy and paste it on a new tab of the browser. We can find that the application gets accessed from both the servers alternatively depending on the load.
In this below image, the application gets accessed from Server 1.
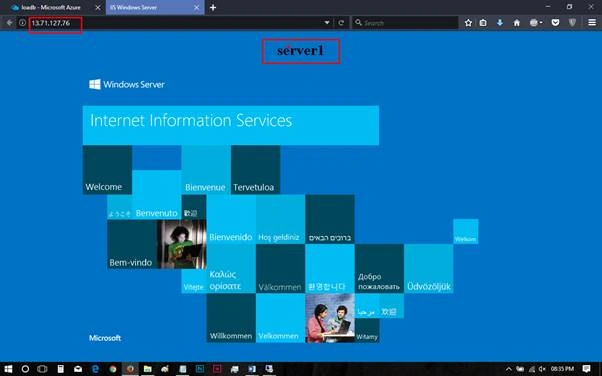
Now, when we refresh the page, the application gets accessed from the another server machine of 2.
Join the conversation! Your thoughts help the community grow.