
Introduction

This is the second part of my article. If you have not read the previous articles then please go through the first article:
  1. CSS Properties in HTML: Level-1
CSS bottom Property example
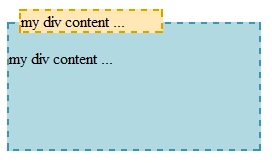
The CSS bottom property is used to offset an element's bottom position. It moves the element upward and the position property of the element determines the behavior of the placement it gets.
  1. <style type="text/css">
  2. #div1
  3. {
  4. background: #B1D8E2;
  5. border: #3E95AE 2px dashed;
  6. width: 250px;
  7. height: 125px;
  8. margin-top: 40px;
  9. }
  10. #div2
  11. {
  12. bottom: 15px;
  13. left: 10px;
  14. position: relative;
  15. background: #FFE8B7;
  16. border: #E19D00 2px dashed;
  17. width: 140px;
  18. height: 20px;
  19. }
  20. </style>
  21. <div id="div1">
  22. <div id="div2">
  23. my div content ...</div>
  24. my div content ...
  25. </div>
bottom-property-in-html.png
CSS caption-side Property example
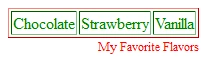
The CSS caption-side property is used to specify the position of a caption element in relation to its table element.
  1. <!DOCTYPE html>
  2. <style type="text/css">
  3. #myTable
  4. {
  5. color: red;
  6. }
  7. #myTable td
  8. {
  9. color: Green;
  10. }
  11. #myTable caption
  12. {
  13. caption-side: bottom;
  14. text-align: right;
  15. font-size: 12px;
  16. color: Red;
  17. }
  18. </style>
  19. <table id="myTable" border="1">
  20. <caption>
  21. My Favorite Flavors</caption>
  22. <tr>
  23. <td>
  24. Chocolate
  25. </td>
  26. <td>
  27. Strawberry
  28. </td>
  29. <td>
  30. Vanilla
  31. </td>
  32. </tr>
  33. </table>
caption-side-property-in-html.png
CSS content Property example
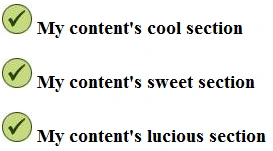
The CSS content property is used to generate content to the document when using CSS selectors that are intended to generate or replace content in the document. ::before and ::after are two such selectors.
Specify a single value or a space-separated list of values to be generated.
  1. <!DOCTYPE html>
  2. <style type="text/css">
  3. .myClass::before
  4. {
  5. content: url(m5.jpg) " My ";
  6. }
  7. .myClass::after
  8. {
  9. content: "'s " attr(title) " section";
  10. }
  11. </style>
  12. <h3 class="myClass" title="cool">
  13. content</h3>
  14. <h3 class="myClass" title="sweet">
  15. content</h3>
  16. <h3 class="myClass" title="lucious">
  17. content</h3>
content-property-in-html.png
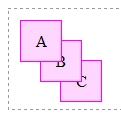
CSS absolute-position Property example
absolute
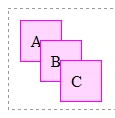
Allows the offset properties to apply to the element. The element will scroll with other content on the page. This setting takes the element out of its normal flow in the document.
  1. <style type="text/css">
  2. #container
  3. {
  4. border: #999 1px dashed;
  5. height: 100px;
  6. }
  7. #container div
  8. {
  9. position: absolute;
  10. background: #FFD5FF;
  11. border: #F0F 1px solid;
  12. padding: 10px;
  13. width: 20px;
  14. height: 20px;
  15. }
  16. #div1
  17. {
  18. top: 20px;
  19. left: 20px;
  20. }
  21. #div2
  22. {
  23. top: 40px;
  24. left: 40px;
  25. }
  26. #div3
  27. {
  28. top: 60px;
  29. left: 60px;
  30. }
  31. </style>
  32. <div id="container">
  33. <div id="div1">
  34. A</div>
  35. <div id="div2">
  36. B</div>
  37. <div id="div3">
  38. C</div>
  39. </div>
absolute-postion-in-html.png
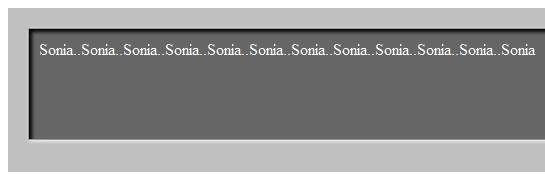
CSS box-shadow Property example
The CSS box-shadow property is used to render shadows for content containers (boxes). Each distinct shadow can get up to 4 parameters and an optional "inset" keyword.
You can create a comma-separated list of distinct shadows that will apply under the same box to create various looking effects, as well as setting shadows to "inset" for embossing and engraving effects.
specify shadow parameters
Example: "inset 1px 2px 3px #000"
The optional inset keyword places a shadow inside of the box.
  • The first value sets the horizontal offset of the shadow.
  • The second value sets the vertical offset of the shadow.
  • The third value sets the blur radius of the shadow.
  • The fourth value sets the color of the shadow.
none
Specifies that no shadow is to be on the container
  1. <style type="text/css">
  2. #myDiv
  3. {
  4. background: #666;
  5. border: #999 1px solid;
  6. height: 90px;
  7. margin-bottom: 12px;
  8. padding: 10px;
  9. color: #FFF;
  10. box-shadow: inset 3px 3px 3px #000, 1px 1px 3px #FFF;
  11. }
  12. #container
  13. {
  14. background: #C0C0C0;
  15. padding: 20px;
  16. }
  17. </style>
  18. <div id="container">
  19. <div id="myDiv">
  20. Sonia ...Sonia ...Sonia ...Sonia ...Sonia ...Sonia ...Sonia ...Sonia ...Sonia ...Sonia
  21. ...Sonia ...Sonia ...Sonia ...Sonia ...</div>
  22. </div>
box-shadow-property-in-html.png
CSS ceneterd-image Property example
  1. <html>
  2. <head>
  3. <title>Css</title>
  4. <style type="text/css">
  5. body
  6. {
  7. background-image: url(4113.jpg);
  8. background-position: center top;
  9. background-repeat: no-repeat;
  10. background-attachment: scroll;
  11. background-color: #FFFFFF;
  12. }
  13. </style>
  14. </head>
  15. <body>
  16. <h1>
  17. sonia</h1>
  18. </body>
  19. </html>
centered-bg-image-property-in-html.png
CSS direction-property example
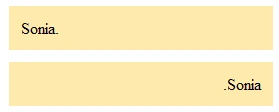
The CSS direction property is used to specify the writing direction in an element. It also affects the direction of a table column layout, as well as the horizontal content overflow direction of an element.
  1. <style type="text/css">
  2. #div1
  3. {
  4. direction: ltr;
  5. }
  6. #div2
  7. {
  8. direction: rtl;
  9. }
  10. #div1, #div2
  11. {
  12. width: 240px;
  13. background: #FEEAAB;
  14. padding: 12px;
  15. margin: 12px;
  16. }
  17. </style>
  18. <div id="div1">
  19. My DIV content.</div>
  20. <div id="div2">
  21. My DIV content.</div>
direction-property-in-html.png
CSS empty-cells-hide Property example
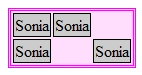
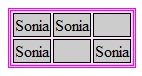
The CSS empty-cells property is used to specify whether or not tables should render empty cells.
  1. <!DOCTYPE html>
  2. <style type="text/css">
  3. #myTable
  4. {
  5. empty-cells: hide;
  6. border: #F0F 3px double;
  7. background: #FFDDFC;
  8. }
  9. #myTable td
  10. {
  11. border: #000 1px solid;
  12. background: #CCC;
  13. }
  14. </style>
  15. <table id="myTable">
  16. <tr>
  17. <td>
  18. sonia
  19. </td>
  20. <td>
  21. sonia
  22. </td>
  23. <td>
  24. </td>
  25. </tr>
  26. <tr>
  27. <td>
  28. sonia
  29. </td>
  30. <td>
  31. </td>
  32. <td>
  33. sonia
  34. </td>
  35. </tr>
  36. </table>
empty-cells-hide-property-in-html.png
CSS empty-cells-show Property example
  1. <!DOCTYPE html>
  2. <style type="text/css">
  3. #myTable
  4. {
  5. empty-cells: show;
  6. border: #F0F 3px double;
  7. background: #FFDDFC;
  8. }
  9. #myTable td
  10. {
  11. border: #000 1px solid;
  12. background: #CCC;
  13. }
  14. </style>
  15. <table id="myTable">
  16. <tr>
  17. <td>
  18. sonia
  19. </td>
  20. <td>
  21. sonia
  22. </td>
  23. <td>
  24. </td>
  25. </tr>
  26. <tr>
  27. <td>
  28. sonia
  29. </td>
  30. <td>
  31. </td>
  32. <td>
  33. sonia
  34. </td>
  35. </tr>
  36. </table>
empty-cells-show-in-html.png
CSS visibility Property example
The CSS visibility property is used to hide content while maintaining the real estate it would occupy in the document layout. It will make the element disappear but its real estate remains.
To let other page elements occupy the real estate where invisible content resides, use the display property with a value of "none" instead of the visibility property set to "hidden".
Possible Values
hidden- Hide the element.
  1. <style type="text/css">
  2. .divClass
  3. {
  4. background: #C6E2FF;
  5. border: #09F 1px solid;
  6. height: 30px;
  7. }
  8. #div2
  9. {
  10. visibility: hidden;
  11. }
  12. </style>
  13. <div id="div1" class="divClass">
  14. div content ...</div>
  15. <div id="div2" class="divClass">
  16. div content ...</div>
  17. <div id="div3" class="divClass">
  18. div content ...</div>
hidden-visibility-property-in-html.png
visible- Show the element.
  1. <style type="text/css">
  2. .divClass
  3. {
  4. background: #C6E2FF;
  5. border: #09F 1px solid;
  6. height: 30px;
  7. }
  8. #div2
  9. {
  10. visibility: visible;
  11. }
  12. </style>
  13. <div id="div1" class="divClass">
  14. div content ...</div>
  15. <div id="div2" class="divClass">
  16. div content ...</div>
  17. <div id="div3" class="divClass">
  18. div content ...</div>
visible-visibility-property-in-html.png
CSS horizontal-image-repetititon Property example
  1. <html>
  2. <head>
  3. <title></title>
  4. <style>
  5. body
  6. {
  7. background-image: url(4113.jpg);
  8. background-repeat: repeat-x;
  9. background-attachment: scroll;
  10. }
  11. </style>
  12. </head>
  13. <body>
  14. sonia
  15. </body>
  16. </html>
horizontal-image-repetition-property-in-html.png
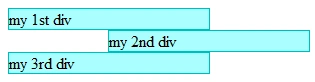
CSS left Property example
The CSS left property is used to offset an element's left position. It moves the element to the right and the position property of the element determines the behavior of the placement it gets.
  1. <style type="text/css">
  2. .divClass
  3. {
  4. background: #AFF;
  5. border: #0BB 1px solid;
  6. width: 200px;
  7. position: relative;
  8. }
  9. #myDiv
  10. {
  11. left: 100px;
  12. }
  13. </style>
  14. <div class="divClass">
  15. my 1st div</div>
  16. <div class="divClass" id="myDiv">
  17. my 2nd div</div>
  18. <div class="divClass">
  19. my 3rd div</div>
left-property-in-html.png
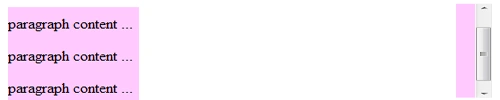
CSS max-height Property example
The CSS max-height property is used to set the maximum height that an element can grow to be. Use with min-height to create a height range for the element. Use in conjuction with the overflow property to show scrollbars or hide content that might go beyond the max-height of the element.
The example below creates a height range in which the element cannot be less than 90px high, and cannot be more than 200px high.
  1. <!DOCTYPE html>
  2. <style type="text/css">
  3. #myDiv
  4. {
  5. max-height: 200px;
  6. min-height: 90px;
  7. background: #FFCAFF;
  8. overflow: auto;
  9. }
  10. </style>
  11. <div id="myDiv">
  12. <p>
  13. paragraph content ...</p>
  14. <p>
  15. paragraph content ...</p>
  16. <p>
  17. paragraph content ...</p>
  18. <p>
  19. paragraph content ...</p>
  20. <p>
  21. paragraph content ...</p>
  22. <p>
  23. paragraph content ...</p>
  24. <p>
  25. paragraph content ...</p>
  26. <p>
  27. paragraph content ...</p>
  28. <p>
  29. paragraph content ...</p>
  30. </div>
max-height-property-in-html.png
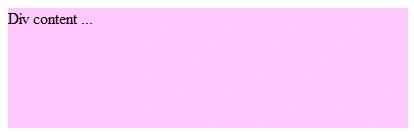
CSS max-width Property example
The CSS max-width property is used to specify the maximum width an element can grow to be. Use with min-width to create a width range for the element.
The example below creates a width range in which the element cannot be less than 300px wide, and cannot be more than 400px wide. To see the effect run this code in a new HTML document, and slowly resize your browser window horizontally making it smaller.
  1. <!DOCTYPE html>
  2. <style type="text/css">
  3. #myDiv
  4. {
  5. max-width: 400px;
  6. min-width: 300px;
  7. background: #FFCAFF;
  8. height: 120px;
  9. }
  10. </style>
  11. <div id="myDiv">
  12. Div content ...</div>
max-width-property-in0html.png
CSS min-height Property example
The CSS min-height property is used to specify the minumum height an element should be. Use with max-height to create a height range for the element.
  1. <!DOCTYPE html>
  2. <style type="text/css">
  3. #myDiv
  4. {
  5. min-height: 90px;
  6. max-height: 200px;
  7. background: #FFCAFF;
  8. }
  9. </style>
  10. <div id="myDiv">
  11. <p>
  12. paragraph content ...</p>
  13. </div>
min-height-property-in-html.png
CSS min-width Property example
The CSS min-width property is used to specify the minimum width an element should be. Use with max-width to create a width range for the element.
The example below creates a width range in which the element cannot be less than 300px wide, and cannot be more than 400px wide. To see the effect run this code in a new document, and resize your browser window horizontally.
  1. <!DOCTYPE html>
  2. <style type="text/css">
  3. #myDiv
  4. {
  5. min-width: 300px;
  6. max-width: 400px;
  7. background: #FFCAFF;
  8. height: 120px;
  9. }
  10. </style>
  11. <div id="myDiv">
  12. Div content ...</div>
min-height-property-in-html.png
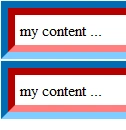
CSS outline-color Property example
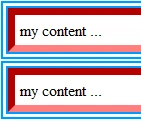
The CSS outline-color property is used to specify the color of an outline. Outlines are somewhat similar to borders, however outlines are drawn on the outside of elements and do not affect the position or size of the element.
  1. <!DOCTYPE>
  2. <style type="text/css">
  3. .class1
  4. {
  5. outline-color: #09F;
  6. outline-width: 7px;
  7. outline-style: inset;
  8. border-color: #F00;
  9. border-width: 7px;
  10. border-style: inset;
  11. padding: 5px;
  12. }
  13. </style>
  14. <p class="class1">
  15. my content ...</p>
  16. <p class="class1">
  17. my content ...</p>
outline-color-property-in-html.png
CSS outline-style Property example
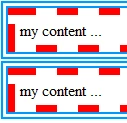
The CSS outline-style property is used to specify the style of an outline. Outlines are somewhat similar to borders, however outlines are drawn on the outside of elements and do not affect the position or size of the element.
  1. <!DOCTYPE>
  2. <style type="text/css">
  3. .class1
  4. {
  5. outline-color: #09F;
  6. outline-width: 7px;
  7. outline-style: inset;
  8. border-color: #F00;
  9. border-width: 7px;
  10. border-style: inset;
  11. padding: 5px;
  12. }
  13. </style>
  14. <p class="class1">
  15. my content ...</p>
  16. <p class="class1">
  17. my content ...</p>
outline-style-property-in-html.png
CSS outline-width Property example
The CSS outline-width property is used to specify the width of an outline drawn onto an element. Outlines are somewhat similar to borders, however outlines are drawn on the outside of elements and do not affect the position or size of the element.
  1. <!DOCTYPE>
  2. <style type="text/css">
  3. .class1
  4. {
  5. outline-color: #09F;
  6. outline-width: 7px;
  7. outline-style: inset;
  8. border-color: #F00;
  9. border-width: 7px;
  10. border-style: inset;
  11. padding: 5px;
  12. }
  13. </style>
  14. <p class="class1">
  15. my content ...</p>
  16. <p class="class1">
  17. my content ...</p>
outline-width-property-in-html.png
CSS outline Property example
The CSS outline property is shorthand for specifying the outline-color, outline-style and outline-width properties.
  1. <!DOCTYPE>
  2. <style type="text/css">
  3. .class1
  4. {
  5. outline: #09F inset 7px;
  6. border: #F00 inset 7px;
  7. padding: 5px;
  8. }
  9. </style>
  10. <p class="class1">
  11. my content ...</p>
  12. <p class="class1">
  13. my content ...</p>
outline-property-in-html.png
CSS overflow-x Property example
The CSS overflow-x property is used to specify how content inside of an element should be clipped along the X axis, which is the horizontal plane. If you set the width of an element, and the width of the content inside of that element happens to exceed the width of its parent, use overflow-x to handle how the overflowing content is treated.
Possible Values
  • auto- This setting will make a scroll bar appear only if the content requires it.
  • scroll- This setting will make a scroll bar appear.
  • visible- This setting will make no scroll bar and will not hide the overflow content.
  • hidden- This setting will make no scroll bar and it will hide the overflow content.
  1. <style type="text/css">
  2. div#myDiv
  3. {
  4. width: 120px;
  5. overflow-x: auto;
  6. height: 50px;
  7. padding: 10px;
  8. }
  9. </style>
  10. <div id="myDiv">
  11. ABCDEFGHIJKLMNOPQRSTUVWXYZ</div>
overflow-x-property-in-html.png
CSS overflow-y Property example
The CSS overflow-y property is used to specify how content inside of an element should be clipped along the Y axis, which is the vertical plane. If you set the height of an element, and the height of the content inside of that element happens to exceed the height of its parent, use overflow-y to handle how the overflowing content is treated.
Possible Values
  • auto- This setting will make a scroll bar appear only if the content requires it.
  • scroll- This setting will make a scroll bar appear.
  • visible- This setting will make no scroll bar and will not hide the overflow content.
  • hidden- This setting will make no scroll bar and will hide the overflow content.
  1. <style type="text/css">
  2. div#myDiv
  3. {
  4. height: 80px;
  5. overflow-y: auto;
  6. }
  7. </style>
  8. <div id="myDiv">
  9. ABCDEFGHIJKLMNOPQRSTUVWXYZ
  10. <hr />
  11. ABCDEFGHIJKLMNOPQRSTUVWXYZ
  12. <hr />
  13. ABCDEFGHIJKLMNOPQRSTUVWXYZ
  14. <hr />
  15. ABCDEFGHIJKLMNOPQRSTUVWXYZ
  16. </div>
overflow-y-property-in-html.png
CSS quotes Property example
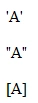
The CSS quotes property is used to specify the characters that will encapsulate a string of quoted text.
  1. <!DOCTYPE html>
  2. <style type="text/css">
  3. #p1 > q
  4. {
  5. quotes: "'" "'";
  6. }
  7. #p2 > q
  8. {
  9. quotes: '"' '"';
  10. }
  11. #p3 > q
  12. {
  13. quotes: "[" "]";
  14. }
  15. </style>
  16. <p id="p1">
  17. <q>A</q></p>
  18. <p id="p2">
  19. <q>A</q></p>
  20. <p id="p3">
  21. <q>A</q></p>
quotes-property-in-html.png
CSS relative-position Property example
relative
Allows the offset properties to apply to the element and its positioning is relative to its parent container and sibling elements.
  1. <style type="text/css">
  2. #container
  3. {
  4. border: #999 1px dashed;
  5. height: 100px;
  6. }
  7. #container div
  8. {
  9. position: relative;
  10. background: #FFD5FF;
  11. border: #F0F 1px solid;
  12. padding: 10px;
  13. width: 20px;
  14. height: 20px;
  15. }
  16. #div1
  17. {
  18. top: 20px;
  19. left: 20px;
  20. }
  21. #div2
  22. {
  23. top: 40px;
  24. left: 40px;
  25. }
  26. #div3
  27. {
  28. top: 60px;
  29. left: 60px;
  30. }
  31. </style>
  32. <div id="container">
  33. <div id="div1">
  34. A</div>
  35. <div id="div2">
  36. B</div>
  37. <div id="div3">
  38. C</div>
  39. </div>
relative-position-property-in-html.png
CSS right Property example
The CSS right property is used to offset an element's right position. It moves the element to the left and the position property of the element determines the behavior of the placement it gets.
  1. <style type="text/css">
  2. .divClass
  3. {
  4. background: #FFEDC4;
  5. border: #FDB100 1px solid;
  6. width: 300px;
  7. padding: 8px;
  8. float: right;
  9. position: relative;
  10. clear: right;
  11. }
  12. #myDiv
  13. {
  14. right: 150px;
  15. }
  16. </style>
  17. <div class="divClass">
  18. my 1st div</div>
  19. <div class="divClass" id="myDiv">
  20. my 2nd div</div>
  21. <div class="divClass">
  22. my 3rd div</div>
right-property-in-html.png
CSS text-shadow Property example
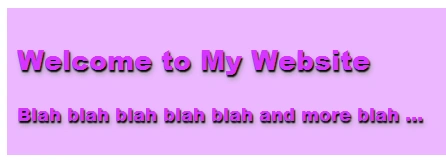
The CSS text-shadow property is used to render shadows for text. Each distinct shadow gets 2 - 4 values and an optional "inset" keyword.
You can create a comma-separated list of distinct shadows that will apply under the same text to create various looking effects.
Possible Values
specify shadow settings
Example: "inset 1px 2px 3px #000"
  • The optional inset keyword makes the shadow inset as opposed to rendering it under the text.
  • The first value sets the horizontal offset of the shadow.
  • The second value sets the vertical offset of the shadow.
  • The third value sets the blur radius of the shadow.
  • The fourth value sets the color of the shadow.
  1. <style type="text/css">
  2. #myDiv
  3. {
  4. background: #EBB7FF;
  5. padding: 10px;
  6. font-family: "Arial Black" , Gadget, Arial, serif;
  7. font-size: 18px;
  8. color: #D634FE;
  9. text-shadow: 1px 2px 1px #000, 2px 4px 4px #999;
  10. }
  11. </style>
  12. <div id="myDiv">
  13. <h2>
  14. Welcome to My Website</h2>
  15. <p>
  16. Blah blah blah blah blah and more blah ...</p>
  17. </div>
text-shadow-property-in-html.png
CSS repaeting-tiles Property example
  1. <html>
  2. <head>
  3. <title>CSS</title>
  4. <style type="text/css">
  5. body
  6. {
  7. background-image: url(4113.jpg);
  8. }
  9. </style>
  10. </head>
  11. <body>
  12. sonia
  13. </body>
  14. </html>
tiles-image-property-in-html.png
CSS top Property example
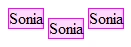
The CSS top property is used to offset an element's top position. It moves the element downward and the position property of the element determines the behavior of the placement it gets.
  1. <style type="text/css">
  2. span.allSpans
  3. {
  4. background: #FFD7FF;
  5. border: #F0F 1px solid;
  6. }
  7. #mySpan
  8. {
  9. top: 10px;
  10. position: relative;
  11. }
  12. </style>
  13. <span class="allSpans">my span content</span> <span class="allSpans" id="mySpan">my
  14. span content</span> <span class="allSpans">my span content</span>
top-property-in-html.png
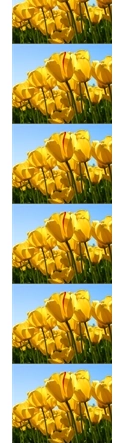
CSS Background Image Strip that repeats vertically
  1. <html>
  2. <head>
  3. <title>CSS</title>
  4. <style type="text/css">
  5. body
  6. {
  7. background-image: url(4113.jpg);
  8. background-position: center;
  9. background-repeat: repeat-y;
  10. background-attachment: scroll;
  11. }
  12. </style>
  13. </head>
  14. <body>
  15. sonia
  16. </body>
  17. </html>
vertical-image-repetition-property-in-html.png
CSS z-index Property example
The CSS z-index property is used to layer elements by specifying their z-axis hierarchy number in the stack order of elements. Higher indexes stack on top of lower indexes.
The effect is only seen on containers that are positioned in such a way that they overlap or cover one another.
  1. <style type="text/css">
  2. #container
  3. {
  4. border: #999 1px dashed;
  5. height: 100px;
  6. }
  7. #container div
  8. {
  9. position: absolute;
  10. background: #FFD5FF;
  11. border: #F0F 1px solid;
  12. padding: 10px;
  13. text-align: center;
  14. width: 20px;
  15. height: 20px;
  16. }
  17. #div1
  18. {
  19. z-index: 3;
  20. top: 20px;
  21. left: 20px;
  22. }
  23. #div2
  24. {
  25. z-index: 2;
  26. top: 40px;
  27. left: 40px;
  28. }
  29. #div3
  30. {
  31. z-index: 1;
  32. top: 60px;
  33. left: 60px;
  34. }
  35. </style>
  36. <div id="container">
  37. <div id="div1">
  38. A</div>
  39. <div id="div2">
  40. B</div>
  41. <div id="div3">
  42. C</div>
  43. </div>
z-ibdex-property-in-html.png

Summary

Through this article you are able to design web pages.