

For this demo, I am going to use Visual Studio 2012 and SQL Server.
Database Part
Let’s start with the database part first.
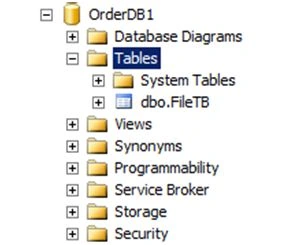
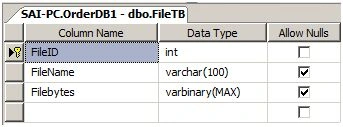
I already have a database with the name OrderDB1, and inside that I have a table with the name FileTB.
It has two columns; one is File Name, and another one is Filebytes. Filename will store the name of the file, and Filebytes will store bytes of images.
Below is a snapshot of the OrderDB1 database.
Below is a snapshot of FileTB table.
After completing it by adding the table in the database, now let’s move forward and create a new project in MVC for inserting data and displaying inserted data WebGrid.
Creating an MVC application
From Visual studio IDE select File Menu right at the top; inside that select New, then click on Project.
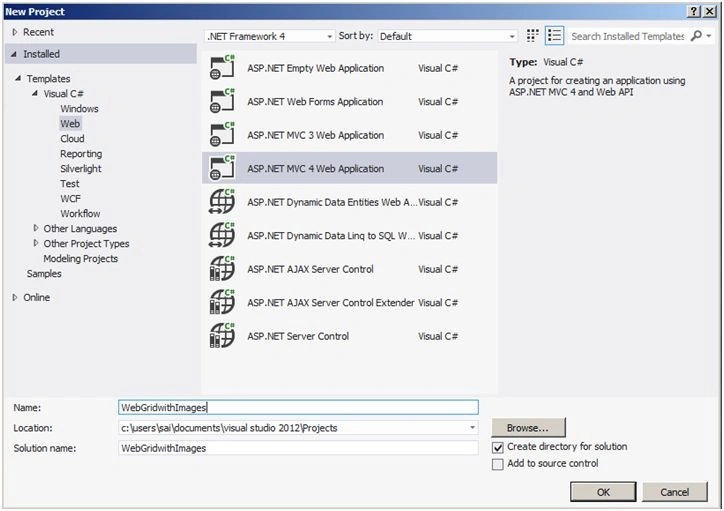
After clicking on Project, a New Project Wizard will pop up.
Inside that select Templates, then Visual C#; inside this select Web. After selecting you will see various Project Templates (Webforms , MVC , ASP.NET AJAX Server control) in this select “ ASP.NET MVC 4 Web Application,” after selecting, just name your Project “WebGridwithImages” and finally click on the OK button to create the project.
Selecting Templates
After clicking on the Ok button to create a project a new dialog will pop up with the name “New ASP.NET MVC 4 Project”. In this project template just select Basic Template and then in View Engine select Razor and click the Ok button.
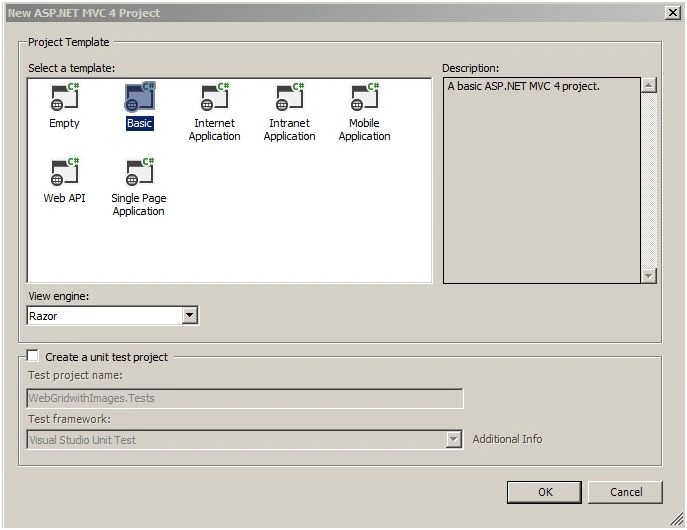
Wait for some tim -- it requires some seconds for configuringa solution for you.
After creating the project, here is your project ready for you.
It containsa whole lot of MVC folder structure and other script and .css styles.
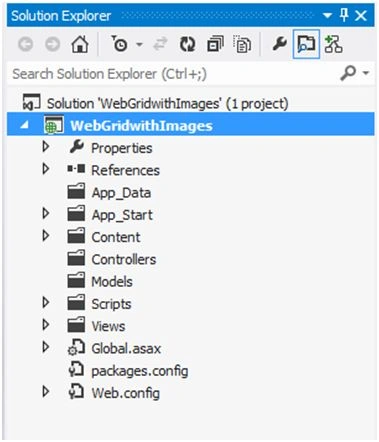
After successfully creating the application now let’s add ADO.NET Entity Data Model for inserting and retrieving data from the database.
Adding ADO.NET Entity Data Model
For adding ADO.NET Entity Data Model just right click on Models folder and from list select Add, then select ADO.NET Entity Data Model.
Model - Add, then ADO.NET Entity Data Model.
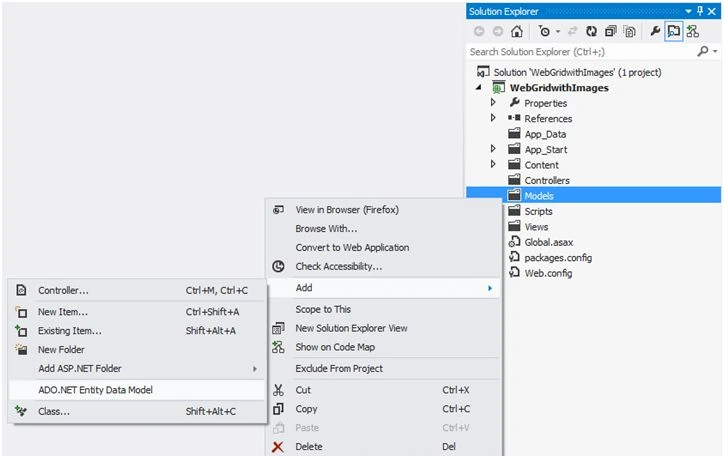
After selecting, a new dialog will pop up with the name “Specify Name for Item.” I have entered name MvcOrderDb. You can specify as per your requirement and then click on the Ok button.
After that a new Wizard will pop up.
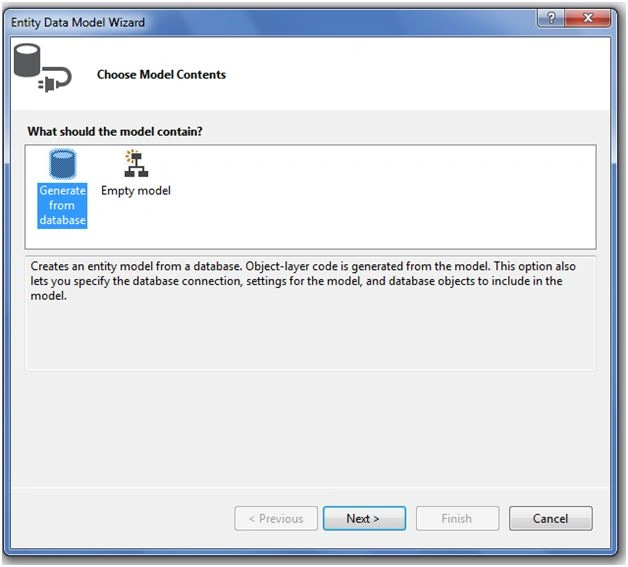
From that select Generate from database and click the Next button.
After clicking the Next button a New Wizard will pop up for Choosing Data Connection.
Choosing Data Connection:
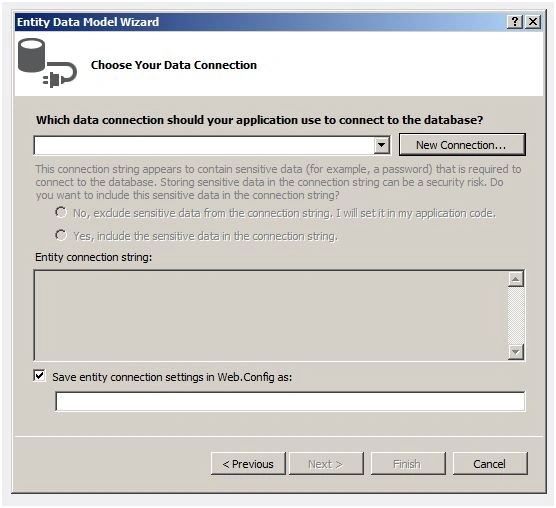
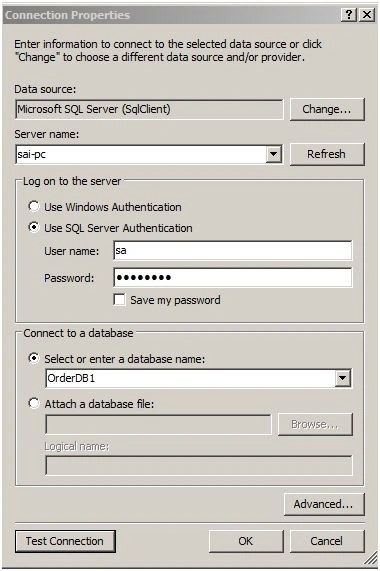
After clicking on New Connection a new dialog of Connection Properties will pop up.
Let’s configure it.
In Server Name you need to add your SQL Server Name.
Using SQL Server Authentication you need to enter User name and Password of Sql server.
Lastly I am going to select Database Name: OrderDB1.
Click on the OK button.
After adding, the Entity Data Model Wizard will look like the following screenshot:
Selecting database objects
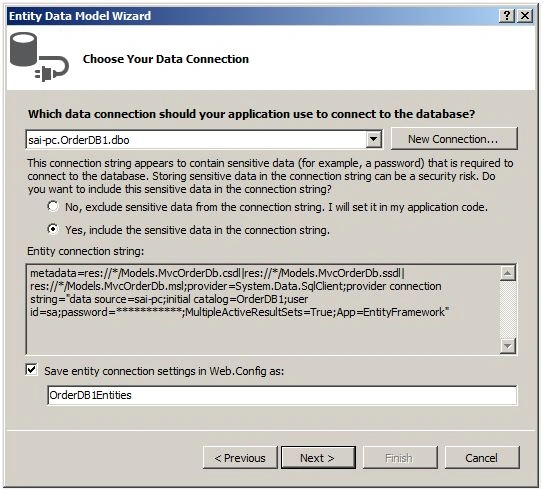
Now click on Next button.
A new wizard will pop up for selecting database object and in this you will see the entire table which we have created in the database. But for this demo we are going to need only one table, FileTB.
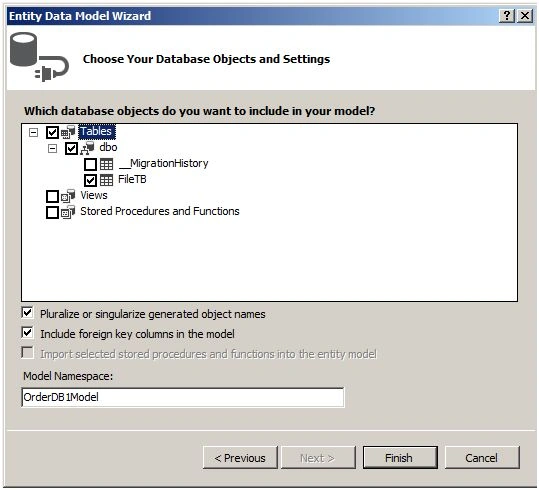
At lastly click on the Finish button.
Here is the screenshot after adding ADO.NET Entity Data Model.
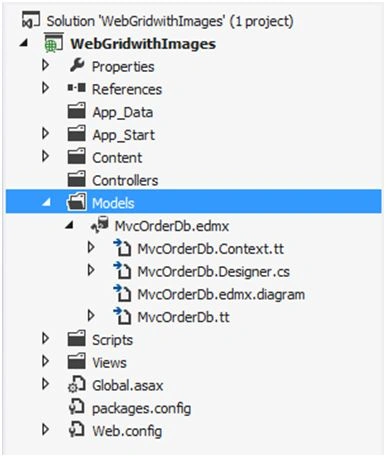
After adding ADO.NET Model now let us add Controller and Action Method.
Adding Default1 Controller
For adding Default1Controller just right click on the Controllers folder, inside that, select Add and then select Controller.
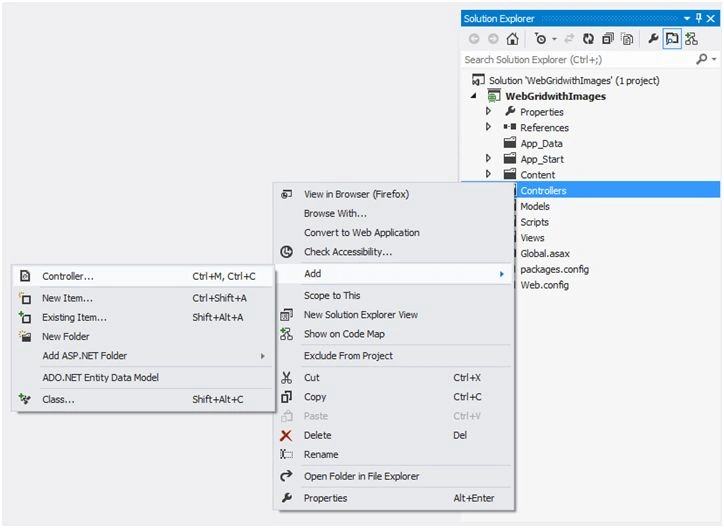
After clicking on Controller a new dialog will pop up withthe name Add Controller.
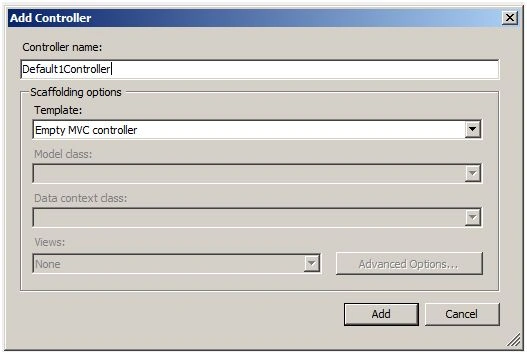
In this dialog, to add Controller we are not going to make any change, just click on the Add button to add a Controller with the default name “Default1Controller”.
Code snippet of Default1Controller when added for the first time
- using System;
- using System.Collections.Generic;
- using System.Linq;
- using System.Web;
- using System.Web.Mvc;
- namespace WebGridwithImages.Controllers
- {
- public class Default1Controller : Controller
- {
- //
- // GET: /Default1/
- public ActionResult Index()
- {
- return View();
- }
- }
- }
We are going to add two Action Methods with name UploadImages().
Adding 2 Action Method to Default1Controller
- [HttpGet]
- public ActionResult UploadImages()
- {
- return View();
- }
- [HttpPost]
- public ActionResult UploadImages(HttpPostedFileBase uploadFile)
- {
- return View();
- }
- using System;
- using System.Collections.Generic;
- using System.IO;
- using System.Linq;
- using System.Web;
- using System.Web.Mvc;
- using WebGridwithImages.Models;
- namespace WebGridwithImages.Controllers
- {
- public class Default1Controller : Controller
- {
- public ActionResult Index()
- {
- return View();
- }
- [HttpGet]
- public ActionResult UploadImages()
- {
- return View();
- }
- [HttpPost]
- public ActionResult UploadImages(HttpPostedFileBase uploadFile)
- {
- OrderDB1Entities ODB = new OrderDB1Entities(); // DbContext
- FileTB objfiletb = new FileTB(); // object of table
- HttpPostedFileBase httpobj = Request.Files["file"];
- string[] Filename =httpobj.FileName.Split('.'); //Spliting Image Name to Get FileName
- objfiletb.FileID = 0;
- objfiletb.FileName = Filename[0];
- using (Stream inputStream = Request.Files[0].InputStream) //File Stream which is Uploaded
- {
- MemoryStream memoryStream = inputStream as MemoryStream;
- if (memoryStream == null)
- {
- memoryStream = new MemoryStream();
- inputStream.CopyTo(memoryStream);
- }
- objfiletb.Filebytes = memoryStream.ToArray();
- }
- ODB.FileTBs.Add(objfiletb);
- ODB.SaveChanges(); //Inserting Image and details in Database
- return View();
- }
- }
- }
In UploadImages Post Request we are going to create an object of DBcontext class [OrderDB1Entities] which is required for Inserting data.
This DBcontext class is located in ADO.NET Entity Data Model files which we have added earlier [MvcOrderDb.edmx].
After that we are going to Create Object of [FileTB] Class; that is your Model. We are going to Assign Values to this Model and then Pass it to FileTBs DbSet [ ODB.FileTBs.Add(objfiletb); ] after assigning value to the model, to save data finally call ODB.SaveChanges(); //Inserting Image and details in Database.
Adding View [UploadImages]
After adding Controller and Action Method now let’s add View to this Action Method [UploadImages].
For adding View, from just right inside UploadImages Action Method from List select Add View; after selecting Add View a new dialog of Add View will pop up.
If view is the same name as that of Action Method we are not going to make a change to it. After that we are going select View engine -- that’s Razor. Then we are going to create a strongly typed View -- for that select Model FileTB, and in Scaffold template we are going to select Empty template. If you want layout then check the given option. Finally , click on the Add button. This view will get added in the View folder; inside that there will a folder with the name of controller Default1 and inside that, this view will be placed.
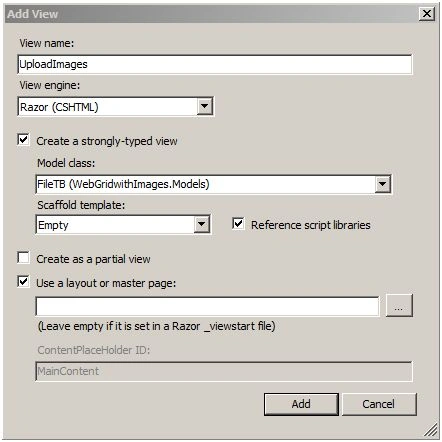
Locating View
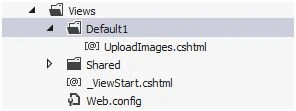
After adding view now let us begin with Add control for file upload and button to submit this file to the server.
Complete code snippet of UploadImages View.
In this view I have added a file upload control and a button control.
- @model WebGridwithImages.Models.FileTB
- @{
- ViewBag.Title = "UploadImages";
- }
- <link href="~/bootstrap-3.3.6-dist/css/bootstrap.min.css" rel="stylesheet" />
- <script src="~/Scripts/jquery-1.9.1.js"></script>
- <script src="~/bootstrap-3.3.6-dist/js/bootstrap.js"></script>
- @using (Html.BeginForm("UploadImages", "Default1", FormMethod.Post, new { enctype = "multipart/form-data", @class = "form-horizontal", role = "form" }))
- {
- <div class="container" >
- <h3>UploadImages</h3>
- <div class="form-group">
- <label for="file">Filename:</label>
- <input type="file" name="file" id="file" />
- </div>
- <div class="form-group">
- <button type="submit" class="btn btn-default">Submit</button>
- </div>
- </div>
- }
The enctype='multipart/form-data is an encoding type that allows files to be sent through a POST.
Quite simply, without this encoding the files cannot be sent through POST.
If you want to allow a user to upload a file via a form, you must use this enctype.
Now just save and run your Application Add Images to database.
UploadImages View for Inserting Images.
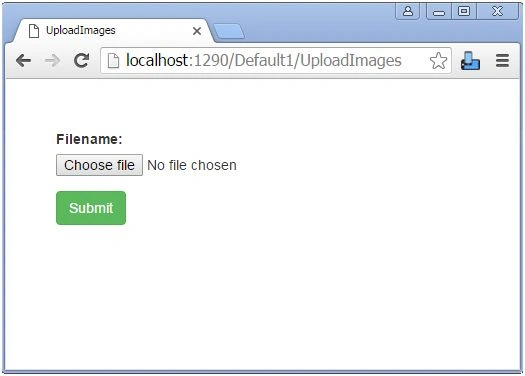
After inserting few images in database.
FileTB snapshot after inserting Images
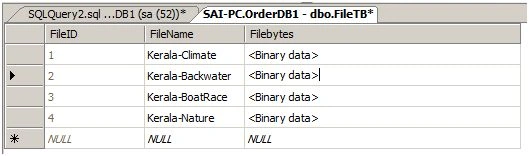
Now we have come to final main topic where we want to display images in WebGrid, which is stored in binary format in the database.
Adding New Action Method Show Images in Default1Controller
To display images in WebGrid we are going to add a new Action Method with the name ShowImages.
The ShowImages Action Method going to return a list of image names and binary data to display on View.
- [HttpGet]
- public ActionResult ShowImages()
- {
- OrderDB1Entities ODB = new OrderDB1Entities(); //DBcontext class
- var listofpic = ODB.FileTBs.ToList(); // Get List of images stored in FileTB table
- return View(listofpic);
- }
For adding View just right inside ShowImages Action Method and from list select Add View. After selecting Add View a new dialog of Add View will pop up.
If view is the same name as that of Action Method we are not going to make a change to it. After that we are going select View engine -- that’s Razor. Then we are going to create a strongly typed View -- for that we are going to select Model [FileTB] and in Scaffold template we are going to select Empty template.
If you want layout then check the given option. Finally, click on the Add button. This view will get added in View Folder, inside that, there will a folder with the name of controller Default1, inside that this view will be placed.
Adding View [ShowImages]
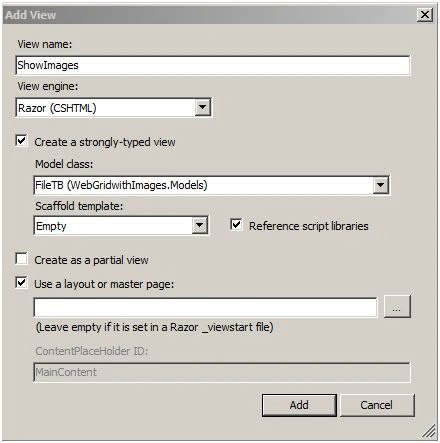
After adding View we are going to add some script of Bootstrap and WebGrid to display data.
Adding .css and Script Reference to [ShowImages] View
Let’s start with adding script and .css first.
- <div style="margin-left: 50px; margin-right: 50px; margin-top: 50px;">
- @{
- var grid = new WebGrid(Model, canPage: true, rowsPerPage: 5);
- grid.Pager(WebGridPagerModes.All);
- }
- @grid.GetHtml(
- htmlAttributes: new { id = "gridMapping" },
- tableStyle: "table table-bordered",
- headerStyle: "info",
- footerStyle: "webgrid-footer",
- alternatingRowStyle: "webgrid-alternating-row",
- selectedRowStyle: "webgrid-selected-row",
- rowStyle: "gridrow",
- columns: grid.Columns
- (
- grid.Column("FileName", "FileName", null, style: "name"),
- grid.Column(header: "Images", format:
- @<text>
- <img id="imagebtn"
- onclick="ZoomImage('data:image/jpg;base64,@(Convert.ToBase64String(item.Filebytes))')"
- src="data:image/jpg;base64,@(Convert.ToBase64String(item.Filebytes))"
- width="70px"
- height="70px"
- alt="@item.FileName" />
- </text>, style: "Imagepix"))
- )
- </div>
Code snippet of WebGrid which display Images on [ShowImages] View
- <div style="margin-left: 50px; margin-right: 50px; margin-top: 50px;">
- @{
- var grid = new WebGrid(Model, canPage: true, rowsPerPage: 5);
- grid.Pager(WebGridPagerModes.All);
- }
- @grid.GetHtml(
- htmlAttributes: new { id = "gridMapping" },
- tableStyle: "table table-bordered",
- headerStyle: "info",
- footerStyle: "webgrid-footer",
- alternatingRowStyle: "webgrid-alternating-row",
- selectedRowStyle: "webgrid-selected-row",
- rowStyle: "gridrow",
- columns: grid.Columns
- (
- grid.Column("FileName", "FileName", null, style: "name"),
- grid.Column(header: "Images", format:
- @<text>
- <img id="imagebtn"
- onclick="ZoomImage('data:image/jpg;base64,@(Convert.ToBase64String(item.Filebytes))')"
- src="data:image/jpg;base64,@(Convert.ToBase64String(item.Filebytes))"
- width="70px"
- height="70px"
- alt="@item.FileName" />
- </text>, style: "Imagepix"))
- )
- </div>
For displaying those [byte[]] we have to convert it to base 64 string as in the following:
- [@(Convert.ToBase64String(item.Filebytes))]
- @<text>
- <img id="imagebtn"
- onclick="ZoomImage('data:image/jpg;base64,@(Convert.ToBase64String(item.Filebytes))')"
- src="data:image/jpg;base64,@(Convert.ToBase64String(item.Filebytes))"
- width="70px"
- height="70px"
- alt="@item.FileName" />
- </text>,
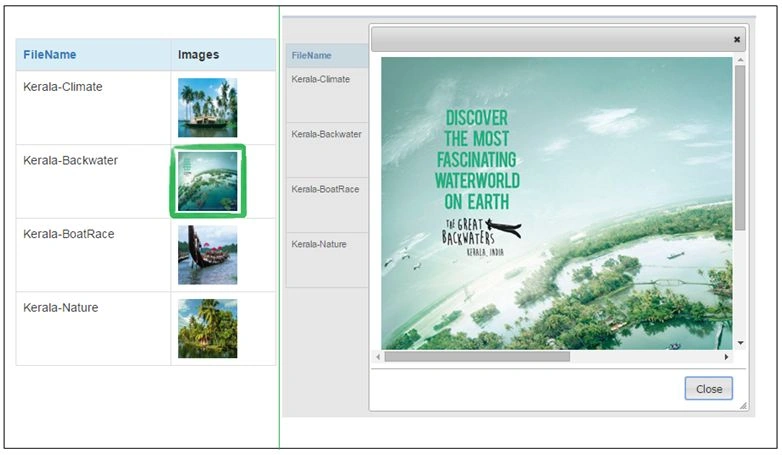
ShowImages View for Displaying Images in WebGrid
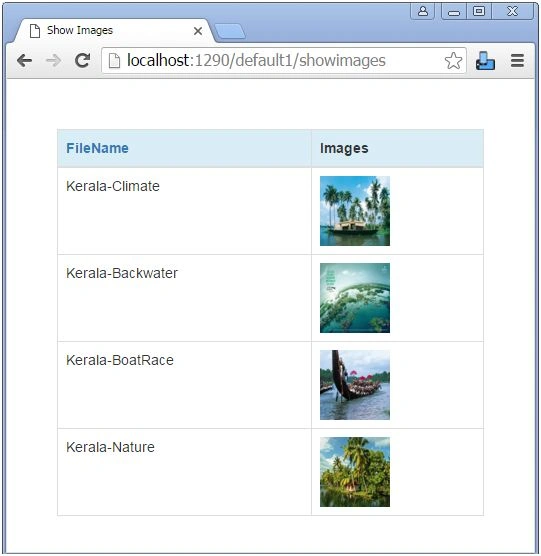
We have finally displayed images in WebGrid, but the images are too small to view.
Let’s display large Images as we click on the Image displayed in WebGrid.
Adding code snippet of JavaScript function for displaying large images on click of image
For that, I am going add JavaScript code, which will take the image as input and display that Image in a Large Popup.
This function will get called when we are going to click on the image.
- <script type="text/javascript">
- function ZoomImage(image) {
- document.getElementById("main").src = image;
- $("#popupdiv").dialog({
- width: 600,
- height: 600,
- modal: true,
- buttons: {
- Close: function () {
- $(this).dialog('close');
- }
- }
- });
- }
- </script>
Calling JavaScript function of ZoomImage on click of Image
- <img id="imagebtn"
- onclick="ZoomImage('data:image/jpg;base64,@(Convert.ToBase64String(item.Filebytes))')"
- src="data:image/jpg;base64,@(Convert.ToBase64String(item.Filebytes))"
- width="70px"
- height="70px"
- alt="@item.FileName" />
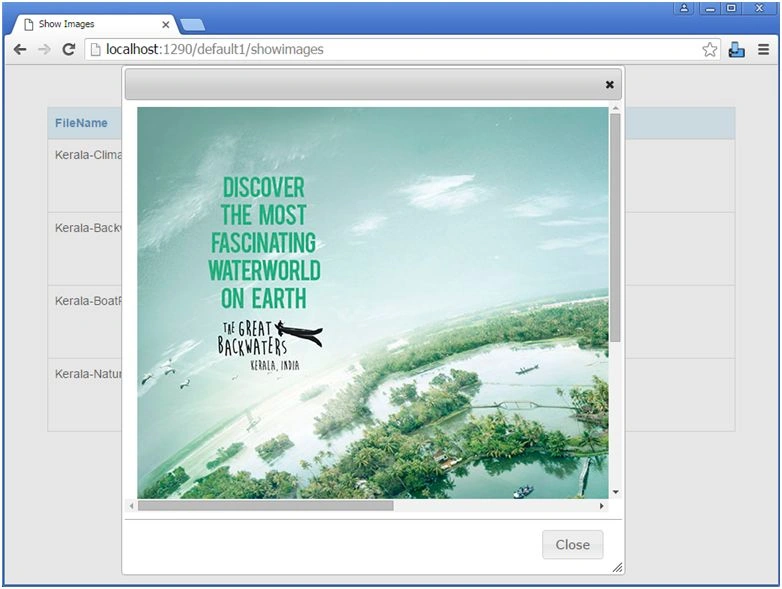
Popup which is displayed when we click on image
- <div id="popupdiv" style="display: none">
- <img id="main" src="images/main.jpg">
- </div>
Code snippet of ShowImages.cshtml
- @model List<WebGridwithImages.Models.FileTB>
- @{
- ViewBag.Title = "Show Images";
- Layout = null;
- }
- <!DOCTYPE html>
- <html>
- <head>
- <meta name="viewport" content="width=device-width" />
- <title>Show Images</title>
- <link href="~/bootstrap-3.3.6-dist/css/bootstrap.min.css" rel="stylesheet" />
- <script src="~/Scripts/jquery-1.9.1.js"></script>
- <script src="~/bootstrap-3.3.6-dist/js/bootstrap.js"></script>
- <link href="~/Content/themes/base/jquery-ui.css" rel="stylesheet" />
- <script src="~/Scripts/jquery-1.8.2.js"></script>
- <script src="~/Scripts/jquery-ui-1.8.24.js"></script>
- <script type="text/javascript">
- function ZoomImage(image) {
- document.getElementById("main").src = image;
- $("#popupdiv").dialog({
- width: 600,
- height: 600,
- modal: true,
- buttons: {
- Close: function () {
- $(this).dialog('close');
- }
- }
- });
- }
- </script>
- </head>
- <body>
- <div style="margin-left: 50px; margin-right: 50px; margin-top: 50px;">
- @{
- var grid = new WebGrid(Model, canPage: true, rowsPerPage: 5);
- grid.Pager(WebGridPagerModes.All);
- }
- @grid.GetHtml(
- htmlAttributes: new { id = "gridMapping" },
- tableStyle: "table table-bordered",
- headerStyle: "info",
- footerStyle: "info",
- alternatingRowStyle: "webgrid-alternating-row",
- selectedRowStyle: "webgrid-selected-row",
- rowStyle: "gridrow",
- columns: grid.Columns
- (
- grid.Column("FileName", "FileName", null, style: "name"),
- grid.Column(header: "Images", format:
- @<text>
- <img id="imagebtn"
- onclick="ZoomImage('data:image/jpg;base64,@(Convert.ToBase64String(item.Filebytes))')"
- src="data:image/jpg;base64,@(Convert.ToBase64String(item.Filebytes))"
- width="70px"
- height="70px"
- alt="@item.FileName" />
- </text>, style: "Imagepix"))
- )
- </div>
- <div id="popupdiv" style="display: none">
- <img id="main" src="images/main.jpg">
- </div>
- </body>
- </html>
- using System;
- using System.Collections.Generic;
- using System.IO;
- using System.Linq;
- using System.Web;
- using System.Web.Mvc;
- using WebGridwithImages.Models;
- namespace WebGridwithImages.Controllers
- {
- public class Default1Controller: Controller
- {
- public ActionResult Index()
- {
- return View();
- }
- [HttpGet]
- public ActionResult UploadImages()
- {
- return View();
- }
- [HttpPost]
- public ActionResult UploadImages(HttpPostedFileBase uploadFile)
- {
- try
- {
- OrderDB1Entities ODB = new OrderDB1Entities(); // DbContext
- FileTB objfiletb = new FileTB(); // object of table
- HttpPostedFileBase httpobj = Request.Files["file"];
- string[] Filename = httpobj.FileName.Split('.'); //Spliting Image Name to Get FileName
- objfiletb.FileID = 0;
- objfiletb.FileName = Filename[0];
- using(Stream inputStream = Request.Files[0].InputStream) //File Stream which is Uploaded
- {
- MemoryStream memoryStream = inputStream as MemoryStream;
- if (memoryStream == null)
- {
- memoryStream = new MemoryStream();
- inputStream.CopyTo(memoryStream);
- }
- objfiletb.Filebytes = memoryStream.ToArray();
- }
- ODB.FileTBs.Add(objfiletb);
- ODB.SaveChanges(); //Inserting Image in Database
- TempData["Message"] = "Data Saved Successfully";
- return View();
- }
- catch (Exception)
- {
- throw;
- }
- }
- [HttpGet]
- public ActionResult ShowImages()
- {
- OrderDB1Entities ODB = new OrderDB1Entities(); //DBcontext class
- var listofpic = ODB.FileTBs.ToList(); // Get List of images stored in FileTB table
- return View(listofpic);
- }
- }
- }
After completing with the code, save your application and run Access Action Method ShowImages().
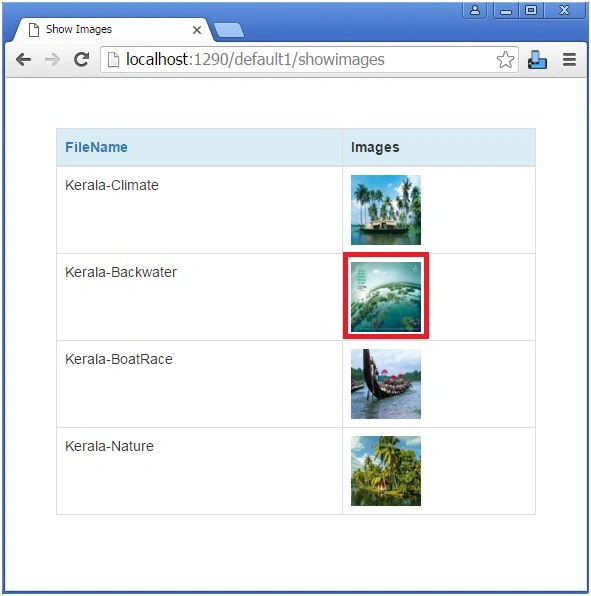
Enlarged image after clicking on image in WebGrid.
Rajesh DintakurthiPosted Apr 3, 2019, 1:14 AM
Tanks @SaineshwarBageri for this article very helpful to me I hope u have create many articles.
Jim JackPosted Jan 29, 2017, 8:45 AM
Hi thanks for this. It is very good. Can you tell me how to reduce the level of zoom please? Jim
Delpin Susai RajPosted Aug 28, 2016, 10:20 AM
Good one
Sthitaprajnya Debasis NayakPosted Feb 9, 2016, 9:54 AM
Super Article !!!
Shubham KumarPosted Feb 5, 2016, 11:54 PM
nice one
Santhakumar MunuswamyPosted Feb 5, 2016, 3:34 PM
Thanks for nice article
Hemant SrivastavaPosted Feb 5, 2016, 1:42 PM
Nice share!
Saillesh PawarPosted Feb 5, 2016, 1:15 PM
Good 1 Sai sir...
Mohammed IbrahimPosted Feb 5, 2016, 1:13 PM
nice