

A few years ago I wrote a series of articles showing how to add dynamic textboxes, dynamic dropdownlists and a combination of both controls in a GridView control. I've posted another couple of posts about how to delete rows for dynamically created rows and how to save them all at once. You can find the series of articles here: ASP.NET and Dynamic Controls.
In this article, I'm going to wrap up everything into one for easy reference. The following are the main features that you will see:
- Adding rows of TextBox and DropDownlist
- Retain TextBox values and DropDownList selected values across postbacks
- Ability to remove rows
- Save all values at once
To get started fire up Visual Studio and then add a new WebForm page. Add a GridView control to the page. Here's the GridView HTML markup:
ASPX Markup
- <asp:gridview ID="Gridview1" runat="server" ShowFooter="true"
- AutoGenerateColumns="false"
- OnRowCreated="Gridview1_RowCreated">
- <Columns>
- <asp:BoundField DataField="RowNumber" HeaderText="Row Number" />
- <asp:TemplateField HeaderText="Header 1">
- <ItemTemplate>
- <asp:TextBox ID="TextBox1" runat="server"></asp:TextBox>
- </ItemTemplate>
- </asp:TemplateField>
- <asp:TemplateField HeaderText="Header 2">
- <ItemTemplate>
- <asp:TextBox ID="TextBox2" runat="server"></asp:TextBox>
- </ItemTemplate>
- </asp:TemplateField>
- <asp:TemplateField HeaderText="Header 3">
- <ItemTemplate>
- <asp:DropDownList ID="DropDownList1" runat="server"
- AppendDataBoundItems="true">
- <asp:ListItem Value="-1">Select</asp:ListItem>
- </asp:DropDownList>
- </ItemTemplate>
- </asp:TemplateField>
- <asp:TemplateField HeaderText="Header 4">
- <ItemTemplate>
- <asp:DropDownList ID="DropDownList2" runat="server"
- AppendDataBoundItems="true">
- <asp:ListItem Value="-1">Select</asp:ListItem>
- </asp:DropDownList>
- </ItemTemplate>
- <FooterStyle HorizontalAlign="Right" />
- <FooterTemplate>
- <asp:Button ID="ButtonAdd" runat="server"
- Text="Add New Row"
- onclick="ButtonAdd_Click" />
- </FooterTemplate>
- </asp:TemplateField>
- <asp:TemplateField>
- <ItemTemplate>
- <asp:LinkButton ID="LinkButton1" runat="server"
- onclick="LinkButton1_Click">Remove</asp:LinkButton>
- </ItemTemplate>
- </asp:TemplateField>
- </Columns>
- </asp:gridview>
As you can see from the markup above, I have setup a BoundField for displaying the RowNumber and some TemplateField columns so that the GridView will automatically generate a row of TextBoxes and DropDownLists when adding a new row. You will also see that I have added a Button Control under the FooterTemplate at the last dropdownlist column and a LinkButton at the last column in the GridView for removing rows.
Note: Since we added a control at the GridView footer, then be sure to set ShowFooter to TRUE in the GridView.
CODE BEHIND
Just for the simplicity of the demo, I'm creating a dummy data using ArrayList as the data source for our DropDownLists. In a real scenario you may query your database and bind it to your DropDownList. Here is the full code:
- using System;
- using System.Collections;
- using System.Data;
- using System.Web.UI;
- using System.Web.UI.WebControls;
- namespace WebFormsDemo
- {
- public partial class DynamicGrid : System.Web.UI.Page
- {
- private ArrayList GetDummyData() {
- ArrayList arr = new ArrayList();
- arr.Add(new ListItem("Item1", "1"));
- arr.Add(new ListItem("Item2", "2"));
- arr.Add(new ListItem("Item3", "3"));
- arr.Add(new ListItem("Item4", "4"));
- arr.Add(new ListItem("Item5", "5"));
- return arr;
- }
- private void FillDropDownList(DropDownList ddl) {
- ArrayList arr = GetDummyData();
- foreach (ListItem item in arr) {
- ddl.Items.Add(item);
- }
- }
- private void SetInitialRow() {
- DataTable dt = new DataTable();
- DataRow dr = null;
- dt.Columns.Add(new DataColumn("RowNumber", typeof(string)));
- dt.Columns.Add(new DataColumn("Column1", typeof(string)));//for TextBox value
- dt.Columns.Add(new DataColumn("Column2", typeof(string)));//for TextBox value
- dt.Columns.Add(new DataColumn("Column3", typeof(string)));//for DropDownList selected item
- dt.Columns.Add(new DataColumn("Column4", typeof(string)));//for DropDownList selected item
- dr = dt.NewRow();
- dr["RowNumber"] = 1;
- dr["Column1"] = string.Empty;
- dr["Column2"] = string.Empty;
- dt.Rows.Add(dr);
- //Store the DataTable in ViewState for future reference
- ViewState["CurrentTable"] = dt;
- //Bind the Gridview
- Gridview1.DataSource = dt;
- Gridview1.DataBind();
- //After binding the gridview, we can then extract and fill the DropDownList with Data
- DropDownList ddl1 = (DropDownList)Gridview1.Rows[0].Cells[3].FindControl("DropDownList1");
- DropDownList ddl2 = (DropDownList)Gridview1.Rows[0].Cells[4].FindControl("DropDownList2");
- FillDropDownList(ddl1);
- FillDropDownList(ddl2);
- }
- private void AddNewRowToGrid() {
- if (ViewState["CurrentTable"] != null) {
- DataTable dtCurrentTable = (DataTable)ViewState["CurrentTable"];
- DataRow drCurrentRow = null;
- if (dtCurrentTable.Rows.Count > 0) {
- drCurrentRow = dtCurrentTable.NewRow();
- drCurrentRow["RowNumber"] = dtCurrentTable.Rows.Count + 1;
- //add new row to DataTable
- dtCurrentTable.Rows.Add(drCurrentRow);
- //Store the current data to ViewState for future reference
- ViewState["CurrentTable"] = dtCurrentTable;
- for (int i = 0; i < dtCurrentTable.Rows.Count - 1; i++) {
- //extract the TextBox values
- TextBox box1 = (TextBox)Gridview1.Rows[i].Cells[1].FindControl("TextBox1");
- TextBox box2 = (TextBox)Gridview1.Rows[i].Cells[2].FindControl("TextBox2");
- dtCurrentTable.Rows[i]["Column1"] = box1.Text;
- dtCurrentTable.Rows[i]["Column2"] = box2.Text;
- //extract the DropDownList Selected Items
- DropDownList ddl1 = (DropDownList)Gridview1.Rows[i].Cells[3].FindControl("DropDownList1");
- DropDownList ddl2 = (DropDownList)Gridview1.Rows[i].Cells[4].FindControl("DropDownList2");
- // Update the DataRow with the DDL Selected Items
- dtCurrentTable.Rows[i]["Column3"] = ddl1.SelectedItem.Text;
- dtCurrentTable.Rows[i]["Column4"] = ddl2.SelectedItem.Text;
- }
- //Rebind the Grid with the current data to reflect changes
- Gridview1.DataSource = dtCurrentTable;
- Gridview1.DataBind();
- }
- }
- else {
- Response.Write("ViewState is null");
- }
- //Set Previous Data on Postbacks
- SetPreviousData();
- }
- private void SetPreviousData() {
- int rowIndex = 0;
- if (ViewState["CurrentTable"] != null) {
- DataTable dt = (DataTable)ViewState["CurrentTable"];
- if (dt.Rows.Count > 0) {
- for (int i = 0; i < dt.Rows.Count; i++) {
- TextBox box1 = (TextBox)Gridview1.Rows[i].Cells[1].FindControl("TextBox1");
- TextBox box2 = (TextBox)Gridview1.Rows[i].Cells[2].FindControl("TextBox2");
- DropDownList ddl1 = (DropDownList)Gridview1.Rows[rowIndex].Cells[3].FindControl("DropDownList1");
- DropDownList ddl2 = (DropDownList)Gridview1.Rows[rowIndex].Cells[4].FindControl("DropDownList2");
- //Fill the DropDownList with Data
- FillDropDownList(ddl1);
- FillDropDownList(ddl2);
- if (i < dt.Rows.Count - 1) {
- //Assign the value from DataTable to the TextBox
- box1.Text = dt.Rows[i]["Column1"].ToString();
- box2.Text = dt.Rows[i]["Column2"].ToString();
- //Set the Previous Selected Items on Each DropDownList on Postbacks
- ddl1.ClearSelection();
- ddl1.Items.FindByText(dt.Rows[i]["Column3"].ToString()).Selected = true;
- ddl2.ClearSelection();
- ddl2.Items.FindByText(dt.Rows[i]["Column4"].ToString()).Selected = true;
- }
- rowIndex++;
- }
- }
- }
- }
- protected void Page_Load(object sender, EventArgs e) {
- if (!Page.IsPostBack) {
- SetInitialRow();
- }
- }
- protected void ButtonAdd_Click(object sender, EventArgs e) {
- AddNewRowToGrid();
- }
- protected void Gridview1_RowCreated(object sender, GridViewRowEventArgs e) {
- if (e.Row.RowType == DataControlRowType.DataRow) {
- DataTable dt = (DataTable)ViewState["CurrentTable"];
- LinkButton lb = (LinkButton)e.Row.FindControl("LinkButton1");
- if (lb != null) {
- if (dt.Rows.Count > 1) {
- if (e.Row.RowIndex == dt.Rows.Count - 1) {
- lb.Visible = false;
- }
- }
- else {
- lb.Visible = false;
- }
- }
- }
- }
- protected void LinkButton1_Click(object sender, EventArgs e) {
- LinkButton lb = (LinkButton)sender;
- GridViewRow gvRow = (GridViewRow)lb.NamingContainer;
- int rowID = gvRow.RowIndex;
- if (ViewState["CurrentTable"] != null) {
- DataTable dt = (DataTable)ViewState["CurrentTable"];
- if (dt.Rows.Count > 1) {
- if (gvRow.RowIndex < dt.Rows.Count - 1) {
- //Remove the Selected Row data and reset row number
- dt.Rows.Remove(dt.Rows[rowID]);
- ResetRowID(dt);
- }
- }
- //Store the current data in ViewState for future reference
- ViewState["CurrentTable"] = dt;
- //Re bind the GridView for the updated data
- Gridview1.DataSource = dt;
- Gridview1.DataBind();
- }
- //Set Previous Data on Postbacks
- SetPreviousData();
- }
- private void ResetRowID(DataTable dt) {
- int rowNumber = 1;
- if (dt.Rows.Count > 0) {
- foreach (DataRow row in dt.Rows) {
- row[0] = rowNumber;
- rowNumber++;
- }
- }
- }
- }
- }
Method Definitions
- GetDummyData(): A method that returns an ArrayList. Basically this method contains a static dummy data for populating the DropDownList. You may want to use a database when dealing with real world scenarios.
- FillDropDownList(DropDownList ddl): A method that fills the DropDownList with the dummy data.
- SetInitialRow(): A method that binds the GridView on initial load with a single row of data. The DataTable defined in this method is stored in ViewState so that it can be referenced anywhere in the code across postbacks. Basically this table will serve as the original DataSource for the GridView. Keep in mind that this is just for demo, so be careful when using ViewState to avoid page performance issue. Also ViewState has a limit when it comes to size so make sure that you don't store a huge amount of data in it.
- AddNewRowToGrid(): A method that adds a new row to the GridView when a Button is clicked and store the newly added row values in the Original Table that was defined in the SetInitialRow() method.
- SetPreviousData(): A method that retains all the items that was selected from the DropDownList and TextBox when it postbacks.
- ResetRowID(): A method that refreshes the grid's row number when a row is deleted.
The Events
- ButtonAdd_ Click: Calls then AddNewRowToGrid() method.
- LinkButto1_Click: This method will be invoked once the “remove” link is clicked from the grid. This is where the data from the data source will be remove based on the row index , reset the row number afterwards and finally store the updated data source in ViewState again and bind it to the grid to reflect the changes.
- Gridview1_RowCreated: This is where we put the basic validation in GridView for not allowing users to see the “remove” button in the last row.
The Output
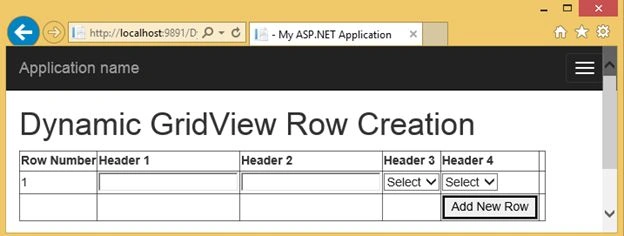
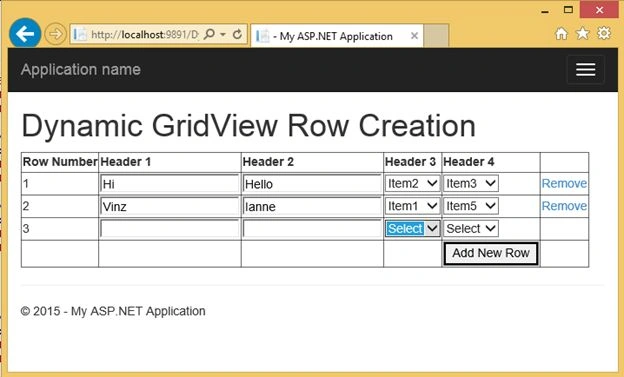
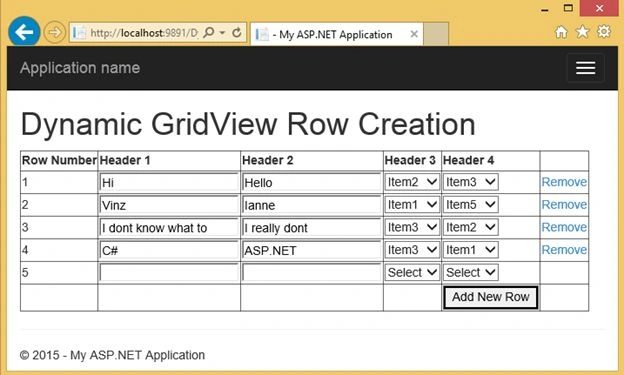
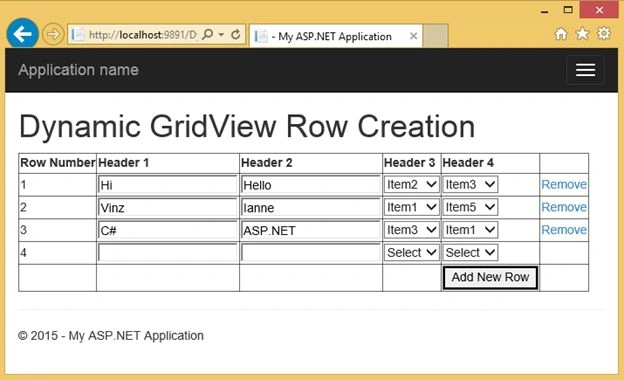
Running the page will display something like this in the browser.
On Initial load:
After adding a new row:
Removing a row:
After removing a row:
That's it! Now the next thing that you guys might be asking is how to save the data in the database. Well, don't worry, because in the next step I'm going to show you how.
Saving All Data at Once
The first thing to do is you need to create a database and a table for storing the data. So fire up SQL Management Studio or the Express version of SQL Server and create the table below with the following fields.
Save the table to whatever you like but for this demo I named the table as “GridViewDynamicRow”.
Note: I set the RowID to auto increment so that the id will be automatically generated for every new added row in the table. To do this select the Column name “RowID” and in the column properties set the “Identity Specification” to yes.
Once you've created the table then switch back to Visual Studio and add a Button control to the form.
For example:
- <asp:Button ID="BtnSave" runat="server" Text="Save All" OnClick="BtnSave_Click" />
Now let's create the method for saving the data to the database. The first thing we need here is to set up the connection string so that we can communicate with our database from our code. For this example we will use the web.config file for setting up the connection string. See the markup below:
- <connectionStrings>
- <add name="DBConnection" connectionString="Data Source=win- ehm93ap21cf\SQLEXPRESS;Initial Catalog=DemoDB;Integrated Security=SSPI;" providerName="System.Data.SqlClient"/>
- </connectionStrings>
We can now proceed to creating the method for saving the data to the database. First, add the following namespaces below:
- using System.Collections.Specialized;
- using System.Text;
- using System.Data.SqlClient;
We need to declare the namespaces above so that we can use the SqlClient, StrngCollections and StringBuilder built-in methods in our code later.
Second, create the method for calling the connection string that was setup from the web.config file.
- private string GetConnectionString()
- {
- return ConfigurationManager.ConnectionStrings["DBConnection"].ConnectionString;
- }
And here's the code block for inserting all the rows into our database:
- private void InsertRecords(StringCollection sc)
- {
- StringBuilder sb = new StringBuilder(string.Empty);
- string[] splitItems = null;
- const string sqlStatement = "INSERT INTO GridViewDynamicData (Field1,Field2,Field3,Field4) VALUES";
- foreach(string item in sc)
- {
- if (item.Contains(","))
- {
- splitItems = item.Split(",".ToCharArray());
- sb.AppendFormat("{0}('{1}','{2}','{3}','{4}'); ", sqlStatement, splitItems[0], splitItems[1], splitItems[2], splitItems[3]);
- }
- }
- using(SqlConnection connection = new SqlConnection(GetConnectionString()))
- {
- connection.Open();
- using(SqlCommand cmd = new SqlCommand(sb.ToString(), connection))
- {
- cmd.CommandType = CommandType.Text;
- cmd.ExecuteNonQuery();
- }
- }
- lblMessage.Text = "Records successfully saved!";
- }
The InsertRecords() method takes a StringCollection object as the parameter. The StringCollection object holds all the values from the dynamic grid. We then split the values from the collection and then create a SQL query for each row using StringBuilder. Then we then make a connection to the database and then execute the query for inserting the data.
Finally, here is the code block for the Button click event:
- protected void BtnSave_Click(object sender, EventArgs e)
- {
- int rowIndex = 0;
- StringCollection sc = new StringCollection();
- if (ViewState["CurrentTable"] != null)
- {
- DataTable dtCurrentTable = (DataTable) ViewState["CurrentTable"];
- if (dtCurrentTable.Rows.Count > 0)
- {
- for (int i = 1; i <= dtCurrentTable.Rows.Count; i++)
- {
- //extract the TextBox values
- TextBox box1 = (TextBox) Gridview1.Rows[rowIndex].Cells[1].FindControl("TextBox1");
- TextBox box2 = (TextBox) Gridview1.Rows[rowIndex].Cells[2].FindControl("TextBox2");
- DropDownList ddl1 = (DropDownList) Gridview1.Rows[rowIndex].Cells[3].FindControl("DropDownList1");
- DropDownList ddl2 = (DropDownList) Gridview1.Rows[rowIndex].Cells[4].FindControl("DropDownList2");
- //get the values from TextBox and DropDownList
- //then add it to the collections with a comma "," as the delimited values
- sc.Add(string.Format("{0},{1},{2},{3}", box1.Text, box2.Text, ddl1.SelectedItem.Text, ddl2.SelectedItem.Text));
- rowIndex++;
- }
- //Call the method for executing inserts
- InsertRecords(sc);
- }
- }
- }
The code above is pretty much straight forward. It simply loops through the data from the DataTable stored in ViewState and then add each row values in a StringCollection. After all the values are added, we then call the method InsertRecords() to actually execute the inserts to the database.
Here's the output below after clicking on the “Save All” button:
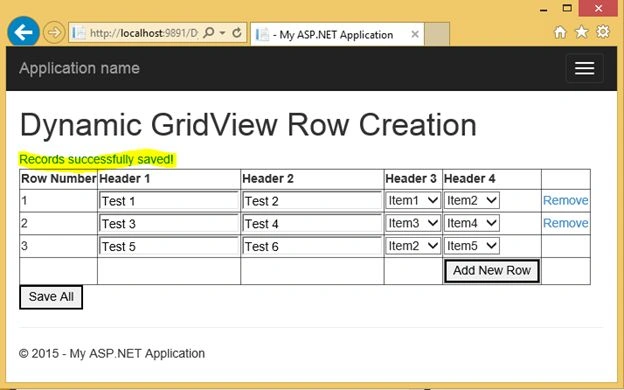
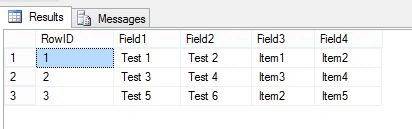
And here's the captured data stored in the database:
That's it! I hope you will find this article useful.
I have attached the project for you to download. The project is in Visual Studio 2015. Just look for the file DynamicGrid.aspx and DynamicGrid.aspx.cs to see the code.
Shivakumar HalacheriPosted Apr 26, 2023, 5:17 AM
Hi when remove row previous row data refreshing
Shujauddin BaratiPosted Jan 11, 2021, 5:11 PM
How to fill dropdownlist from sql table using select query, please advise?
Sachin MitnaPosted Oct 7, 2020, 12:47 AM
How to grand total in footer plz suggest the code
SOMRAJ CHAUHANPosted Aug 27, 2020, 3:17 AM
How to get data from database with add or remove button?
Amit MPosted May 1, 2020, 10:01 AM
First thanks for this code, need code to save multiple data in access mdb database showing The ConnectionString property has not been initialized.
Rakesh ChopadaPosted Apr 7, 2020, 1:08 AM
I have tried same example in VB.NET but Grid is not displaying ..
sridhar tjPosted Jan 29, 2019, 7:10 AM
HI dude, I have a major issue dude.. I am using selection index changed in my task...when I choose select developer in first dropdown and I choose the developer name in second dropdown. this part is working fine but when i add new row means, first dropdown selected value is goes to 0. Please help me how to fix this issue
soham jainPosted Nov 1, 2018, 1:15 PM
Hi..can u help me with a thing... i also used dropdownlist in my dynamically gridview...in my ProductName column... what i want is... after selecting Product name the price of that product automatically comes in price section TextBox using database...
Ramzanali MominPosted Oct 11, 2018, 2:19 AM
Nice Article .Please share more about Gridview control or asp.net advanced control .
Neha KhanPosted Apr 9, 2018, 11:38 AM
There are so many errors please send a correct code ... help out
SeethaParthaPosted Mar 3, 2018, 12:38 AM
Thanks for this article. Please tell How to add image like other controls (textbox, DDL) dynamically. I want to add this to every row. " TEXTBOX <IMG id="ImgLensCd" onclick="javascript:OpenItemLOV()" runat="server">"
Asfaqur RahmanPosted Jan 16, 2018, 5:38 AM
Thanks for your code...I've tried it but my dropdownlist don't work for last row of the grid . Is there any way to solve it?
kumartyrPosted May 26, 2016, 8:03 AM
Hi Vincent i posted the URL http://www.c-sharpcorner.com/forums/how-to-save-data-from-gridview-to-database
kumartyrPosted May 26, 2016, 6:56 AM
Hi Vincent... First Thanks for your code... I used your code & not able to insert only single row data but without semicolon at the end it is inserting atleast single first row data but if user enters 2 or more rows of data in gridview, it is not saving in DB instead its showing "ORA-00911: invalid character". not able to identify what is the problem.. kind help me in this problem.. To be Short i am getting above said ORA Error.
mikePosted May 12, 2016, 5:48 PM
Sorry, Here is the actual page: http://www.c-sharpcorner.com/forums/inserting-multiple-records-once-trying-to-group-with-1-id
mikePosted May 12, 2016, 5:47 PM
Hi, I posted my question here: http://www.c-sharpcorner.com/forums/technologies/database/sql
mikePosted May 12, 2016, 4:27 PM
Thanks for your reply. I figured it out. But I do have another question. Is there a way to instead of having Row count the number of rows, But maybe have the same number(Id) per group of records inserted at the same time? I'm trying to group together the multiple records that are inserted when I click save. Then have a different number(Id) when there are another group of records save and so on? Thanks for getting back to me on my first question.
mikePosted May 11, 2016, 7:11 PM
I'm using your code and it works great. But I'm using it down on the middle of my page so every time I add a new row the page refreshes and takes me to the top of the page. Is there a way to put focus on the first new text box I create?
Avinoor SinghPosted Feb 4, 2016, 3:58 AM
what do we write inside the insert query
Munawar KhanPosted Oct 19, 2015, 10:17 AM
best one
Bama Raja SegaranPosted Jul 29, 2015, 3:19 AM
How do I enable the RequiredFieldValidator only for the first row of the dynamic gridview
Khargesh RajputPosted Jun 24, 2015, 1:51 AM
nice
Shubham KumarPosted May 4, 2015, 9:52 PM
Good explain thnx for sharing
Karthik Muthu KaruppanPosted May 4, 2015, 1:58 PM
Nice one
Santhakumar MunuswamyPosted May 3, 2015, 2:09 PM
Thanks for nice article