

Introduction
- In this article, I explain about Heart Beat Pulse checking through the Arduino Mega. It can easily display the wave on a PC monitor.
- In the PC monitor, it displays the reading of the pulse.
- The wave form can be displayed in the sine wave form.
Parts Of List:
- Arduino Mega
- Easy pulsev1.1 sensor
- HRM-2511E
- Hookup wires
- PC.
Connection:
Step 1: Connection from the Easy pulsev1.1 sensor to Arduino mega.
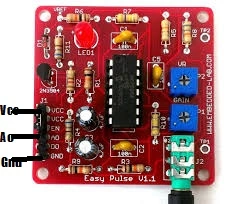
Figure1: Easy pulsev1.1
- Connect the Vcc in the Easy pulse v1.1 sensor to the Vcc of the Arduino Mega.
- Connect the Gnd in the Easy pulse v1.1 sensor to the Gnd of the Arduino Mega.
- Connect the Ao in the Easy pulse v1.1 sensor to the Ao of the Arduino Mega.
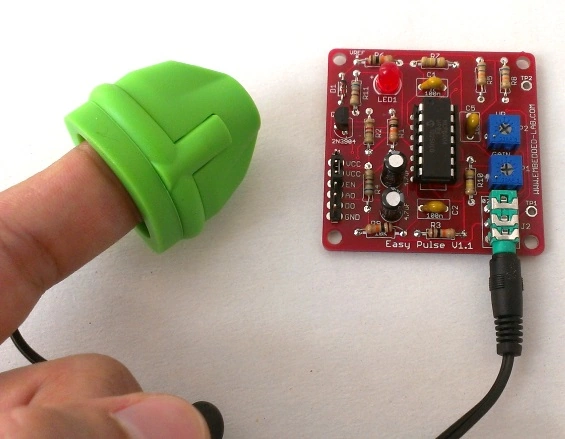
Figure2: connection of HRM-2511E to Easy pulsev1.1
Programming
Explanation:
- void setup()
- {
- Serial.begin(115200);
- }
- void loop()
- {
- int sensorValue = analogRead(A0);
- Serial.println(sensorValue);
- delay_x(5);
- }
- void delay_x(uint32_t millis_delay)
- {
- uint16_t micros_now = (uint16_t)micros();
- while (millis_delay > 0)
- {
- if (((uint16_t)micros() - micros_now) >= 1000)
- {
- millis_delay--;
- micros_now += 1000;
- }
- }
- }
- void setup()
- {
- Serial.begin(115200);
- }
- void loop()
- {
- int sensorValue = analogRead(A0);
- Serial.println(sensorValue);
- delay_x(5);
- }
- void delay_x(uint32_t millis_delay)
- {
- uint16_t micros_now = (uint16_t)micros();
- while (millis_delay > 0)
- {
- if (((uint16_t)micros() - micros_now) >= 1000)
- {
- millis_delay--;
- micros_now += 1000;
- }
- }
- }
- It can easily check the heart pulse in the body.
- Connect to the HRM-2511E and see the heart beat pulse in the PC monitor.
- It will display the sine wave pulse as the correct wave form.
Output:
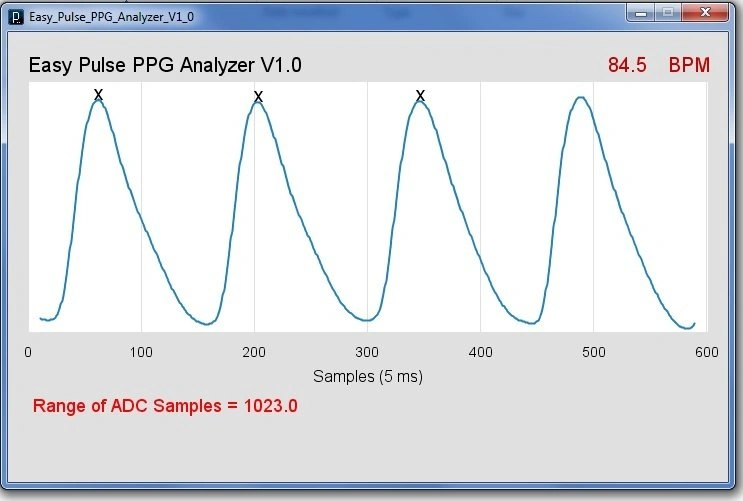
Figure3:output
Read more articles on Arduino:
Sr KarthigaPosted Feb 29, 2016, 7:45 PM
thank you asfend sir
Sr KarthigaPosted Feb 29, 2016, 7:44 PM
kkk sir
Sr KarthigaPosted Feb 29, 2016, 7:44 PM
thank you asfend sir
Asfend YarPosted Feb 29, 2016, 2:23 PM
dont thanks me again you really write wonderful stuff thanks to you
Asfend YarPosted Feb 29, 2016, 2:22 PM
good
Sr KarthigaPosted Feb 15, 2016, 7:18 AM
thank you sibeesh sir
Sr KarthigaPosted Feb 15, 2016, 7:18 AM
thank you Asfend sir
Sr KarthigaPosted Feb 15, 2016, 7:17 AM
thank you mohammed sir
Sr KarthigaPosted Feb 15, 2016, 7:17 AM
Thank you shridhar sir
Sibeesh VenuPosted Feb 15, 2016, 12:37 AM
Nice Share
Asfend YarPosted Feb 14, 2016, 11:36 PM
very well
Mohammed IbrahimPosted Feb 14, 2016, 11:28 PM
nice
Shridhar SharmaPosted Feb 14, 2016, 11:22 PM
nice share
Sr KarthigaPosted Feb 13, 2016, 4:23 AM
Thank you santhakumar sir
Santhakumar MunuswamyPosted Feb 13, 2016, 2:59 AM
Thanks for nice share
Sr KarthigaPosted Feb 13, 2016, 12:34 AM
Thank you pramod sir
Pramod ThakurPosted Feb 13, 2016, 12:29 AM
thanks for sharing...
Sr KarthigaPosted Feb 12, 2016, 7:39 PM
Thank you gowtham sir
Gowtham KPosted Feb 12, 2016, 10:58 AM
Good one
Sr KarthigaPosted Feb 12, 2016, 8:00 AM
Thank you Shubham sir
Sr KarthigaPosted Feb 12, 2016, 8:00 AM
Thank you sibeesh sir
Sr KarthigaPosted Feb 12, 2016, 7:59 AM
Thank you kumaresh sir
Shubham KumarPosted Feb 12, 2016, 6:38 AM
nice keep share :)
Sibeesh VenuPosted Feb 12, 2016, 6:18 AM
Nice Share
Kumaresh RajalingamPosted Feb 12, 2016, 6:04 AM
Good