

Introduction
As discussed in our previous posts, Firebase provides User Authentication in many types as Email, Google Plus, Facebook, Phone Authentication and more. We already have seen or heard about OTP authentication for mobile app users. In this article, we will learn a very useful feature of Firebase Phone Authentication.
To learn about Firebase Email authentication, read my posts here.
- Firebase User Authentication In Android - Part One
- Firebase User Authentication In Android - Part Two
Firebase Phone Authentication
Google's Firebase provides free service for a limited amount of authentication per month. However, if you need to sign in a very high volume of users with phone authentication, you might need to upgrade your pricing plan. You can view the pricing page here.
You can use Firebase Authentication to sign in a user by sending an SMS message to the user's phone. The user signs in using a one-time code contained in the SMS message.
Firebase Setup
Before starting to code, we have to set up Firebase for Android and enable Phone Authentication. If you are new to firebase, the following link will be useful to know the method for setting up the project in firebase.
https://androidmads.blogspot.in/2016/10/android-getting-started-with-firebase.html
After setting up, open Authentication sign-in method and enable the phone authentication method as shown in the following figure.
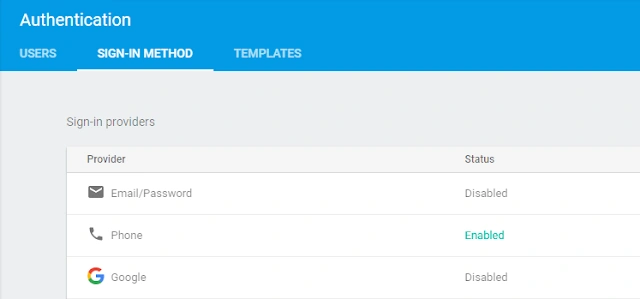
You should add SHA Fingerprint in your application. The following terminal will be used to get the SHA Fingerprint with Command Prompt in Windows for debug mode.
- keytool -list -v -keystore "%USERPROFILE%\.android\debug.keystore" -alias androiddebugkey -storepass android -keypass android
Coding Part
I have split this part into 3 steps as follows.
- Step 1: Creating a New Project with Empty Activity.
- Step 2: Setting up the Firebase Library.
- Step 3: Implementation of Firebase Phone Authentication.
Step 1 - Creating a New Project with Android Studio
- Open Android Studio and select Create a new project.
- Name the project as you wish and select your activity template.
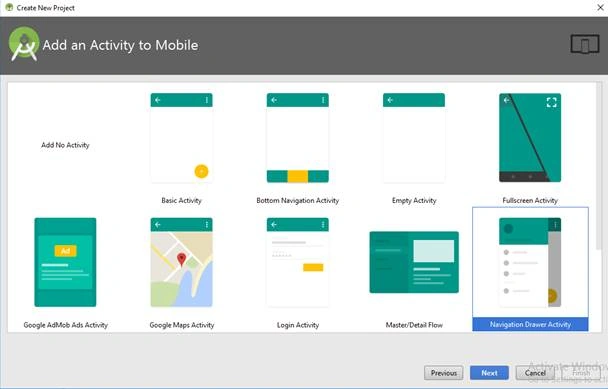
- Click the “Finish” button to create a new project in Android Studio.
Step 2- Setting up the Firebase Library
In this part, we will see how to set up the library for the project.
- Open your project level build.gradle file and add the following lines in dependencies
- {
- …
- classpath 'com.google.gms:google-services:3.1.0'
- …
- }
- Then add the following lines in all projects in the project level build.gradle file.
- allprojects {
- repositories {
- google()
- jcenter()
- maven {
- url "https://maven.google.com"
- }
- }
- }
- Then add the following lines in app level build.gradle file to apply google services to your project.
- dependencies {
- ...
- implementation 'com.google.firebase:firebase-auth:11.8.0'
- }
- apply plugin: 'com.google.gms.google-services'
- Then click “Sync Now” to setup your project.
Step 3 - Implementation of Firebase Phone Authentication
In this step, we will learn about, How to
- send verification code
- validates verification success & failure
- manage sign-in & sign-out from the application
- To verify the user’s phone number, we have to prompt users to enter the phone number.
- Then send the phone number to firebase and request to validate the user’s phone number.
- It is achieved by PhoneAuthProvider as shown in the following code snippet.
- PhoneAuthProvider.getInstance().verifyPhoneNumber(
- phoneNumber, // Phone number to verify
- 60, // Timeout duration
- TimeUnit.SECONDS, // Unit of timeout
- this, // Activity (for callback binding)
- mCallbacks); // OnVerificationStateChangedCallbacks
- mCallbacks are used to know the verification status and the callback method is implemented as in the following.
- mCallbacks = new PhoneAuthProvider.OnVerificationStateChangedCallbacks() {
- @Override
- public void onVerificationCompleted(PhoneAuthCredential credential) {
- Log.d(TAG, "onVerificationCompleted:" + credential);
- signInWithPhoneAuthCredential(credential);
- }
- @Override
- public void onVerificationFailed(FirebaseException e) {
- Log.w(TAG, "onVerificationFailed", e);
- if (e instanceof FirebaseAuthInvalidCredentialsException) {
- mPhoneNumberField.setError("Invalid phone number.");
- } else if (e instanceof FirebaseTooManyRequestsException) {
- Snackbar.make(findViewById(android.R.id.content), "Quota exceeded.",
- Snackbar.LENGTH_SHORT).show();
- }
- }
- @Override
- public void onCodeSent(String verificationId,
- PhoneAuthProvider.ForceResendingToken token) {
- Log.d(TAG, "onCodeSent:" + verificationId);
- mVerificationId = verificationId;
- mResendToken = token;
- }
- };
- Here,
- onVerificationCompleted(PhoneAuthCredential)
This method is called when the user number verified successfully. - onVerificationFailed(FirebaseException)
This method is called when an error occurred during verification.
- onCodeSent(String verification, PhoneAuthProvider.ForceResendingToken)
This method is called when the verification code is sent to the user via SMS.
- onVerificationCompleted(PhoneAuthCredential)
- Phone Authentication Credentials can be read from PhoneAuthProvider as shown in the following snippets.
- PhoneAuthCredential credential = PhoneAuthProvider.getCredential(verificationId, code);
- // verificationId can be found in onCodeSent function in callback functionality
- // code is retrieved from SMS send by Firebase
- The retrieved credentials are used to sign in to the application. It can be achieved by the following snippet.
- mAuth.signInWithCredential(credential)
- .addOnCompleteListener(this, new OnCompleteListener() {
- @Override
- public void onComplete(@NonNull Task task) {
- if (task.isSuccessful()) {
- Log.d(TAG, "signInWithCredential:success");
- FirebaseUser user = task.getResult().getUser();
- startActivity(new Intent(PhoneAuthActivity.this, MainActivity.class));
- finish();
- } else {
- Log.w(TAG, "signInWithCredential:failure", task.getException());
- if (task.getException() instanceof FirebaseAuthInvalidCredentialsException) {
- mVerificationField.setError("Invalid code.");
- }
- }
- }
- });
- Sign-Out from the app will be done from the following snippet.
- FirebaseAuth mAuth = FirebaseAuth.getInstance();
- mAuth.signOut();
Full Code
You can find the full code implementation here.
- public class PhoneAuthActivity extends AppCompatActivity implements
- View.OnClickListener {
- EditText mPhoneNumberField, mVerificationField;
- Button mStartButton, mVerifyButton, mResendButton;
- private FirebaseAuth mAuth;
- private PhoneAuthProvider.ForceResendingToken mResendToken;
- private PhoneAuthProvider.OnVerificationStateChangedCallbacks mCallbacks;
- String mVerificationId;
- private static final String TAG = "PhoneAuthActivity";
- @Override
- protected void onCreate(@Nullable Bundle savedInstanceState) {
- super.onCreate(savedInstanceState);
- setContentView(R.layout.activity_phone);
- mPhoneNumberField = (EditText) findViewById(R.id.field_phone_number);
- mVerificationField = (EditText) findViewById(R.id.field_verification_code);
- mStartButton = (Button) findViewById(R.id.button_start_verification);
- mVerifyButton = (Button) findViewById(R.id.button_verify_phone);
- mResendButton = (Button) findViewById(R.id.button_resend);
- mStartButton.setOnClickListener(this);
- mVerifyButton.setOnClickListener(this);
- mResendButton.setOnClickListener(this);
- mAuth = FirebaseAuth.getInstance();
- mCallbacks = new PhoneAuthProvider.OnVerificationStateChangedCallbacks() {
- @Override
- public void onVerificationCompleted(PhoneAuthCredential credential) {
- Log.d(TAG, "onVerificationCompleted:" + credential);
- signInWithPhoneAuthCredential(credential);
- }
- @Override
- public void onVerificationFailed(FirebaseException e) {
- Log.w(TAG, "onVerificationFailed", e);
- if (e instanceof FirebaseAuthInvalidCredentialsException) {
- mPhoneNumberField.setError("Invalid phone number.");
- } else if (e instanceof FirebaseTooManyRequestsException) {
- Snackbar.make(findViewById(android.R.id.content), "Quota exceeded.",
- Snackbar.LENGTH_SHORT).show();
- }
- }
- @Override
- public void onCodeSent(String verificationId,
- PhoneAuthProvider.ForceResendingToken token) {
- Log.d(TAG, "onCodeSent:" + verificationId);
- mVerificationId = verificationId;
- mResendToken = token;
- }
- };
- }
- private void signInWithPhoneAuthCredential(PhoneAuthCredential credential) {
- mAuth.signInWithCredential(credential)
- .addOnCompleteListener(this, new OnCompleteListener<AuthResult>() {
- @Override
- public void onComplete(@NonNull Task<AuthResult> task) {
- if (task.isSuccessful()) {
- Log.d(TAG, "signInWithCredential:success");
- FirebaseUser user = task.getResult().getUser();
- startActivity(new Intent(PhoneAuthActivity.this, MainActivity.class));
- finish();
- } else {
- Log.w(TAG, "signInWithCredential:failure", task.getException());
- if (task.getException() instanceof FirebaseAuthInvalidCredentialsException) {
- mVerificationField.setError("Invalid code.");
- }
- }
- }
- });
- }
- private void startPhoneNumberVerification(String phoneNumber) {
- PhoneAuthProvider.getInstance().verifyPhoneNumber(
- phoneNumber, // Phone number to verify
- 60, // Timeout duration
- TimeUnit.SECONDS, // Unit of timeout
- this, // Activity (for callback binding)
- mCallbacks); // OnVerificationStateChangedCallbacks
- }
- private void verifyPhoneNumberWithCode(String verificationId, String code) {
- PhoneAuthCredential credential = PhoneAuthProvider.getCredential(verificationId, code);
- signInWithPhoneAuthCredential(credential);
- }
- private void resendVerificationCode(String phoneNumber,
- PhoneAuthProvider.ForceResendingToken token) {
- PhoneAuthProvider.getInstance().verifyPhoneNumber(
- phoneNumber, // Phone number to verify
- 60, // Timeout duration
- TimeUnit.SECONDS, // Unit of timeout
- this, // Activity (for callback binding)
- mCallbacks, // OnVerificationStateChangedCallbacks
- token); // ForceResendingToken from callbacks
- }
- private boolean validatePhoneNumber() {
- String phoneNumber = mPhoneNumberField.getText().toString();
- if (TextUtils.isEmpty(phoneNumber)) {
- mPhoneNumberField.setError("Invalid phone number.");
- return false;
- }
- return true;
- }
- @Override
- public void onStart() {
- super.onStart();
- FirebaseUser currentUser = mAuth.getCurrentUser();
- if (currentUser != null) {
- startActivity(new Intent(PhoneAuthActivity.this, MainActivity.class));
- finish();
- }
- }
- @Override
- public void onClick(View view) {
- switch (view.getId()) {
- case R.id.button_start_verification:
- if (!validatePhoneNumber()) {
- return;
- }
- startPhoneNumberVerification(mPhoneNumberField.getText().toString());
- break;
- case R.id.button_verify_phone:
- String code = mVerificationField.getText().toString();
- if (TextUtils.isEmpty(code)) {
- mVerificationField.setError("Cannot be empty.");
- return;
- }
- verifyPhoneNumberWithCode(mVerificationId, code);
- break;
- case R.id.button_resend:
- resendVerificationCode(mPhoneNumberField.getText().toString(), mResendToken);
- break;
- }
- }
- }
Download Code
You can download the full source code of the article in GitHub. If you like this article, do star the repo in GitHub. Hit like the article.
Hadshana KamalanathanPosted Jul 22, 2018, 6:23 AM
thanks for sharing
Viknaraj ManogararajahPosted Jul 14, 2018, 10:59 PM
Nice Article, Thank you for sharing.........
Ravishankar NPosted Jul 12, 2018, 12:39 AM
Nice article. Thanks for sharing