Dear all, hope everyone doing great.
In this article, we will see how to read XML data from SharePoint Library and display it in a table on the client-side and upload the XML data to SharePoint List.
Prerequisites
- Upload XML data to the document library,
- Create a site page & List,
- Get the Sample XML data and code files from my GitHub and upload them to your site assets :).
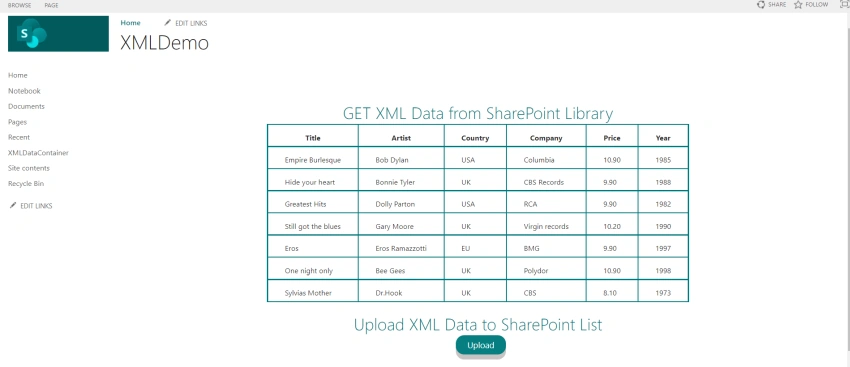
Screenshot of our application,
Basics of XML
First, let's see some basics of XML,
What is XML?
XML - stands for eXtensible Markup Language, designed to store and transport data.
XML Tree Structure
XML documents are formed as element trees.
An XML tree starts at a root element and branches from the root to child elements.
<root>
  <child>
    <subchild>.....</subchild>
  </child>
</root>
XML Prolong
<?xml version="1.0" encoding="UTF-8"?>
The XML prolog is optional,
- XML documents can contain international characters, like Norwegian or French.
- To avoid errors, you should specify the encoding used, or save your XML files as UTF-8.
XML Parser
- Before an XML document can be accessed, it must be loaded into an XML DOM object.
- The XML DOM defines the properties and methods for accessing and editing XML.
- All modern browsers have a built-in XML parser that can convert text into an XML DOM object.
XMLHttpRequest
The XMLHttpRequest object used to request data from a web server.
var xhttp = new XMLHttpRequest();
xhttp.onreadystatechange = function() {
    if (this.readyState == 4 && this.status == 200) {
       // Typical action to be performed when the document is ready:
       document.getElementById("demo").innerHTML = xhttp.responseText;
    }
};
xhttp.open("GET", "filename", true);
xhttp.send();
Let's get started,
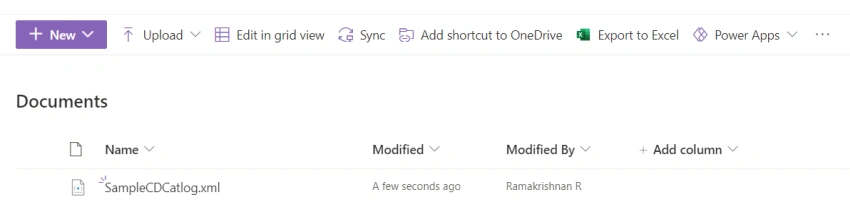
Step 1 - Upload the XML to SharePoint Library
Add the sample XML file to the document library,
Step 2 - Create a SharePoint List
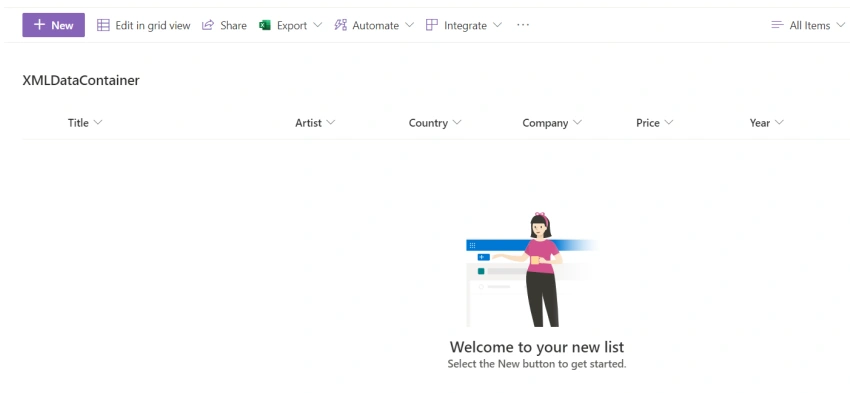
Create the SharePoint List, with respect to your element tags in the XML,
Step 3 - Structuring Client Side
Let us structure our client side,
Refer the HTML to the content editor web part.
<body>
    <div id="XMLData">
         <h1>GET XML Data from SharePoint Library</h1>
         <table id="XMLTable"></table>
    </div>
    <br />
    <div id="uploadXMLData">
	  <h1>Upload XML Data to SharePoint List</h1>
          <button class="button" onclick="fnUploadData()">Upload</button>
    </div>
</body>
Refer the js file, once div is loaded after <body> tag,
<script type="text/javascript" src="../SiteAssets/XMLtoSP.js"></script>
<script>
   $(document).ready(function () {
       loadXMLData();
   });
</script>
Step 4 - Get XML File from SharePoint Library
With the help of XMLHttpRequest, Get the XML file from the SharePoint Document Library,
var oXHR = window.XMLHttpRequest ? new XMLHttpRequest() : new ActiveXObject('Microsoft.XMLHTTP');

function rStatus() {
	if(oXHR.readyState == 4) fnShowXMLData(this.responseXML);
}

oXHR.onreadystatechange = rStatus;
//Refer XML File path from SharePoint Library
oXHR.open("GET", "../Shared%20Documents/SampleCDCatlog.xml", true); // true = Asynchronous, false = Synchronous
oXHR.send();
Step 5 - Display the XML Data in table format
function fnShowXMLData(xml) {
		xmlTag = xml.getElementsByTagName("CD");
		table = "<tr><th>Title</th><th>Artist</th><th>Country</th><th>Company</th><th>Price</th><th>Year</th></tr>";
	for(i = 0; i < xmlTag.length; i++) {
		table += "<tr><td>";
		table += xmlTag[i].getElementsByTagName("TITLE")[0].childNodes[0].nodeValue;
		table += "</td><td>";
		table += xmlTag[i].getElementsByTagName("ARTIST")[0].childNodes[0].nodeValue;
		table += "</td><td>";
		table += xmlTag[i].getElementsByTagName("COUNTRY")[0].childNodes[0].nodeValue;
		table += "</td><td>";
		table += xmlTag[i].getElementsByTagName("COMPANY")[0].childNodes[0].nodeValue;
		table += "</td><td>";
		table += xmlTag[i].getElementsByTagName("PRICE")[0].childNodes[0].nodeValue;
		table += "</td><td>";
		table += xmlTag[i].getElementsByTagName("YEAR")[0].childNodes[0].nodeValue;
		table += "</td></tr>";
	}
	document.getElementById("XMLTable").innerHTML = table;
};
The XML data is displayed as shown below,
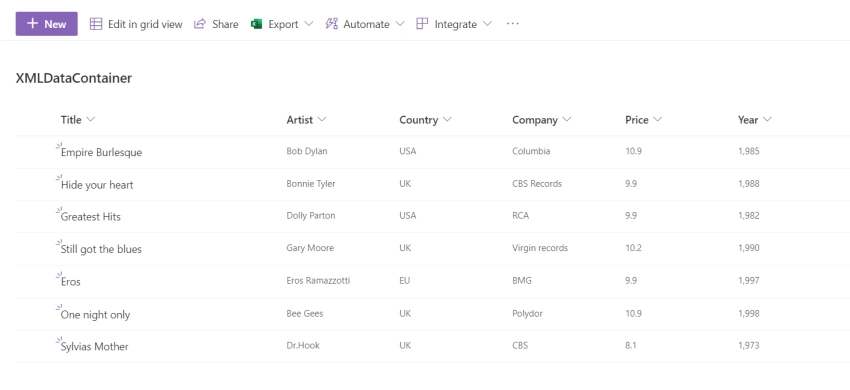
Step 6 - Uploading XML Data to SharePoint List
Add the onclick event to the button "Upload",
REST API POST method is used to create items in the SharePoint list,
function fnUploadData() {
	for(i = 0; i < xmlTag.length; i++) {
		var title = xmlTag[i].getElementsByTagName("TITLE")[0].childNodes[0].nodeValue;
		var artist = xmlTag[i].getElementsByTagName("ARTIST")[0].childNodes[0].nodeValue;
		var country = xmlTag[i].getElementsByTagName("COUNTRY")[0].childNodes[0].nodeValue;
		var company = xmlTag[i].getElementsByTagName("COMPANY")[0].childNodes[0].nodeValue;
		var price = xmlTag[i].getElementsByTagName("PRICE")[0].childNodes[0].nodeValue;
		var year = xmlTag[i].getElementsByTagName("YEAR")[0].childNodes[0].nodeValue;
        fnUploadToList(title, artist, country, company, price, year);
	}
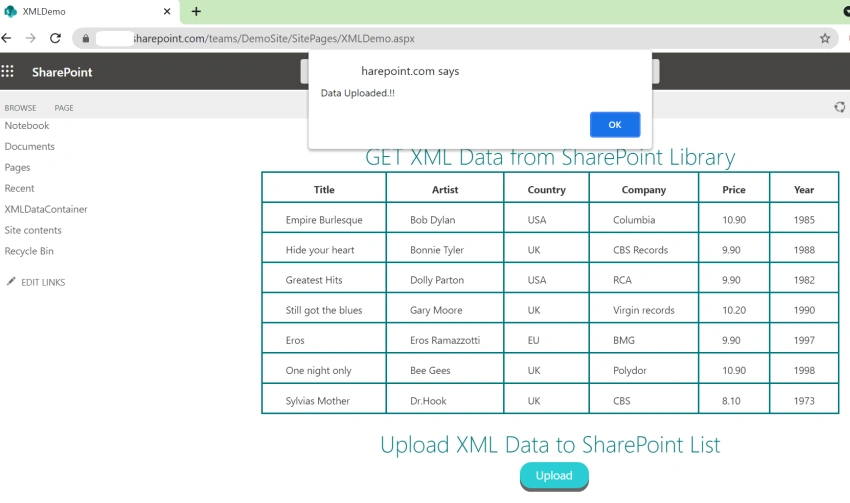
    alert("Data Uploaded.!!");
}
On the for loop, each item is created in the List,
function fnUploadToList(Title, Artist, Country, Company, Price, Year){
    var requestUriPOST = _spPageContextInfo.webAbsoluteUrl + "/_api/web/lists/getbytitle('XMLDataContainer')/items?";
	$.ajax({
		url: requestUriPOST,
		type: "POST",
		data: JSON.stringify({
			__metadata: {
				type: "SP.Data.XMLDataContainerListItem"
			},
			Title: Title,
            Artist: Artist,
            Country: Country,
            Company: Company,
            Price: Price,
            Year : Year
		}),
        async: false,
		headers: {
			"Accept": "application/json;odata=verbose",
			"Content-Type": "application/json;odata=verbose",
			"X-RequestDigest": $("#__REQUESTDIGEST").val(),
			"X-HTTP-Method": "POST"
		},
		success: function(data) {
            console.log("Item Created.!");
        },
		error: function(data) {
			alert(data.responseJSON.error);
		}
	});
}
Refer to the below screenshot,
Hooray!! Happy Coding!
Hope you all find this article useful.
For more information about XML refer to the below links,


Join the conversation! Your thoughts help the community grow.