

Introduction
React Native is an open-source JavaScript library created by Facebook. It helps us to build an attractive Android, IOS, and Windows application with a native look and feel. It also uses a mobile application framework that makes the hierarchy of UI components to build JavaScript code.
Prerequisites
- Ubuntu 19.04
- Android studio
- Android Mobile
- Install NodeJs & NPM
- Install react-native CLI
- Install JDK
- Setup Android Device (Android SDK and Android Virtual Device)
- Choose best code editor
- Create Project
- Run the App
Install NodeJs & NPM
Update device
- $ sudo apt update && sudo apt upgrade
Add NodeJs repository
- $ curl -sL https://deb.nodesource.com/setup_12.x | sudo -E bash -
- $ apt-get install -y nodejs
- $ sudo apt-get update && sudo apt-get install yarn
- $ sudo apt-get install npm
- $ node –-version
- $ npm -V
Install React-native CLI globally
- $ sudo npm install -g react-native-cli
- $ React-natice –-version
Install Wtachamn
- $ sudo apt-get update
- $ sudo apt-get install -y autoconf automake build-essential python-dev libtool pkg-config libssl-dev
- $ git clone https://github.com/facebook/watchman.git
- $ cd watchman
- $ git checkout v4.9.0 # The latest stable release
- $ ./autogen.sh
- $ ./configure --without-python --without-pcre --enable-lenient
- $ sudo make
- $ sudo make install
SetUp android development
Here, I will provide some important info for Android development.
Install JDK
- $ sudo apt-get install default-jre
- $ sudo apt-get install default-jdk
- $ javac -version
Install android studio
- $ sudo snap install android-studio --classic
- $ android-studio
Configure the ANDROID_HOME environment variable
Let’s export some paths in the profile file for making an android environment.
Open the terminal and run below comments.- $ gedit ~/.profile
- export ANDROID_HOME=$HOME/Android/Sdk
- export PATH=$PATH:$ANDROID_HOME/emulator
- export PATH=$PATH:$ANDROID_HOME/tools
- export PATH=$PATH:$ANDROID_HOME/tools/bin
- export PATH=$PATH:$ANDROID_HOME/platform-tools
Configure SDK

Make sure your configured Android SDK is configured.
Choose best code editor

In my case, I am familiar with VS code Editor, so I will show you how we configure on that for running react-native effectively.
- Go to the extensions >> search React-Native and install React-Native tools
>> search Android and install an Android debug extension, as shown in the below screenshot.
Creating a sample application
Now, the time to create a new react-native app by doing the below instructions.
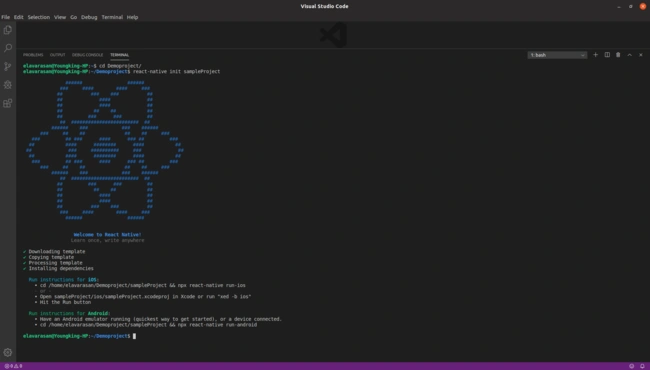
Open terminal >> Navigate your project folder >> run below command.- $react-native init sampleProject
After, running the above command, you will get React-Native project files. As shown below:
Run the App
Here, we can choose the physical device that has separate Ram, which provides better performance rather than AVD.
Note
Open the terminal with your convenient IDE and keep the follow the instructions. Given below
- $ sudo apt install android-tools-adb
- Open sample project: File >> Open folder >> YourProject >> select folder
- Open terminal: View >> Terminal
- Check adb: In terminal type “adb devices” and hit enter.
- Next, we need to split two terminals.
- Run packager: In the first terminal type “react-native start” and run
- Run-on android: In a second terminal type “react-native run-android” and hit enter.

After successfully executing/installing our app on Android, you will see the Default react-native welcome screen. Shown below:
Let’s edit the app.js file and add/change some code. Given below
After adding some codes in app.js, click on File >> save all


After saving the file, the packager will be automatically updated and refreshing the app on Android.
Manibharathi ElavarasanPosted Apr 15, 2021, 2:43 PM
Nice explanation. Thanks for share this article.
Rushi MehtaPosted Jan 10, 2020, 1:02 AM
Great Technical Stuff