

- Install node.js on your system, download from https://nodejs.org/en/
- Install Visual Studio code on your system,download from https://code.visualstudio.com/download
- Install git on your system (if need work with any remote repository e.g. GitHub,TFS.etc.) from https://git-scm.com/download/win
Create a folder in your local drive, where you want keep your code. If you already have any project folder, just open Visual Studio code and select the folder.
Step 2
Now, create package.json file in your project folder. See the code and copy.
- {
- "name": "angular-quickstart",
- "version": "1.0.0",
- "scripts": {
- "start": "tsc&& concurrently \"tsc -w\" \"lite-server\" ",
- "lite": "lite-server",
- "postinstall": "typings install",
- "tsc": "tsc",
- "tsc:w": "tsc -w",
- "typings": "typings"
- },
- "licenses": [{
- "type": "MIT",
- "url": "https://github.com/angular/angular.io/blob/master/LICENSE"
- }],
- "dependencies": {
- "@angular/common": "~2.1.0",
- "@angular/compiler": "~2.1.0",
- "@angular/core": "~2.1.0",
- "@angular/forms": "~2.1.0",
- "@angular/http": "~2.1.0",
- "@angular/platform-browser": "~2.1.0",
- "@angular/platform-browser-dynamic": "~2.1.0",
- "@angular/router": "~3.1.0",
- "@angular/upgrade": "~2.1.0",
- "angular-in-memory-web-api": "~0.1.5",
- "bootstrap": "^3.3.7",
- "core-js": "^2.4.1",
- "reflect-metadata": "^0.1.8",
- "rxjs": "5.0.0-beta.12",
- "systemjs": "0.19.39",
- "zone.js": "^0.6.25"
- },
- "devDependencies": {
- "concurrently": "^3.0.0",
- "lite-server": "^2.2.2",
- "typescript": "^2.0.3",
- "typings": "^1.4.0"
- }
- }
Create file tsconfig.json. This file is used to compile TypeScript code. See the code given below.
- {
- "compilerOptions": {
- "target": "es5",
- "module": "commonjs",
- "moduleResolution": "node",
- "sourceMap": true,
- "emitDecoratorMetadata": true,
- "experimentalDecorators": true,
- "removeComments": false,
- "noImplicitAny": false,
- "watch": true
- } ,
- "compileOnSave": true
- }
Create typings.json. This file contains TypeScript compiler libraries. See the code given below.
- {
- "globalDependencies": {
- "core-js": "registry:dt/core-js#0.0.0+20160725163759",
- "jasmine": "registry:dt/jasmine#2.2.0+20160621224255",
- "node": "registry:dt/node#6.0.0+20160909174046"
- }
- }
Create an app folder. Now, your project will look, as shown below.
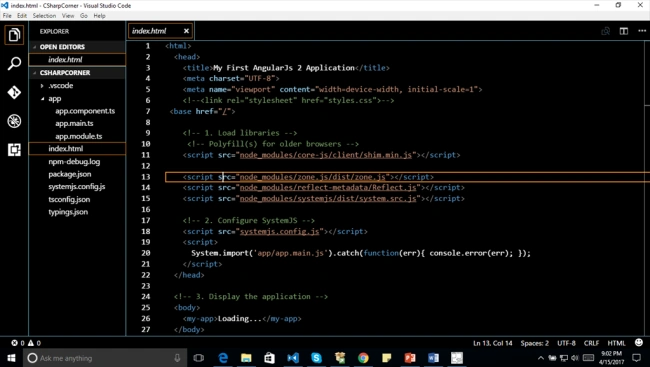
Ignore other given file for o now.
Now, you need to install dependencies, using npm command. Open the integrated terminal from view tab or CTRL+` and go to the project path. Type npm command "npm install" and wait for 1-2 minutes. Thereafter, node_module and typing folder will be created automatically inside the project.
Create systemjs.config.js to load modules, as shown below.
- /**
- * System configuration for Angular samples
- * Adjust as necessary for your application needs.
- */
- (function(global) {
- System.config({
- paths: {
- // paths serve as alias
- 'npm:': 'node_modules/'
- },
- // map tells the System loader where to look for things
- map: {
- // our app is within the app folder
- app: 'app',
- // angular bundles
- '@angular/core': 'npm:@angular/core/bundles/core.umd.js',
- '@angular/common': 'npm:@angular/common/bundles/common.umd.js',
- '@angular/compiler': 'npm:@angular/compiler/bundles/compiler.umd.js',
- '@angular/platform-browser': 'npm:@angular/platform-browser/bundles/platform-browser.umd.js',
- '@angular/platform-browser-dynamic': 'npm:@angular/platform-browser-dynamic/bundles/platform-browser-dynamic.umd.js',
- '@angular/http': 'npm:@angular/http/bundles/http.umd.js',
- '@angular/router': 'npm:@angular/router/bundles/router.umd.js',
- '@angular/forms': 'npm:@angular/forms/bundles/forms.umd.js',
- // other libraries
- 'rxjs': 'npm:rxjs',
- 'angular-in-memory-web-api': 'npm:angular-in-memory-web-api',
- },
- // packages tells the System loader how to load when no filename and/or no extension
- packages: {
- app: {
- main: './main.js',
- defaultExtension: 'js'
- },
- rxjs: {
- defaultExtension: 'js'
- },
- 'angular-in-memory-web-api': {
- main: './index.js',
- defaultExtension: 'js'
- }
- }
- });
- })(this);
Inside an app folder, create component name as app.component.ts, as shown below.
- import { Component } from '@angular/core';
- @Component({
- selector: 'my-app',
- template:'<h1>Hello C# corner</h1>'
- })
- export class AppComponent { }
Create module name as app.module.ts, as shown below.
- import { NgModule
- } from '@angular/core';
- import {
- BrowserModule
- } from '@angular/platform-browser';
- import {
- AppComponent
- } from './app.component';
- @NgModule({
- imports: [BrowserModule],
- declarations: [AppComponent],
- bootstrap: [AppComponent]
- })
- export class AppModule {}
Now, create main.ts file, as shown below.
- import { platformBrowserDynamic } from '@angular/platform-browser-dynamic';
- import { AppModule } from './app.module';
- const platform = platformBrowserDynamic();
- platform.bootstrapModule(AppModule);
Create an index.html, as shown below.
- <html>
- <head>
- <title>My First AngularJs 2 Application</title>
- <meta charset="UTF-8">
- <meta name="viewport" content="width=device-width, initial-scale=1">
- <!--<link rel="stylesheet" href="styles.css">-->
- <base href="/">
- <!-- 1. Load libraries -->
- <!-- Polyfill(s) for older browsers -->
- <script src="node_modules/core-js/client/shim.min.js"></script>
- <script src="node_modules/zone.js/dist/zone.js"></script>
- <script src="node_modules/reflect-metadata/Reflect.js"></script>
- <script src="node_modules/systemjs/dist/system.src.js"></script>
- <!-- 2. Configure SystemJS -->
- <script src="systemjs.config.js"></script>
- <script>
- System.import('app/app.main.js').catch(function(err){ console.error(err); });
- </script>
- </head>
- <!-- 3. Display the application -->
- <body>
- <my-app>Loading...</my-app>
- </body>
- </html>
Project Setup and an Application is done. Now, we have to configure launc.json and task.json to run the task.
Visual Studio Code uses launch.json and tasks.json file to launch your Angular2 Application.
launch.json
First, press F1 or CTRL+SHIFT+P in Visual Studio code and type launch in the address bar on the top of the editor, select node.js file from the selection list. Once you select launch.json file, it will be created under .vscode folder.
In order to launch Angular2 Application, launch.json will use the lite-Server, which is defined in node_modules. Change the program property from “${workspaceRoot}/app.js” to “${workspaceRoot}/node_modules/lite-server/bin/lite-server”.
tasks.json
Press F1 or CTRL+SHIFT+P and type “task”, select “Configure Task runner” and subsequently use Typescript-Watch Mode.This will create tasks.json, which will be created under .vscode folder.
Remember, don't forget install npm,git.
Conslusion
After running the Application, you will see like magic because all ts file has been compiled into JS file and inside the app folder, all ts file make js file, using tsc compiler.
Hamid KhanPosted Jan 30, 2019, 12:22 AM
Good work.............Thanks
Anvesh JainPosted Aug 30, 2017, 12:46 AM
Thanks for the article. It is so helpful for newer person
Dnyaneshwar BabarPosted Jul 6, 2017, 7:19 AM
Step 2 : Now, create project.json file in your project folder. See the code and copy.... Need's to be correct as "package.json"
Mohammad KhalidPosted Apr 18, 2017, 1:01 AM
Good article Bikesh.. but it is quite lengthy I feel. If we can achieve this by typing few lines of code on command prompt what is the need of going this way. Anyway I like your post. Please keep posting so that developer like us can get benefit. Thank you.
Hamid KhanPosted Apr 17, 2017, 4:32 AM
Very good article Bikesh