

Introduction
Today we'll learn to work with the wizard interface in ASP.NET MVC Web Applications. A wizard is used to allow to logically divide and group the data so that any user can enter the data or information gently in a step-by-step manner. In this article you'll see that the implementation of the wizard is so easy in the ASP.NET MVC Application and you can also develop it in the Web Forms application. There are various way to create the wizard in the MVC application and here you can learn the one among them.
In that context, I am creating the wizard in the MVC Web Application in Part 1 of this article and here you will learn to develop the wizard that stores the data in the ASP.NET Session and wizard works on the traditional form submission.
You will see the following approach to develop the wizard in the application:
- Each step of the wizard has the action method and the corresponding view.
- The data is stored in a view model class in each step.
- All action methods have three parameters.
- The Action method gets the data and stores it in the Session until the final step.
- The action method returns the view for the next step if the "Next" button is clicked.
- The validations are checked after the "Next" button is clicked.
You now have some idea of the development of the application, let's develop the application using the following sections:
- Create MVC Web Application
- Working with Entity Data Model
- Working with Model
- Working with Controller
- Working with View
- Run the application
Create MVC Web Application
I am creating the ASP.NET Web Application in Visual Studio 2013 using MVC 5. Proceed with the following procedure.
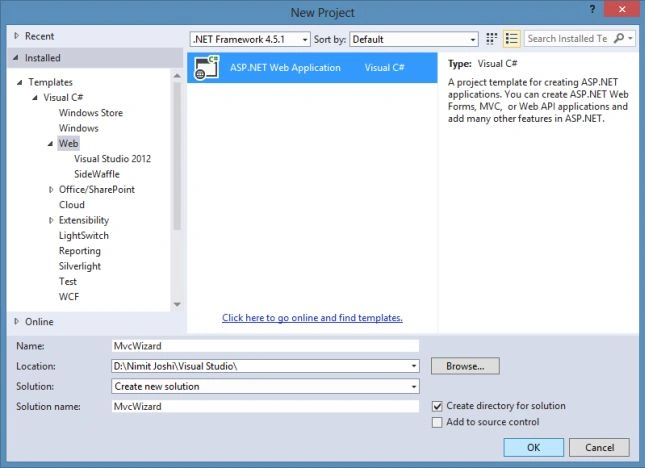
Step 1: Open Visual Studio 2013 and click on "New Project".
Step 2: Select the ASP.NET Web Application and enter the name as "MVC Wizard".
Step 2: In the "One ASP.NET" wizard, select the "MVC" Project Template.
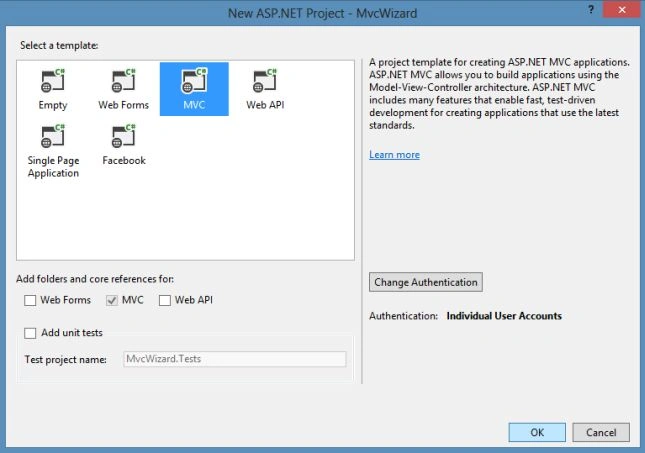
Visual Studio creates the application automatically and adds the files and folders to the application. Now proceed with the next section.
Working with Entity Data Model
In this section, we'll generate the entity data model from the database. I've created the table in the database and I assume that you have the table for generating the model or you can create a new one. So, let's proceed with the following procedure.
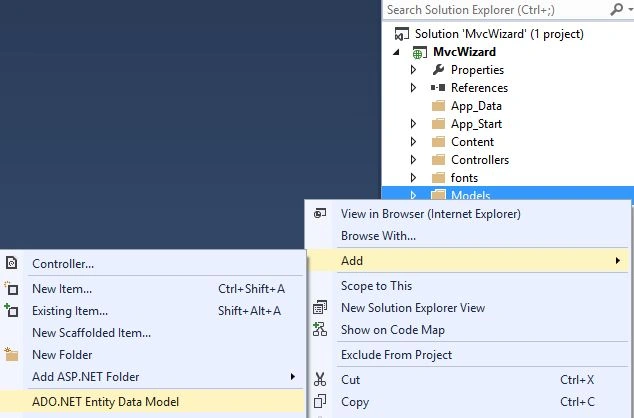
Step 1: In Solution Explorer, just right-click on the Models folder to add a ADO.NET Entity Data Model.
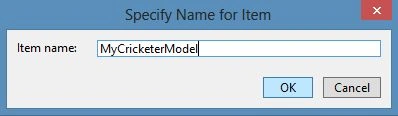
Step 2: Enter the name for the model as "MyCricketerModel".
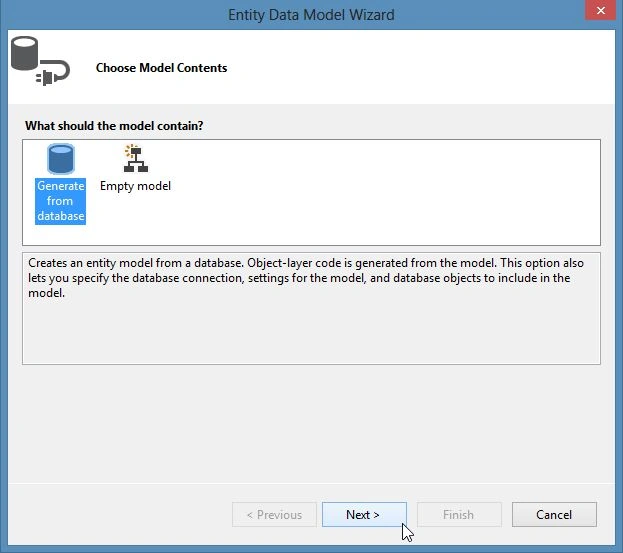
Step 3: Select the "Generate from Database" in the Entity Data Model Wizard.
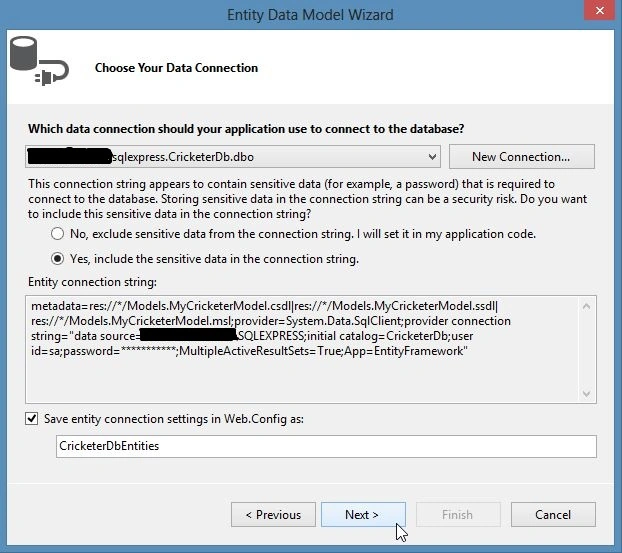
Step 4: Create a "New Connection" to connect with the database and click on "Next".
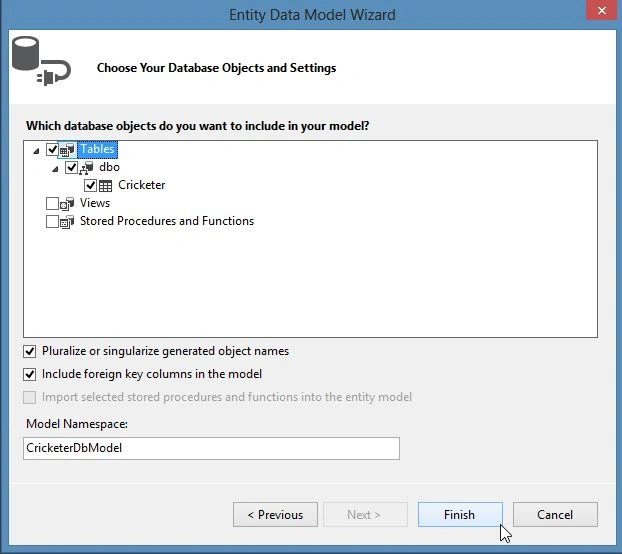
Step 5: Select the table of the database.
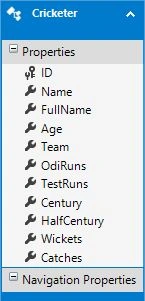
Visual Studio creates the Entity Data Model and generates the diagram of the table. As you can see in the "Cricketer" entity diagram below:
Working with the Model
Now as you can see in the preceding screenshot that there are various properties defined in the entity and for the sake of creating the wizard let's group them into the two steps as follows:
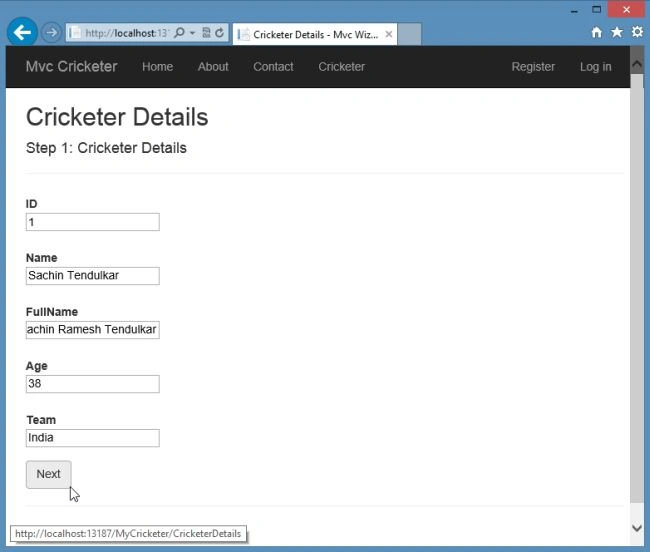
- Cricketer Details: ID, Name, FullName, Age and Team
- Cricketer Statistics: OdiRuns, TestRuns, Century, HalfCentury, Wickets and Catches
So, you need to create the model class for each of the wizard steps defined above. So let's work with the model with the following procedure.
Step 1: In Solution Explorer, just right-click on the Models folder to add a class as in the following:
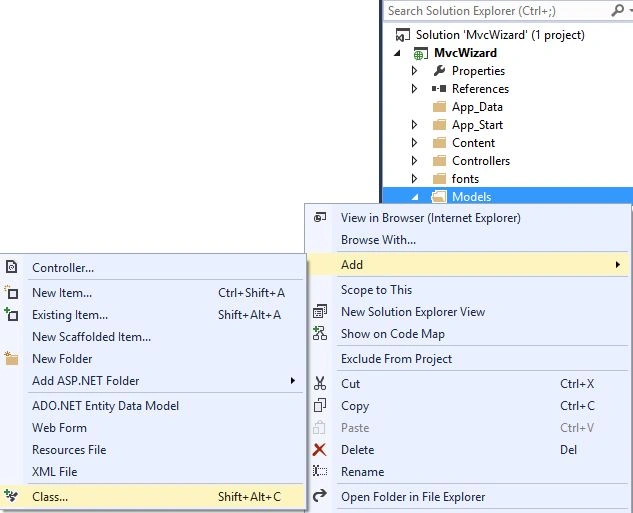
Step 2: Enter the class name as "CricketerDetails" and replace the code with the code below:
- using System.ComponentModel.DataAnnotations;
- namespace MvcWizard.Models
- {
- public class CricketerDetails
- {
- [Required]
- public int ID { get; set; }
- [Required]
- public string Name { get; set; }
- [Required]
- public string FullName { get; set; }
- [Required]
- public int Age { get; set; }
- [Required]
- public string Team { get; set; }
- }
- }
Step 3: Add another class named "CricketerStatistics" and replace the code with the code below:
- using System.ComponentModel.DataAnnotations;
- namespace MvcWizard.Models
- {
- public class CricketerStatistics
- {
- [Required]
- public int OdiRuns { get; set; }
- [Required]
- public int TestRuns { get; set; }
- [Required]
- public int Century { get; set; }
- [Required]
- public int HalfCentury { get; set; }
- [Required]
- public int Wickets { get; set; }
- [Required]
- public int Catches { get; set; }
- }
- }
In both steps, we defined the properties for creating the steps in the wizard. We've also defined the DataAnnotations for the properties to validate. That's all for the model. Now we'll proceed with the next section.
Working with Controller
In this section, we'll create the controller and create various action methods using the following procedure.
Step 1: In Solution Explorer, just right-click on the Controllers folder to add a "New Scaffolded Item".
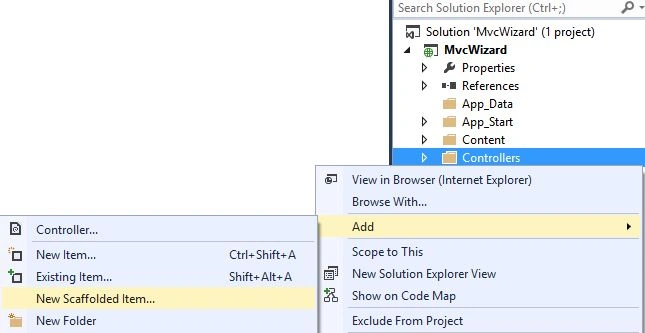
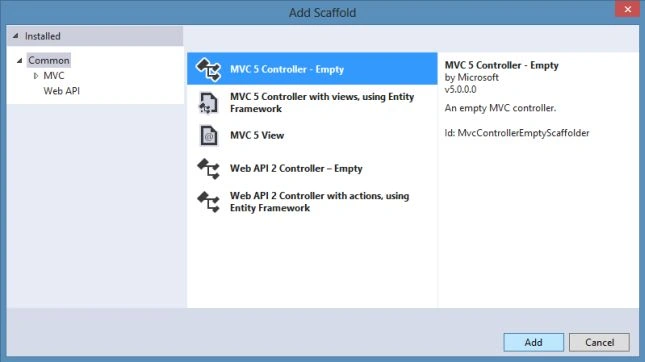
Step 2: Select the "MVC Controller - Empty".
Step 3: Enter the controller name as "MyCricketerController".

Step 4: Just replace the code with the following code:
- using MvcWizard.Models;
- using System.Web.Mvc;
- namespace MvcWizard.Controllers
- {
- public class MyCricketerController : Controller
- {
- //
- // GET: /MyCricketer/
- public ActionResult Index()
- {
- return View("CricketerDetails");
- }
- private Cricketer GetCricketer()
- {
- if (Session["cricketer"] == null)
- {
- Session["cricketer"] = new Cricketer();
- }
- return (Cricketer)Session["cricketer"];
- }
- private void RemoveCricketer()
- {
- Session.Remove("cricketer");
- }
- [HttpPost]
- public ActionResult CricketerDetails(CricketerDetails DetailsData, string BtnPrevious, string BtnNext)
- {
- if (BtnNext != null)
- {
- if (ModelState.IsValid)
- {
- Cricketer CricObj = GetCricketer();
- CricObj.ID = DetailsData.ID;
- CricObj.Name = DetailsData.Name;
- CricObj.FullName = DetailsData.FullName;
- CricObj.Age = DetailsData.Age;
- CricObj.Team = DetailsData.Team;
- return View("CricketerStatistics");
- }
- }
- return View();
- }
- [HttpPost]
- public ActionResult CricketerStatistics(CricketerStatistics StatisticsData, string BtnPrevious, string BtnNext)
- {
- Cricketer CricObj = GetCricketer();
- if (BtnPrevious != null)
- {
- CricketerDetails DetailsObj = new CricketerDetails();
- DetailsObj.ID = CricObj.ID;
- DetailsObj.Name = CricObj.Name;
- DetailsObj.FullName = CricObj.FullName;
- DetailsObj.Age = CricObj.Age;
- DetailsObj.Team = CricObj.Team;
- return View("CricketerDetails",DetailsObj);
- }
- if (BtnNext != null)
- {
- if (ModelState.IsValid)
- {
- CricObj.OdiRuns = StatisticsData.OdiRuns;
- CricObj.TestRuns = StatisticsData.TestRuns;
- CricObj.Century = StatisticsData.Century;
- CricObj.HalfCentury = StatisticsData.HalfCentury;
- CricObj.Wickets = StatisticsData.Wickets;
- CricObj.Catches = StatisticsData.Catches;
- CricketerDbEntities db = new CricketerDbEntities();
- db.Cricketers.Add(CricObj);
- db.SaveChanges();
- RemoveCricketer();
- return View("Success");
- }
- }
- return View();
- }
- }
- }
In the code above the Index() method simply returns a view that represents the CricketerDetails that is the first step of the wizard. The GetCricketer() method is used to check the stored cricketer in the Session and if the cricketer object existsthen that object is returned, otherwise a new cricketer object is created and stored in the Session with a key. The RemoveCricketer() simply removes the cricketer key and Session object.
The CricketerDetails() action method has three parameters named CricketerDetails object, BtnNext and BtnPrevious. The CricketerDetails object contains the value of the properties defined in CricketerDetails. If BtnNext and BtnPrevious is not null then that indicates that the button was clicked.
In the CricketerDetails() action method, the ModelState.IsValid property determines that the model contains the valid data and returns true and GetCustomer() retrieves the cricketer object from the Session. The code then returns to the next view named CricketerStatistics and if there are no validation errors, then the Entity Framework context is instantiated and the cricketer object is added to the Cricketers DbSet. SaveChanges() method to save the data in the database. Finally, the Success view is returned from the method.
Working with View
As I said earlier that I am using the MVC 5 so that here I am using the Razor syntax to define the view. Let's proceed with the following procedure.
Step 1: The MyCricketer folder is created automatically in the Views folder because you've created a New Scaffolded Item with the same name in the Controller, so just right-click on it to add the view.
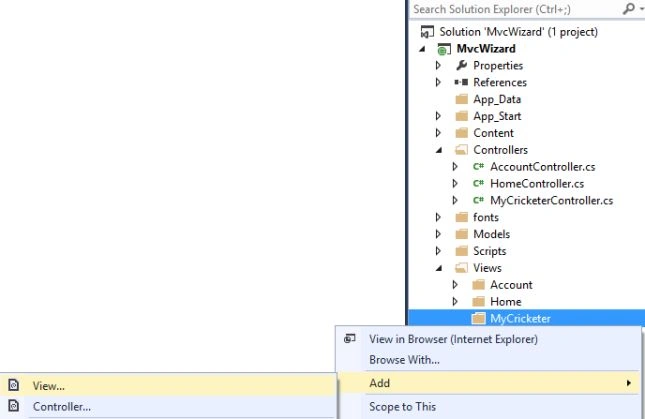
Step 2: Enter the name as "CricketerDetails".
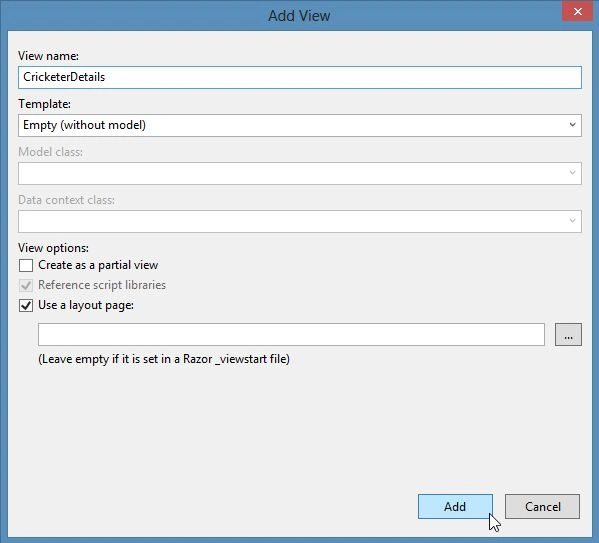
Step 3: Replace the code with the following code:
- using MvcWizard.Models;
- using System.Web.Mvc;
- namespace MvcWizard.Controllers
- {
- public class MyCricketerController : Controller
- {
- //
- // GET: /MyCricketer/
- public ActionResult Index()
- {
- return View("CricketerDetails");
- }
- private Cricketer GetCricketer()
- {
- if (Session["cricketer"] == null)
- {
- Session["cricketer"] = new Cricketer();
- }
- return (Cricketer)Session["cricketer"];
- }
- private void RemoveCricketer()
- {
- Session.Remove("cricketer");
- }
- [HttpPost]
- public ActionResult CricketerDetails(CricketerDetails DetailsData, string BtnPrevious, string BtnNext)
- {
- if (BtnNext != null)
- {
- if (ModelState.IsValid)
- {
- Cricketer CricObj = GetCricketer();
- CricObj.ID = DetailsData.ID;
- CricObj.Name = DetailsData.Name;
- CricObj.FullName = DetailsData.FullName;
- CricObj.Age = DetailsData.Age;
- CricObj.Team = DetailsData.Team;
- return View("CricketerStatistics");
- }
- }
- return View();
- }
- [HttpPost]
- public ActionResult CricketerStatistics(CricketerStatistics StatisticsData, string BtnPrevious, string BtnNext)
- {
- Cricketer CricObj = GetCricketer();
- if (BtnPrevious != null)
- {
- CricketerDetails DetailsObj = new CricketerDetails();
- DetailsObj.ID = CricObj.ID;
- DetailsObj.Name = CricObj.Name;
- DetailsObj.FullName = CricObj.FullName;
- DetailsObj.Age = CricObj.Age;
- DetailsObj.Team = CricObj.Team;
- return View("CricketerDetails",DetailsObj);
- }
- if (BtnNext != null)
- {
- if (ModelState.IsValid)
- {
- CricObj.OdiRuns = StatisticsData.OdiRuns;
- CricObj.TestRuns = StatisticsData.TestRuns;
- CricObj.Century = StatisticsData.Century;
- CricObj.HalfCentury = StatisticsData.HalfCentury;
- CricObj.Wickets = StatisticsData.Wickets;
- CricObj.Catches = StatisticsData.Catches;
- CricketerDbEntities db = new CricketerDbEntities();
- db.Cricketers.Add(CricObj);
- db.SaveChanges();
- RemoveCricketer();
- return View("Success");
- }
- }
- return View();
- }
- }
- }
In the code above, the model has been set to the CricketerDetails. The view renders the form using the BeginForm() HTML helper that posts the CricketerDetails action method of MyCricketerController. The fields for ID, Name and so on are rendered from the LabelFor() and TextBoxFor() helpers. Validations are emitted from the ValidationMeaageFor() helper.
Step 4: Add another view named "CricketerStatistics" and replace the code with the following code:
- @model MvcWizard.Models.CricketerStatistics
- @{
- ViewBag.Title = "Cricketer Statistics";
- }
- <h2>Cricketer Statistics</h2>
- @using (Html.BeginForm("CricketerStatistics", "MyCricketer", FormMethod.Post))
- {
- @Html.AntiForgeryToken()
- <div class="form-horizontal">
- <h4>Step 2: Cricketer Statistics</h4>
- <hr />
- @Html.ValidationSummary(true)
- <div class="form-group">
- @Html.LabelFor(model => model.OdiRuns, new { @class = "control-label col-md-2" })
- <div class="col-md-10">
- @Html.TextBoxFor(model => model.OdiRuns)
- @Html.ValidationMessageFor(model => model.OdiRuns)
- </div>
- </div>
- <div class="form-group">
- @Html.LabelFor(model => model.TestRuns, new { @class = "control-label col-md-2" })
- <div class="col-md-10">
- @Html.TextBoxFor(model => model.TestRuns)
- @Html.ValidationMessageFor(model => model.TestRuns)
- </div>
- </div>
- <div class="form-group">
- @Html.LabelFor(model => model.Century, new { @class = "control-label col-md-2" })
- <div class="col-md-10">
- @Html.TextBoxFor(model => model.Century)
- @Html.ValidationMessageFor(model => model.Century)
- </div>
- </div>
- <div class="form-group">
- @Html.LabelFor(model => model.HalfCentury, new { @class = "control-label col-md-2" })
- <div class="col-md-10">
- @Html.TextBoxFor(model => model.HalfCentury)
- @Html.ValidationMessageFor(model => model.HalfCentury)
- </div>
- </div>
- <div class="form-group">
- @Html.LabelFor(model => model.Wickets, new { @class = "control-label col-md-2" })
- <div class="col-md-10">
- @Html.TextBoxFor(model => model.Wickets)
- @Html.ValidationMessageFor(model => model.Wickets)
- </div>
- </div>
- <div class="form-group">
- @Html.LabelFor(model => model.Catches, new { @class = "control-label col-md-2" })
- <div class="col-md-10">
- @Html.TextBoxFor(model => model.Catches)
- @Html.ValidationMessageFor(model => model.Catches)
- </div>
- </div>
- <div class="form-group">
- <div class="col-md-offset-2 col-md-10">
- <input type="submit" name="BtnPrevious" value="Previous" class="btn btn-default" />
- <input type="submit" name="BtnNext" value="Finish" class="btn btn-default" />
- </div>
- </div>
- </div>
- }
Step 5: Add another view named "Success" and replace the code with the following code:
- @{
- ViewBag.Title = "Success";
- }
- <h3>Cricketer Saved Successfully! Thanks</h3>
- <div>
- @Html.ActionLink("Add Another Cricketer", "Index", "MyCricketer")
- </div>
Step 6: Open the Views\Shared-_Layout.cshtml file to modify the code as shown in the highlighted code below:
- <title>@ViewBag.Title - Mvc Wizard App</title>
- <ul class="nav navbar-nav">
- <li>@Html.ActionLink("Home", "Index", "Home")</li>
- <li>@Html.ActionLink("About", "About", "Home")</li>
- <li>@Html.ActionLink("Contact", "Contact", "Home")</li>
- <li>@Html.ActionLink("Cricketer", "Index", "MyCricketer")</li>
- </ul>
- <footer>
- <p>© @DateTime.Now.Year - Mvc Wizard Application</p>
- </footer>
Run the Application
Step 1: Press Ctrl+F5 or F5 to run the application and click on the Cricketer link.
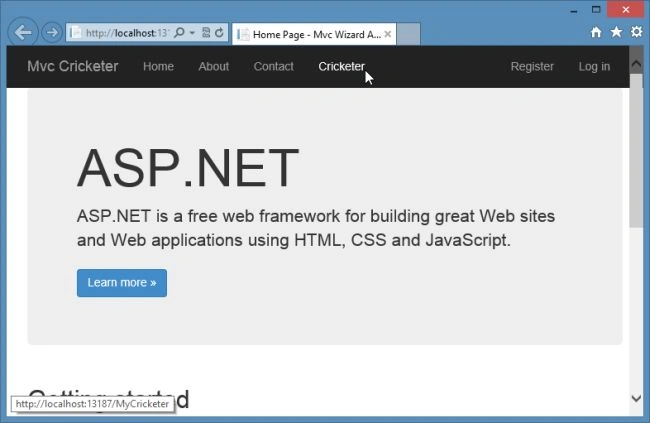
Step 2: Enter the details of cricketer in the first step of the wizard and click on "Next".
Step 3: Fill in the rest of the statistics of cricketer in the second step of the wizard and click on "Finish".
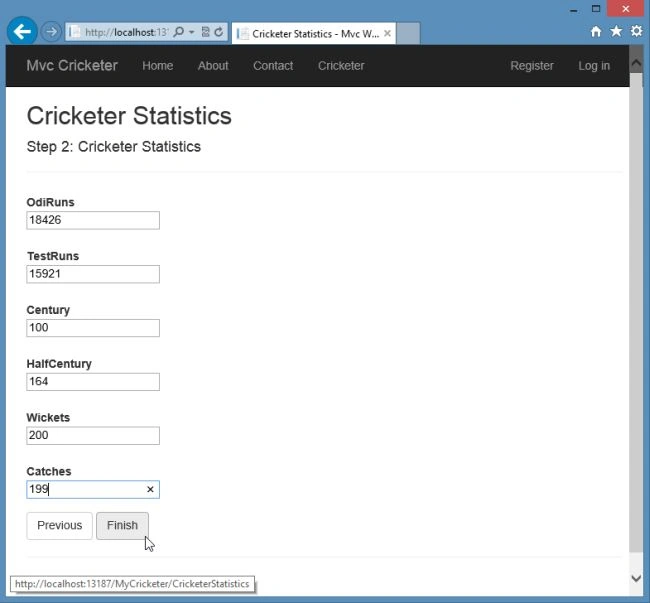
You can also click on the Previous button to edit in the Details view.
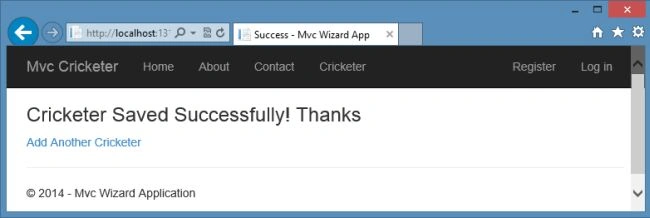
Step 4: The Success View opens and the data saved successfully. You can add another cricketer also from here.
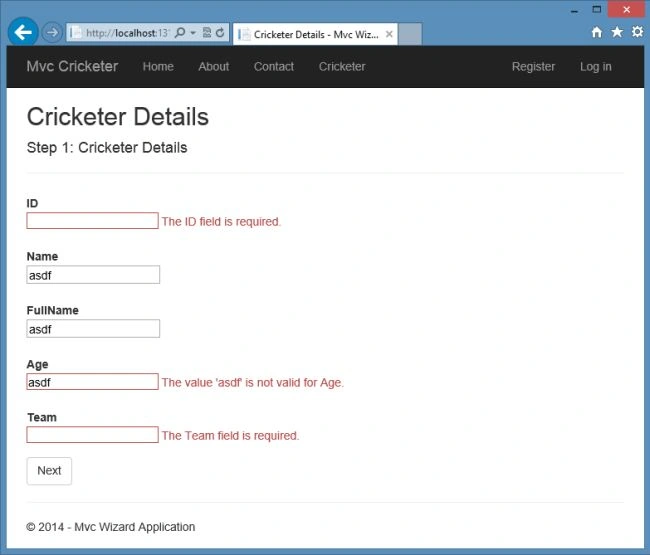
You can also see the Validation Message, if the wrong data was inserted.
Summary
This articles has described how to create the wizard in the MVC Web Application. We learned in the second part how to create a wizard using Ajax. Thanks for reading and Happy Coding!
shweta otariPosted Nov 30, 2021, 9:45 AM
Hi.. there is not view coding for CricketerDetails. Can you please share coding for same
Muhammad IlyasPosted Oct 20, 2021, 2:23 AM
CricketerDetails View is missing
Gerson AzabachePosted Oct 10, 2021, 1:27 AM
Hi guys, I've made a Wizard in Net Core available in my dev blog https://bravedeveloper.com/2021/10/08/como-hacer-un-wizard-formulario-estilo-next-next-finish-con-net-core-mvc/ its in Net Core and uses EF Code first, and from my post you can get the missing View here (or have an idea). Thanks Nimit this post helped me a lot buddy, hope you enjoy my post as well !
Charles ZvarimwaPosted Jun 5, 2021, 3:04 PM
I am a bit confused on the code for the CricketerDetails views, it seems like the same from the controller am I getting this wrong? I am a bit stuck there...
Charles ZvarimwaPosted Jun 4, 2021, 2:16 PM
Thank you for such as insightful tutorial, is there any chance I can download this to debug in my own environment. If so may I kindly have the link. Thank you
Antony JudesPosted Jan 2, 2019, 12:21 AM
When will you post "how to create a wizard using Ajax in ASP.NET MVC 5"
Robert O'BriantPosted Jan 25, 2018, 3:40 PM
Did you ever put out the article describing how to do this with Ajax?
Chris AldersonPosted Sep 11, 2017, 4:38 AM
Is there any similar tutorials that use more than one table in a database, so for example a registrartion form, i.e. table 1. Id firtsname, Surname, date of birthtable 2. Id Address line1 Address line2 ...etc...table FKtable 3. Id EMC Full name, Address, contact table Fk (Emergency contact EMC) It would be helpful is someone could help me out on this. Thank you
Sagar MandkePosted Aug 23, 2017, 3:31 PM
Nimit sir I have implemented this functionality successfully... But one issue. Previous button is not working. When I click on previous button, client side validation occurs. So I have to fill the data first, then It works perfectly. Any Help ?
Sagar MandkePosted Aug 22, 2017, 4:47 AM
I need help. I am newbie to MVC. I don't want to show ID field on the view. So, I used hidden field for ID. But model is giving error that ID field is required. What should I do now ? any suggestions...
Surajit BeraPosted Jan 21, 2017, 12:53 AM
But here two view is using.
Surajit BeraPosted Jan 7, 2017, 5:13 AM
Nimit Joshi sir Is it cross page posting or wizard??????
Anu VPosted Dec 17, 2016, 6:36 AM
Nice article.. thanks for sharing..
Robert McLendonPosted Nov 12, 2016, 11:45 PM
> "I've created the table in the database and I assume that you have the table for generating the model or you can create a new one." What are the specs for this table? Would it ok to use Code First and just start with your model cose and generate the db from that?
Sr KarthigaPosted Feb 21, 2016, 11:18 PM
nice one
Sr KarthigaPosted Feb 21, 2016, 11:17 PM
Nice explanation
Shubham KumarPosted Feb 11, 2016, 6:39 AM
nice
Manish Kumar ChoudharyPosted Dec 30, 2014, 11:07 PM
Nice and very useful post..
Hussain AfridiPosted Nov 24, 2014, 10:18 AM
i want to show data from database in html table in asp.net webforms.
Pasquale MarmittaPosted Jul 25, 2014, 11:20 AM
If you press the previous button (BtnPrevious) then you trigger data validation, so you can't go in the previous form until you fill the input correctly... Any idea about resolving this issue?