
A Grid is a very powerful and useful Layout in WPF. It enables you to arrange children elements in cells defined by rows and columns. In fact, when we add a new XAML document or create a new WPF Project in Visual Studio, Visual Studio automatically adds a Grid as the first container inside the window element.
We can create Rows and Columns in the following two ways.
First Method: By typing XAML Code
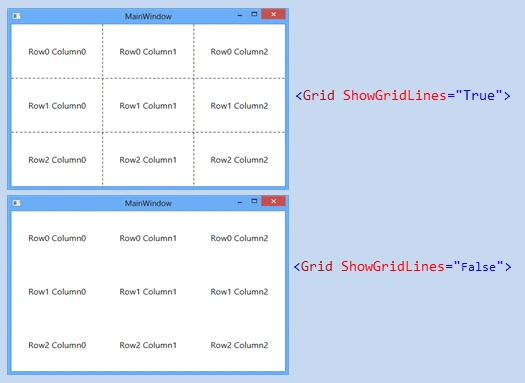
By default, a Grid has one row and one column. We can add more rows and columns by adding a RowDefinition Element for each row inside the Grid.RowDefinitions property and a ColumnDefinition Element for each column inside the Grid.ColumnDefinitions property. By default, GridLines are invisible. For showing the GridLines, set the ShowGridLines property of the Grid to True. GridLines are helpful during debugging for determining which element is in which cell.
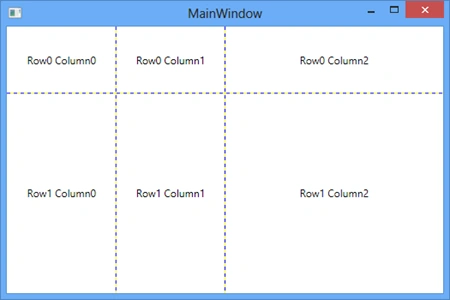
Let's understand it with a simple example. In this example, we have created 3 rows and 3 columns. Then added 9 TextBlocks and mainted the TextBlock position inside the grid by specifying the Grid.Row and Grid.Column values. If we don't specify a Grid.Row and Grid.Column property then an Element is placed in Grid.Row="0" and Grid.Column="0", in other words in First Row and First Column.
<Window x:Class="GridLayoutExample1.MainWindow"
        xmlns="http://schemas.microsoft.com/winfx/2006/xaml/presentation"
        xmlns:x="http://schemas.microsoft.com/winfx/2006/xaml"
        Title="MainWindow" Height="350" Width="525">
    <Grid ShowGridLines="True">
        <Grid.ColumnDefinitions>
            <ColumnDefinition></ColumnDefinition>
            <ColumnDefinition></ColumnDefinition>
            <ColumnDefinition></ColumnDefinition>
        </Grid.ColumnDefinitions>
        <Grid.RowDefinitions>
            <RowDefinition></RowDefinition>
            <RowDefinition></RowDefinition>
            <RowDefinition></RowDefinition>
        </Grid.RowDefinitions>
        <TextBlock Text="Row0 Column0" Grid.Row="0" Grid.Column="0" FontSize="16" VerticalAlignment="Center" HorizontalAlignment="Center"></TextBlock>
        <TextBlock Text="Row0 Column1" Grid.Row="0" Grid.Column="1" FontSize="16" VerticalAlignment="Center" HorizontalAlignment="Center"></TextBlock>
        <TextBlock Text="Row0 Column2" Grid.Row="0" Grid.Column="2" FontSize="16" VerticalAlignment="Center" HorizontalAlignment="Center"></TextBlock>
        <TextBlock Text="Row1 Column0" Grid.Row="1" Grid.Column="0" FontSize="16" VerticalAlignment="Center" HorizontalAlignment="Center"></TextBlock>
        <TextBlock Text="Row1 Column1" Grid.Row="1" Grid.Column="1" FontSize="16" VerticalAlignment="Center" HorizontalAlignment="Center"></TextBlock>
        <TextBlock Text="Row1 Column2" Grid.Row="1" Grid.Column="2" FontSize="16" VerticalAlignment="Center" HorizontalAlignment="Center"></TextBlock>
        <TextBlock Text="Row2 Column0" Grid.Row="2" Grid.Column="0" FontSize="16" VerticalAlignment="Center" HorizontalAlignment="Center"></TextBlock>
        <TextBlock Text="Row2 Column1" Grid.Row="2" Grid.Column="1" FontSize="16" VerticalAlignment="Center" HorizontalAlignment="Center"></TextBlock>
        <TextBlock Text="Row2 Column2" Grid.Row="2" Grid.Column="2" FontSize="16" VerticalAlignment="Center" HorizontalAlignment="Center"></TextBlock>
    </Grid>
</Window>
Preview

Second Method: By Clicking on Margin
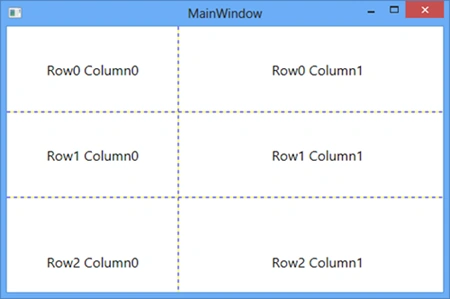
We can control a column's width and a row's height in the following 3 ways.
1) Automatic Sizing
Rows and columns are sized automatically to fit the content/child element.
Example:
<Grid ShowGridLines="True">
        <Grid.ColumnDefinitions>
            <ColumnDefinition Width="auto"></ColumnDefinition>
            <ColumnDefinition Width="auto"></ColumnDefinition>
        </Grid.ColumnDefinitions>
        <Grid.RowDefinitions>
            <RowDefinition Height="auto"></RowDefinition>
            <RowDefinition Height="auto"></RowDefinition>
        </Grid.RowDefinitions>
        <Button Content="Row0 column0" FontSize="16" Grid.Row="0" Grid.Column="0"></Button>
        <Button Content="Row0 column1" FontSize="16" Grid.Row="0" Grid.Column="1"></Button>
</Grid>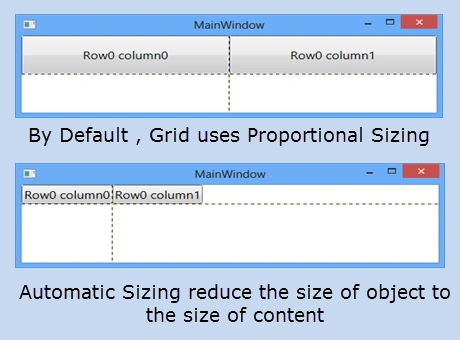
Asad AliPosted May 16, 2018, 3:35 AM
Good video. may i ask which screen recording software are you using?
kalu singh raoPosted Jul 11, 2016, 6:19 AM
Nice...