

Introduction
This article will demonstrate how to create an ASP.NET API to perform CRUD operations. We will create a new Web API project and implement GET, POST, PUT, and DELETE methods for a CRUD operation using Entity Framework. ASP.NET Web API is an extensible framework for building HTTP-based services that can be accessed in different applications on different platforms such as web, windows, mobile, etc.
Step 1. Open SQL Server 2014 (or the version of your choice) create a table and insert some records.
CREATE TABLE [dbo].[Employee](
    [Employee_Id] [int] IDENTITY(1,1) NOT NULL,
      NULL,
      NULL,
    [Salary] [money] NULL,
      NULL,
      NULL,
 CONSTRAINT [PK_Employee] PRIMARY KEY CLUSTERED
(
    [Employee_Id] ASC
)WITH (
    PAD_INDEX = OFF,
    STATISTICS_NORECOMPUTE = OFF,
    IGNORE_DUP_KEY = OFF,
    ALLOW_ROW_LOCKS = ON,
    ALLOW_PAGE_LOCKS = ON
) ON [PRIMARY]
) ON [PRIMARY]

GO
Step 2. Open Visual Studio 2017, click on New Project, and create an empty Web API application project.
Screenshot for creating new project 1

After clicking on New Project, one window will appear. Select Web from the left panel, choose ASP.NET Web Application, give a meaningful name to your project, and then click on OK as shown in the below screenshot.
Screenshot for creating new project 2

After clicking on OK one more window will appear; choose empty, check on the Web API checkbox then click on OK as shown in the below screenshot.
Screenshot for creating new project 3

After clicking OK, the project will be created with the name of WebAPICURD_Demo.
Step 3. Add Entity Framework now. For that, right-click on the Models folder, select Add, then select New Item, then click on it.
Screenshot for adding entity framework 1

After clicking on the New item, you will get a window; from there, select Data from the left panel and choose ADO.NET Entity Data Model, give it the name MyModel (this name is not mandatory you can give any name), and click on Add.
Screenshot for adding entity framework 2

After you click on "Add a window", the wizard will open, choose EF Designer from the database and click Next.
Screenshot for adding entity framework 3

After clicking on Next a window will appear. Choose New Connection. Another window will appear, add your server name if it is local then enter a dot (.). Choose your database and click on OK.
Screenshot for adding entity framework 4

The connection will be added. You can change the name of your connection below. It will save the connection in web config then click on Next.
Screenshot for adding entity framework 5

After clicking on NEXT another window will appear; choose database table name as shown in the below screenshot then click on Finish.
Entity framework will be added and the respective class gets generated under the Models folder.
Screenshot for adding entity framework 6

The following class will be added,
namespace WebAPICURD_Demo.Models
{
    using System;
    using System.Collections.Generic;
    public partial class Employee
    {
        public int Employee_Id { get; set; }
        public string First_Name { get; set; }
        public string Last_Name { get; set; }
        public Nullable<decimal> Salary { get; set; }
        public string Joing_Date { get; set; }
        public string Department { get; set; }
    }
}
Step 4. Right-click on the Controllers folder, select Add, then choose Controller as shown in the below screenshot.
Screenshot 1

After clicking on the controller, a window will appear. Choose Web API 2 Controller-Empty and click on Add.

After clicking on Add another window will appear with DefaultController. Change the name to EmployeeController then click on Add. EmployeeController will be added under the Controllers folder. Remember don’t change the Controller suffix for all controllers, change only highlight, and instead of Default just change Home as shown in the below screenshot.

Complete code for API controller
using System;
using System.Collections.Generic;
using System.Linq;
using System.Net;
using System.Net.Http;
using System.Web.Http;
using WebAPICURD_Demo.Models;
namespace WebAPICURD_Demo.Controllers
{
    public class EmployeeController : ApiController
    {
        public IEnumerable<Employee> GetEmployees()
        {
            using (EmployeeEntities db = new EmployeeEntities())
            {
                return db.Employees.ToList();
            }
        }
        public HttpResponseMessage GetEmployeeById(int id)
        {
            using (EmployeeEntities db = new EmployeeEntities())
            {
                var entity = db.Employees.FirstOrDefault(e => e.Employee_Id == id);
                if (entity == null)
                {
                    return Request.CreateErrorResponse(HttpStatusCode.NotFound, "Employee with id=" + id.ToString() + " not found");
                }
                else
                {
                    return Request.CreateResponse(HttpStatusCode.OK, entity);
                }
            }
        }
        public HttpResponseMessage Post([FromBody] Employee employee)
        {
            try
            {
                using (EmployeeEntities db = new EmployeeEntities())
                {
                    db.Employees.Add(employee);
                    db.SaveChanges();
                    var message = Request.CreateResponse(HttpStatusCode.Created, employee);
                    message.Headers.Location = new Uri(Request.RequestUri + employee.Employee_Id.ToString());
                    return message;
                }
            }
            catch (Exception ex)
            {
                return Request.CreateErrorResponse(HttpStatusCode.BadRequest, ex);
            }
        }
        public HttpResponseMessage Delete(int id)
        {
            using (EmployeeEntities db = new EmployeeEntities())
            {
                var entity = db.Employees.FirstOrDefault(e => e.Employee_Id == id);
                if (entity == null)
                {
                    return Request.CreateErrorResponse(HttpStatusCode.NotFound, "Employee with id=" + id.ToString() + "not found to delete");
                }
                else
                {
                    db.Employees.Remove(entity);
                    db.SaveChanges();
                    return Request.CreateResponse(HttpStatusCode.OK);
                }
            }
        }
        public HttpResponseMessage Put(int id, [FromBody] Employee employee)
        {
            using (EmployeeEntities db = new EmployeeEntities())
            {
                try
                {
                    var entity = db.Employees.FirstOrDefault(e => e.Employee_Id == id);
                    if (entity == null)
                    {
                        return Request.CreateErrorResponse(HttpStatusCode.NotFound, "Employee with id=" + id.ToString() + "not found to update");
                    }
                    else
                    {
                        entity.First_Name = employee.First_Name;
                        entity.Last_Name = employee.Last_Name;
                        entity.Salary = employee.Salary;
                        entity.Joing_Date = employee.Joing_Date;
                        entity.Department = employee.Department;
                        db.SaveChanges();
                        return Request.CreateResponse(HttpStatusCode.OK, entity);
                    }
                }
                catch (Exception ex)
                {
                    return Request.CreateErrorResponse(HttpStatusCode.BadRequest, ex);
                }
            }
        }
    }
}
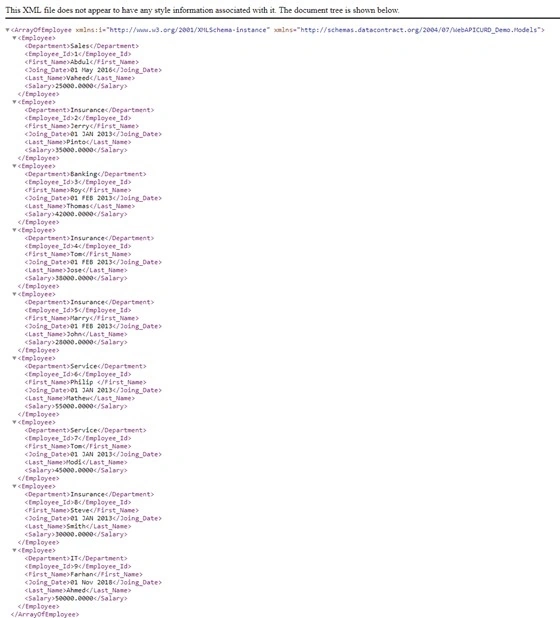
Step 5. Build a project and run the project by pressing ctrl+F5.
URL: portnumeber/api/controllerName
Output
URL: portnumeber/api/controllerName/id (search customer by id)
Output

Conclusion
I have created an ASP.NET Web API to perform GET, POST, PUT, and DELETE operations. It has been tested on Fiddler. I hope this will be helpful for beginners.
Mohan AroraPosted Oct 13, 2019, 2:22 AM
Sir i created viewmodel also but its throwing error like a multiple parameters cant be bind......sir can u help please
Mohan AroraPosted Oct 13, 2019, 2:10 AM
Hi sir I Like Your Post but i have a one questions how to call a post method with Multiple tables can u explain like eg :1) create table city(cityid int primary key,cityname nvarchar), 2) create table State(Stateid int primary key ,statename nvarchar), 3) create table country (CountryId int primarykey ,Countryname nvarchar, stateid int fk,CityId int fk)
Usman AzamPosted Sep 28, 2019, 6:52 AM
AOA Farhan bhai, how can I update multiple json objects using put method in web api?
Bijendra RathodPosted Jun 13, 2019, 7:40 AM
How to write post,put,delete method using request url in c#? plz help me..(note: the request url is "http://ide1.vivasa.in:59725/bag" .
vinoda patilPosted Oct 24, 2018, 11:08 AM
In get(int id) method in else block why you deleting that selected entity ?
Rushi MehtaPosted Oct 23, 2018, 11:13 PM
Thanks for sharing this will will help to every freaher