

Introduction
In this article, I will demonstrate how to display employee details using AngularJS in ASP.NET. I will upload the employee details using bootstrap 4 modal and insert them into a SQL database table and retrieve those using AngularJS and ASP.NET Web Service.
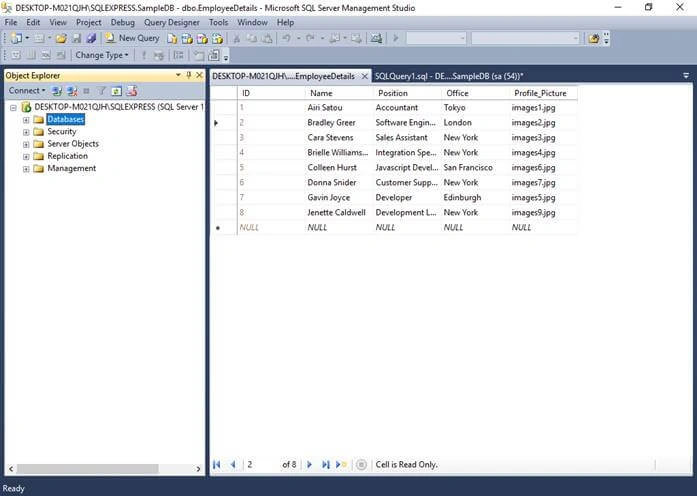
Step 1:Open SQL Server 2014 and create a database table.
- CREATE TABLE [dbo].[EmployeeDetails](
- [ID] [int] IDENTITY(1,1) NOT NULL,
- [Name] [nvarchar](50) NULL,
- [Position] [nvarchar](50) NULL,
- [Office] [nvarchar](50) NULL,
- [Profile_Picture] [nvarchar](50) NULL,
- CONSTRAINT [PK_EmployeeDetails] PRIMARY KEY CLUSTERED
- (
- [ID] ASC
- )WITH (PAD_INDEX = OFF, STATISTICS_NORECOMPUTE = OFF, IGNORE_DUP_KEY = OFF, ALLOW_ROW_LOCKS = ON, ALLOW_PAGE_LOCKS = ON) ON [PRIMARY]
- ) ON [PRIMARY]
- GO
- CREATE ALTER procedure [dbo].[spAddEmployeeDetails]
- (
- @Name nvarchar(50),
- @Position nvarchar(50),
- @Office nvarchar(50),
- @Profile_Picture nvarchar(50)
- )
- as
- begin
- insert into [dbo].[EmployeeDetails](Name,Position,Office,Profile_Picture)
- values(@Name,@Position,@Office,@Profile_Picture)
- end
- CREATE procedure [dbo].[spGetEmployeeDetails]
- as
- begin
- select ID,Name,Position,Office,Profile_Picture from [dbo].[EmployeeDetails]
- end
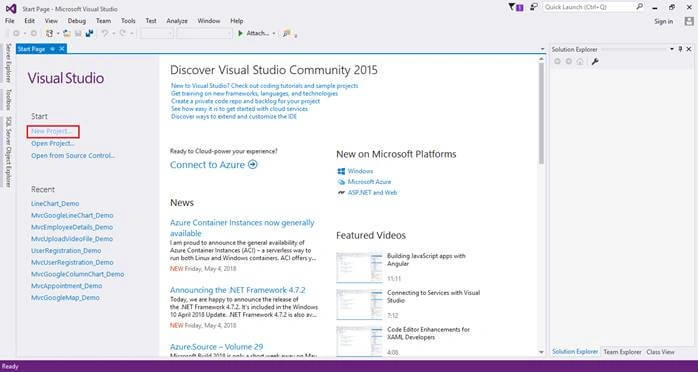
Step 2:Open Visual Studio 2015, click on New Project, and create an empty web application project.
Screenshot for creating new project 1
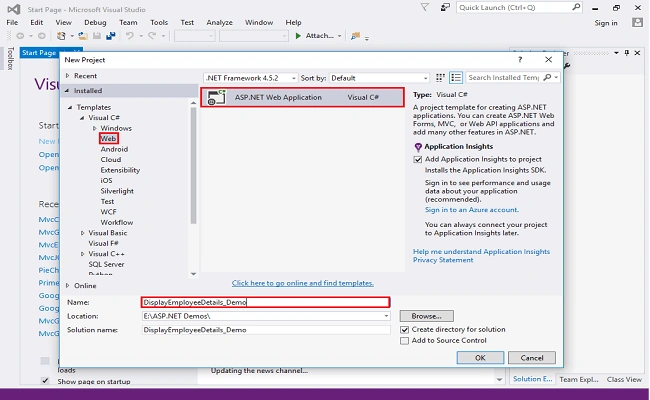
After clicking on New Project, one window will appear. Select Web from the left panel, choose ASP.NET Web Application, give it a meaningful name for your project, then click on OK as shown in the below screenshot.
Screenshot for creating new project 2
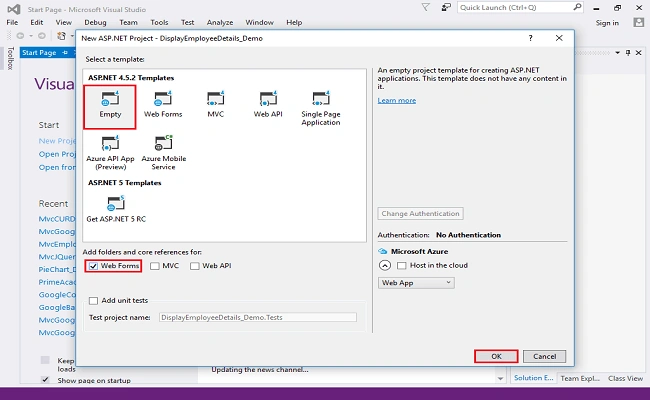
After clicking on OK, one more window will appear. Choose Empty, check on Web Forms checkbox, and click on OK.
Screenshot for creating new project 3
Step 3: Double-click on webconfig file to add database connection.
- <connectionStrings>
- <add name="DBCS" connectionString="data source=DESKTOP-M021QJH\SQLEXPRESS; database=SampleDB; integrated security=true;"/>
- </connectionStrings>
Add the following code to get data.
- <system.web>
- <webServices>
- <protocols>
- <add name="HttpGet"/>
- </protocols>
- </webServices>
- </system.web>
Step 4: Right-click on Models folder, select Add, then choose a class and click.
Add C# class screenshot 1
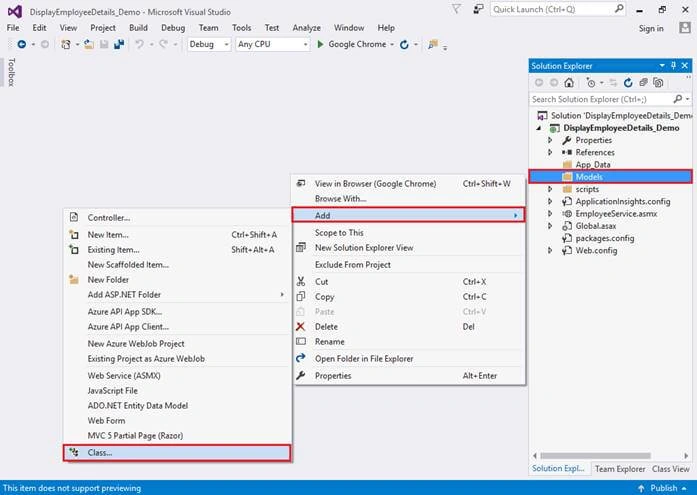
After that, a window will appear. Choose class as shown in the below image. Give it the name EmployeeDetails and click on Add.
Add C# class screenshot 2
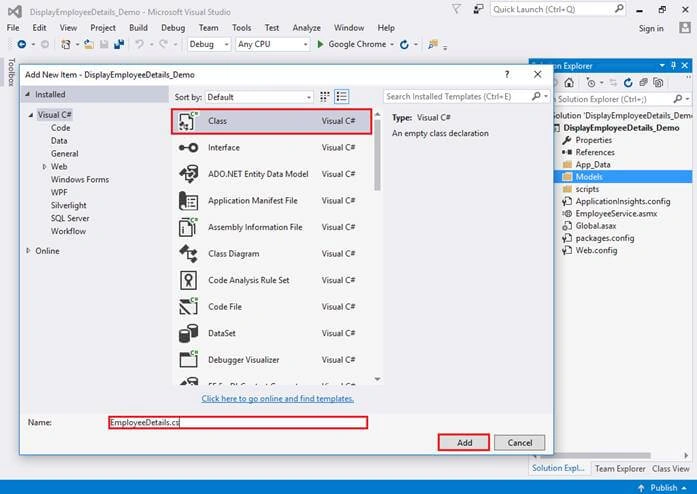
Write the following class.
- namespace DisplayEmployeeDetails_Demo.Models
- {
- public class EmployeeDetails
- {
- public int ID { get; set; }
- public string Name { get; set; }
- public string Position { get; set; }
- public string Office { get; set; }
- public Nullable<int>Experience{ get; set; }
- public string Profile_Picture { get; set; }
- }
- }
Step 5: Right click on the project, select Add, then choose a new item and click on it.
Screenshot for Web Service 1
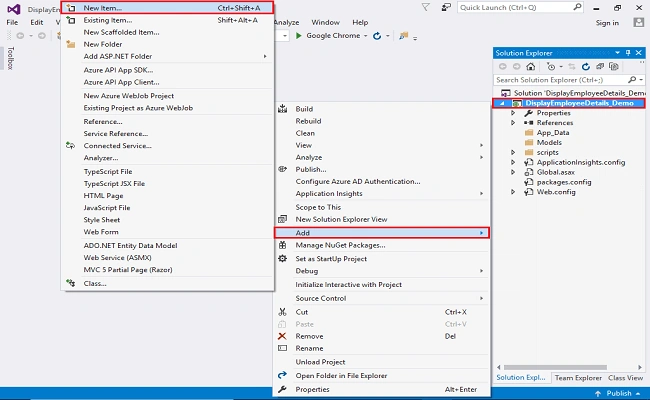
After that, a window will appear. Choose Web Service (ASMX). Give it a name as EmployeeService and click on Add.
Screenshot for Web Service 2
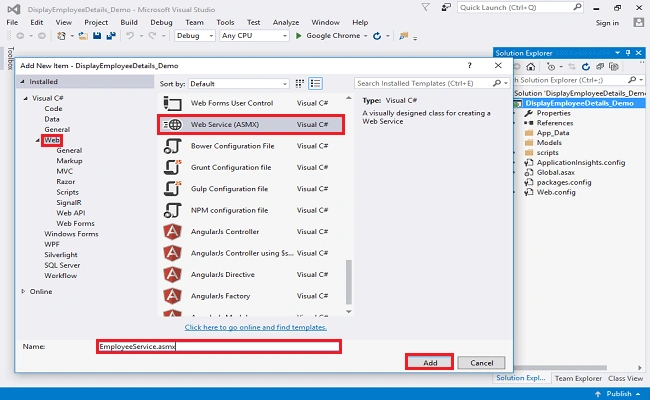
Add namespace
- using DisplayEmployeeDetails_Demo.Models;
- using System.Configuration;
- using System.Data;
- using System.Data.SqlClient;
- using System.Web.Script.Serialization;
- using System.Web.Services;
- Write following code in web service
- [WebMethod]
- public void GetEmployeeDetails()
- {
- List<EmployeeDetails> employeeList = new List<EmployeeDetails>();
- string CS = ConfigurationManager.ConnectionStrings["DBCS"].ConnectionString;
- using (SqlConnection con = new SqlConnection(CS))
- {
- SqlCommand cmd = new SqlCommand("spGetEmployeeDetails", con);
- cmd.CommandType = CommandType.StoredProcedure;
- con.Open();
- SqlDataReader rdr = cmd.ExecuteReader();
- while (rdr.Read())
- {
- EmployeeDetails emp = new EmployeeDetails();
- emp.ID = Convert.ToInt32(rdr["ID"]);
- emp.Name = rdr["Name"].ToString();
- emp.Position = rdr["Position"].ToString();
- emp.Office = rdr["Office"].ToString();
- emp.Profile_Picture = rdr["Profile_Picture"].ToString();
- employeeList.Add(emp);
- }
- }
- JavaScriptSerializer js = new JavaScriptSerializer();
- Context.Response.Write(js.Serialize(employeeList));
- }
Complete web service code
- using DisplayEmployeeDetails_Demo.Models;
- using System;
- using System.Collections.Generic;
- using System.Configuration;
- using System.Data;
- using System.Data.SqlClient;
- using System.Web.Script.Serialization;
- using System.Web.Services;
- namespace DisplayEmployeeDetails_Demo
- {
- /// <summary>
- /// Summary description for EmployeeService
- /// </summary>
- [WebService(Namespace = "http://tempuri.org/")]
- [WebServiceBinding(ConformsTo = WsiProfiles.BasicProfile1_1)]
- [System.ComponentModel.ToolboxItem(false)]
- // To allow this Web Service to be called from script, using ASP.NET AJAX, uncomment the following line.
- // [System.Web.Script.Services.ScriptService]
- public class EmployeeService : System.Web.Services.WebService
- {
- [WebMethod]
- public void GetEmployeeDetails()
- {
- List<EmployeeDetails> employeeList = new List<EmployeeDetails>();
- string CS = ConfigurationManager.ConnectionStrings["DBCS"].ConnectionString;
- using (SqlConnection con = new SqlConnection(CS))
- {
- SqlCommand cmd = new SqlCommand("spGetEmployeeDetails", con);
- cmd.CommandType = CommandType.StoredProcedure;
- con.Open();
- SqlDataReader rdr = cmd.ExecuteReader();
- while (rdr.Read())
- {
- EmployeeDetails emp = new EmployeeDetails();
- emp.ID = Convert.ToInt32(rdr["ID"]);
- emp.Name = rdr["Name"].ToString();
- emp.Position = rdr["Position"].ToString();
- emp.Office = rdr["Office"].ToString();
- emp.Profile_Picture = rdr["Profile_Picture"].ToString();
- employeeList.Add(emp);
- }
- }
- JavaScriptSerializer js = new JavaScriptSerializer();
- Context.Response.Write(js.Serialize(employeeList));
- }
- }
- }
Step 6: Right click on the project, select Add, then choose Web Form and click on it.
Screenshot adding web form 1

After that, one window will appear. Give it the name EmployeeList and click on OK.
Screenshot adding web form 2
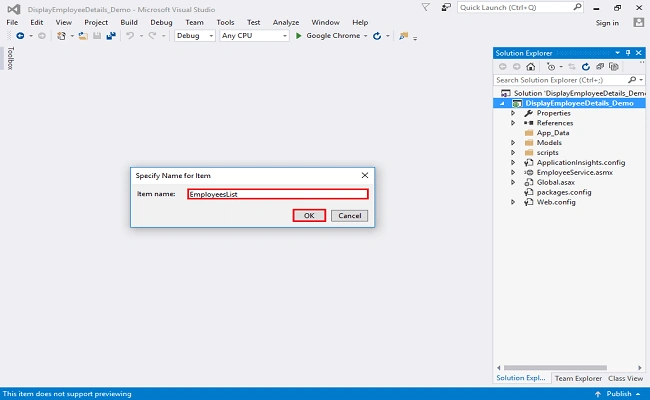
Add the following CDN link for style and script.
- <link rel="stylesheet" href="https://cdnjs.cloudflare.com/ajax/libs/font-awesome/4.7.0/css/font-awesome.min.css">
- <link rel="stylesheet" href="https://maxcdn.bootstrapcdn.com/bootstrap/4.0.0/css/bootstrap.min.css">
- <script src="https://ajax.googleapis.com/ajax/libs/jquery/3.3.1/jquery.min.js"></script>
- <script src="https://maxcdn.bootstrapcdn.com/bootstrap/4.0.0/js/bootstrap.min.js"></script>
- <script src="https://ajax.googleapis.com/ajax/libs/angularjs/1.6.4/angular.min.js"></script>
- <link href="EmployeeCard.css" rel="stylesheet" />
Write the script to retrieve data from the database.
- <script type="text/javascript">
- var app = angular
- .module("myModule", [])
- .controller("myController", function ($scope, $http) {
- $http.get("EmployeeService.asmx/GetEmployeeDetails")
- .then(function (response) {
- $scope.employees = response.data;
- });
- })
- </script>
Design web form
- <body ng-controller="myController">
- <form id="form1" runat="server">
- <div class="container py-4">
- <div class="card">
- <div class="card-header bg-primary text-white">
- <h5 class="card-title text-uppercase">Employee Details</h5>
- </div>
- <div class="card-body">
- <button type="button" class="btn btn-primary rounded-0" data-toggle="modal" data-target="#myModal">
- <i class="fa fa-plus-circle"></i>Add New
- </button>
- <div class="modal" id="myModal">
- <div class="modal-dialog modal-lg">
- <div class="modal-content">
- <div class="modal-header">
- <h5 class="modal-title">Employee Details</h5>
- <button type="button" class="close" data-dismiss="modal">×</button>
- </div>
- <div class="modal-body">
- <div class="row">
- <div class="col-md-6">
- <div class="form-group">
- <label>Name:</label>
- <div class="input-group">
- <div class="input-group-prepend">
- <span class="input-group-text"><i class="fa fa-user"></i></span>
- </div>
- <asp:TextBox ID="txtName" CssClass="form-control" runat="server"></asp:TextBox>
- </div>
- </div>
- </div>
- <div class="col-md-6">
- <div class="form-group">
- <label>Position:</label>
- <div class="input-group">
- <div class="input-group-prepend">
- <span class="input-group-text"><i class="fa fa-suitcase"></i></span>
- </div>
- <asp:TextBox ID="txtPosition" CssClass="form-control" runat="server"></asp:TextBox>
- </div>
- </div>
- </div>
- </div>
- <div class="row">
- <div class="col-md-6">
- <div class="form-group">
- <label>Office:</label>
- <div class="input-group">
- <div class="input-group-prepend">
- <span class="input-group-text"><i class="fa fa-building"></i></span>
- </div>
- <asp:TextBox ID="txtOffice" CssClass="form-control" runat="server"></asp:TextBox>
- </div>
- </div>
- </div>
- <div class="col-md-6">
- <div class="form-group">
- <label>Profile Picture:</label>
- <div class="custom-file">
- <asp:FileUpload ID="ProfileFileUpload" CssClass="custom-file-input" runat="server" />
- <label class="custom-file-label"></label>
- </div>
- </div>
- </div>
- </div>
- </div>
- <div class="modal-footer">
- <asp:Button ID="btnSubmit" CssClass="btn btn-primary rounded-0" runat="server" Text="Submit" OnClick="btnSubmit_Click" />
- <button type="button" class="btn btn-danger rounded-0" data-dismiss="modal">Close</button>
- </div>
- </div>
- </div>
- </div>
- <div class="row">
- <div class="col-md-3 col-sm-6" ng-repeat="emplopye in employees">
- <div class="our-team">
- <div class="pic">
- <img ng-src="{{emplopye.Profile_Picture}}" />
- </div>
- <h3 class="title">{{emplopye.Name}}</h3>
- <span class="post">{{emplopye.Position}}</span>
- <span class="post">{{emplopye.Office}}</span>
- <ul class="social">
- <li><a href="#" class="fa fa-facebook"></a></li>
- <li><a href="#" class="fa fa-twitter"></a></li>
- <li><a href="#" class="fa fa-google-plus"></a></li>
- <li><a href="#" class="fa fa-linkedin"></a></li>
- </ul>
- </div>
- </div>
- </div>
- </div>
- </div>
- </form>
- </body>
Step 7: Right click
on project, select add, then choose stylesheet. Give it the name EmployeeCard.
- .our-team{
- padding: 20px 15px 30px;
- background: #fff;
- text-align: center;
- border: 1px solid #1b1e21;
- margin-top: 10px;
- margin-bottom: 10px;
- box-shadow: 1px 1px 1px #212529;
- border-radius: 3px;
- }
- .our-team .pic{
- display: inline-block;
- width: 100%;
- height: 100%;
- background: #fff;
- padding: 10px;
- margin-bottom: 25px;
- transition: all 0.5s ease 0s;
- }
- .our-team:hover .pic{
- background: #17bebb;
- border-radius: 50%;
- }
- .pic img{
- width: 100%;
- height: auto;
- border-radius: 50%;
- }
- .our-team .title{
- display: block;
- font-size: 16px;
- font-weight: 600;
- color: #2e282a;
- text-transform: uppercase;
- margin: 0 0 7px 0;
- }
- .our-team .post{
- display: block;
- font-size: 15px;
- color: #17bebb;
- text-transform: capitalize;
- margin-bottom: 10px;
- }
- .our-team .social{
- padding: 0;
- margin: 0;
- list-style: none;
- }
- .our-team .social li{
- display: inline-block;
- margin-right: 5px;
- }
- .our-team .social li a{
- display: block;
- width: 30px;
- height: 30px;
- line-height: 30px;
- border-radius: 50%;
- font-size: 15px;
- color: #17bebb;
- border: 1px solid #17bebb;
- transition: all 0.5s ease 0s;
- }
- .our-team:hover .social li a{
- background: #17bebb;
- color: #fff;
- }
- @media only screen and (max-width: 990px){
- .our-team{ margin-bottom: 30px; }
- }
Add namespace
- using System.Data;
- using System.Data.SqlClient;
- using System.Configuration;
- using System.IO;
Complete code for C# backend
- using System;
- using System.Data;
- using System.Data.SqlClient;
- using System.Configuration;
- using System.IO;
- namespace DisplayEmployeeDetails_Demo
- {
- public partial class EmployeesList : System.Web.UI.Page
- {
- protected void Page_Load(object sender, EventArgs e)
- {
- if (!IsPostBack)
- {
- ClearTexBox();
- }
- }
- private void ClearTexBox()
- {
- txtName.Text = string.Empty;
- txtPosition.Text = string.Empty;
- txtOffice.Text = string.Empty;
- }
- protected void btnSubmit_Click(object sender, EventArgs e)
- {
- if (ProfileFileUpload.PostedFile!=null)
- {
- string FileName = Path.GetFileName(ProfileFileUpload.PostedFile.FileName);
- ProfileFileUpload.SaveAs(Server.MapPath("/images" + FileName));
- string CS = ConfigurationManager.ConnectionStrings["DBCS"].ConnectionString;
- using (SqlConnection con = new SqlConnection(CS))
- {
- SqlCommand cmd = new SqlCommand("spAddEmployeeDetails",con);
- cmd.CommandType = CommandType.StoredProcedure;
- con.Open();
- cmd.Parameters.AddWithValue("@Name",txtName.Text.Trim());
- cmd.Parameters.AddWithValue("@Position",txtPosition.Text.Trim());
- cmd.Parameters.AddWithValue("@Office",txtOffice.Text.Trim());
- cmd.Parameters.AddWithValue("@Profile_Picture","images" + FileName);
- cmd.ExecuteNonQuery();
- ClearTexBox();
- }
- }
- }
- }
- }
Step 9: Run the project by pressing ctrl+F5.
Screenshot 1
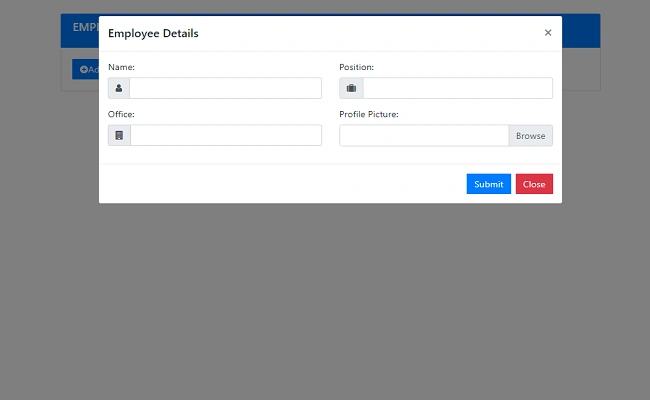
Screenshot 2
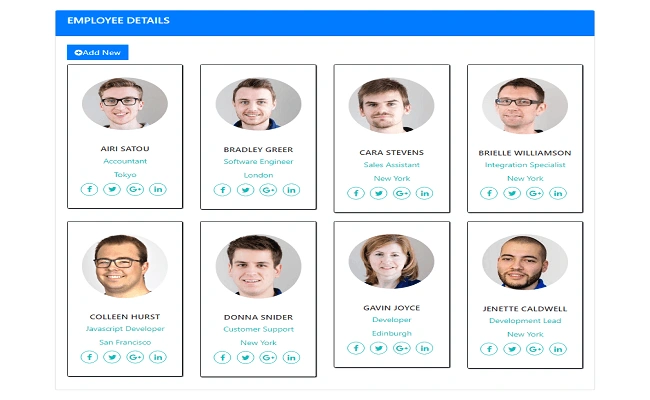
Conclusion
In this article, I have explained how we can display employee list with their respective data. I hope this is useful for you.
Subhashkumar YadavPosted May 28, 2018, 12:38 AM
Hi can you explain this code <script type="text/javascript"> var app = angular .module("myModule", []) .controller("myController", function ($scope, $http) { $http.get("EmployeeService.asmx/GetEmployeeDetails") .then(function (response) { $scope.employees = response.data; }); }) </script>