
In this article, I will explain how to insert, edit, update and delete records in a GridView without a database in ASP.NET.
- Go to Start, then All Programs and open Microsoft Visual Studio 2013.
- Now, click on File, then select New Project and click on Visual C#. Then select ASP.NET Web Application, Empty and click on OK.
- Provide the web application name and location as you wish. I named my web application InsertEditUpdateDeleteGridviewWithOutDB.
- Now the project will be opened. Right-click on the web application name, add a New Item and select Web Form. Then click on Add.
- Add the following code between the <form> tags of the WebForm1.aspx page.
- <div align="center">
- <table>
- <tr>
- <td>EmpId</td>
- <td>
- <asp:TextBox ID="txtEmpId" runat="server" />
- </td>
- </tr>
- <tr>
- <td>EmpName</td>
- <td>
- <asp:TextBox ID="txtEmpName" runat="server" />
- </td>
- </tr>
- <tr>
- <td>EmpSalary</td>
- <td>
- <asp:TextBox ID="txtEmpSalary" runat="server" />
- </td>
- </tr>
- <tr>
- <td>Department</td>
- <td>
- <asp:TextBox ID="txtDept" runat="server" />
- </td>
- </tr>
- </table>
- <br />
- <asp:Button ID="btnInsert" runat="server" Text="Insert" Height="30" Width="70" OnClick="btnInsert_Click" OnClientClick="return validate();" />
- <br /><br />
- <asp:GridView ID="GridView1" HeaderStyle-BackColor="#3AC0F2" HeaderStyle-ForeColor="White" runat="server" AutoGenerateColumns="false" OnRowEditing="GridView1_RowEditing">
- <Columns>
- <asp:BoundField DataField="EmpId" HeaderText="EmpId" ReadOnly="true" />
- <asp:BoundField DataField="EmpName" HeaderText="EmpName" />
- <asp:BoundField DataField="EmpSalary" HeaderText="EmpSalary" />
- <asp:BoundField DataField="Dept" HeaderText="Department" />
- <asp:TemplateField>
- <ItemTemplate>
- <asp:LinkButton Text="Edit" runat="server" CommandName="Edit" />
- <asp:LinkButton Text="Delete" runat="server" OnClick="OnDelete" />
- </ItemTemplate>
- <EditItemTemplate>
- <asp:LinkButton Text="Update" runat="server" OnClick="OnUpdate" />
- <asp:LinkButton Text="Cancel" runat="server" OnClick="OnCancel" />
- </EditItemTemplate>
- </asp:TemplateField>
- </Columns>
- </asp:GridView>
- </div>
6. Add the following code to the page load event method of the WebForm1.aspx.cs page.
- protected void Page_Load(object sender, EventArgs e)
- {
- if (!this.IsPostBack)
- {
- DataTable dt = new DataTable();
- dt.Columns.Add("EmpId");
- dt.Columns.Add("EmpName");
- dt.Columns.Add("EmpSalary");
- dt.Columns.Add("Dept");
- dt.Rows.Add(1, "JACKSON", 75000, "RESEARCH");
- dt.Rows.Add(2, "JOHNSON", 18000, "ACCOUNTING");
- dt.Rows.Add(3, "GRANT", 32000, "SALES");
- dt.Rows.Add(4, "ADAMS", 34000, "OPERATIONS");
- ViewState["dt"] = dt;
- BindGrid();
- }
- }
- protected void BindGrid()
- {
- GridView1.DataSource = ViewState["dt"] as DataTable;
- GridView1.DataBind();
- }
7. Add the following code to the GridView1_RowEditing event method of the WebForm1.aspx.cs page.
- protected void GridView1_RowEditing(object sender, GridViewEditEventArgs e)
- {
- GridView1.EditIndex = e.NewEditIndex;
- BindGrid();
- }
8. Add the following code to the OnUpdate event method of the WebForm1.aspx.cs page.
- protected void OnUpdate(object sender, EventArgs e)
- {
- GridViewRow row = (sender as LinkButton).NamingContainer as GridViewRow;
- string empname=((TextBox)row.Cells[1].Controls[0]).Text;
- int empsal = Convert.ToInt32(((TextBox)row.Cells[2].Controls[0]).Text);
- string dept = ((TextBox)row.Cells[3].Controls[0]).Text;
- DataTable dt = ViewState["dt"] as DataTable;
- dt.Rows[row.RowIndex]["EmpName"] = empname;
- dt.Rows[row.RowIndex]["EmpSalary"] = empsal;
- dt.Rows[row.RowIndex]["Dept"] = dept;
- ViewState["dt"] = dt;
- GridView1.EditIndex = -1;
- BindGrid();
- }
9. Add the following code to the OnCancel event method of the WebForm1.aspx.cs page.
- protected void OnCancel(object sender, EventArgs e)
- {
- GridView1.EditIndex = -1;
- BindGrid();
- }
10. Add the following code to the OnDelete event method of the WebForm1.aspx.cs page.
- protected void OnDelete(object sender, EventArgs e)
- {
- GridViewRow row = (sender as LinkButton).NamingContainer as GridViewRow;
- DataTable dt = ViewState["dt"] as DataTable;
- dt.Rows.RemoveAt(row.RowIndex);
- ViewState["dt"] = dt;
- BindGrid();
- }
11. Add the following code to the btnInsert_Click event method of the WebForm1.aspx.cs page.
- protected void btnInsert_Click(object sender, EventArgs e)
- {
- DataTable dt = ViewState["dt"] as DataTable;
- dt.Rows.Add(txtEmpId.Text, txtEmpName.Text, txtEmpSalary.Text, txtDept.Text);
- ViewState["dt"] = dt;
- BindGrid();
- txtEmpId.Text = string.Empty;
- txtEmpName.Text = string.Empty;
- txtEmpSalary.Text = string.Empty;
- txtDept.Text = string.Empty;
- }
12. Add a <script> tag between the <head> tags and write the following code in it.
- <script type="text/javascript">
- function validate()
- {
- var empid = document.getElementById("txtEmpId").value;
- var empname = document.getElementById("txtEmpName").value;
- var empsalary = document.getElementById("txtEmpSalary").value;
- var dept = document.getElementById("txtDept").value;
- if(empid=="" || empname=="" || empsalary=="" || dept=="")
- {
- alert("Fill All the Fields");
- return false;
- }
- else
- {
- return true;
- }
- }
- </script>
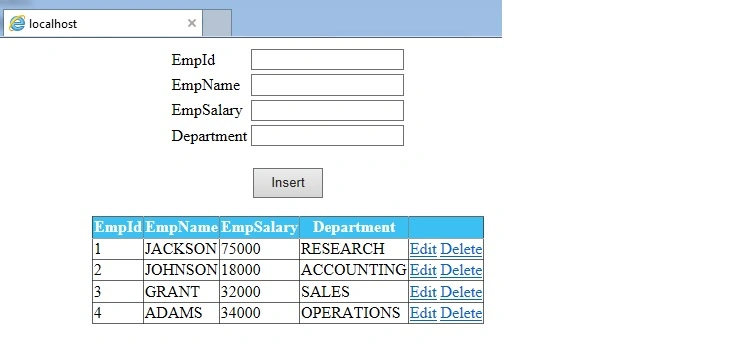
13. Now run the application and you can see it in your browser.
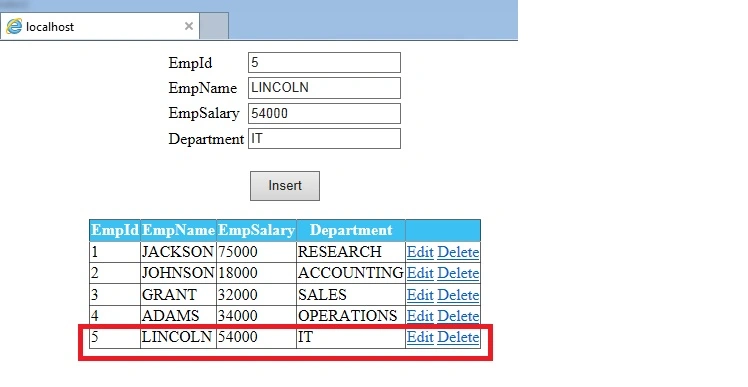
14. Now, insert one record into the GridView.
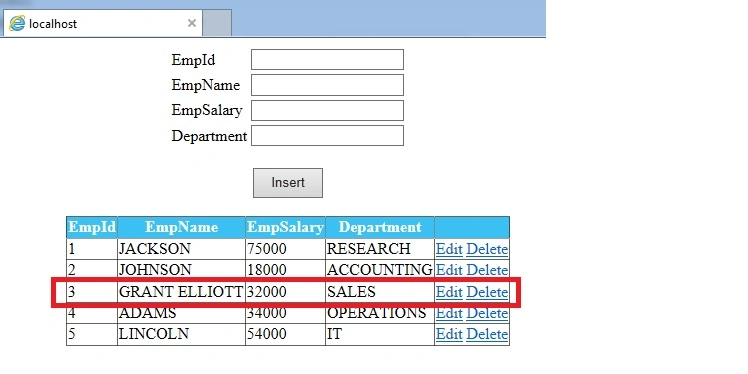
15. Now, update the Name GRANT of the EmpId 3 record to GRANT ELLIOTT.
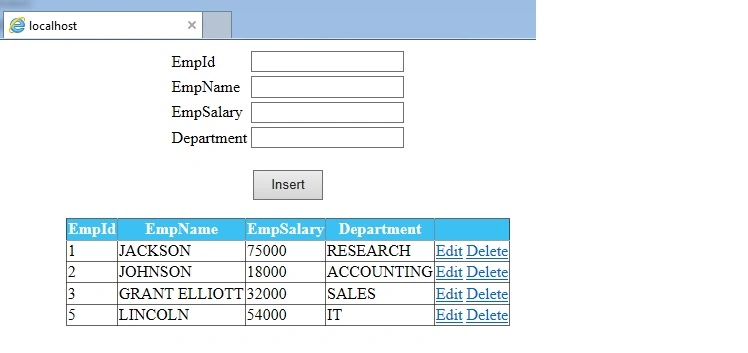
16. Now, delete EmpId 4 Record.
Akshay PPosted Apr 19, 2019, 2:34 AM
How to update Empid without setting it to auto-increment, my empid is not getting updated in edit mode and remaining all fields are getting updated
romil silwalPosted Mar 14, 2018, 12:21 AM
How can we do his same for repater instead of gridview
Yashwanth MuthineniPosted Aug 19, 2015, 6:20 AM
Nice Share
Santhakumar MunuswamyPosted Aug 18, 2015, 2:32 PM
Good one
Shridhar SharmaPosted Aug 18, 2015, 1:22 PM
good one
Chervine BhiwooPosted Aug 18, 2015, 11:22 AM
Nice Article
Govinda Rajulu YemineniPosted Aug 18, 2015, 8:59 AM
Thank you all
Vipul MalhotraPosted Aug 18, 2015, 8:53 AM
nice Article
Sibeesh VenuPosted Aug 18, 2015, 8:15 AM
Nice Share
Rahul PrajapatPosted Aug 18, 2015, 7:31 AM
Good one
RakeshPosted Aug 18, 2015, 3:20 AM
nice one
Gowtham KPosted Aug 18, 2015, 3:03 AM
Good one
Nilesh JadavPosted Aug 18, 2015, 2:38 AM
Nice one sir
Upendra Pratap ShahiPosted Aug 18, 2015, 2:10 AM
nice share..
Vaikesh K PPosted Aug 18, 2015, 2:08 AM
Good one
mahesh patidarPosted Aug 18, 2015, 1:48 AM
Nice but i am unable to update the row using the above code. am i doing somthing wromg...
Rajeesh MenothPosted Aug 18, 2015, 12:36 AM
Nice Share