

Introduction:
This article describes an easy approach to creating custom web controls used to display Microsoft DirectX Image Transformation filter effects in an ASP.NET 2.0 web page. The article includes a class library containing eleven different controls, each of which demonstrates some aspect of the Microsoft DirectX Image Transformation filter effects. Of the eleven included controls, five are page transition effects, the other six are filter effects used to enhance the appearance of text.
Of the six controls used to enhance the appearance of text, each is implemented as a container control. This will permit the user to either key text directly into the container, or to place a label inside the control and apply the effect to the label. The option to use a label control was intended to provide an easy method for sizing, centering, and formatting the text using standard HTML.
The remaining five controls are used to add page transition effects to a web page without writing any additional HTML or C# code. To use the control, the user need only drop it onto the form. There is not visual component to the control whilst the page is displayed in the browser, however, when the user leaves the page, the transition effect is used to open the next page.The included demonstration project contains a simple web site with a single default.aspx page; the page demonstrates each of the six text enhancement controls and one of the page transition effect controls.
The approach applied within the article, demo project, and control library are applicable only for use in Internet explorer, the approach is not intended to support other browser types. If you are targeting Microsoft Internet Explorer only, this article may be of some value to you, otherwise you may wish to consider an alternative approach. If you are working, for example, on a company intranet site and you are assured that all of the users will have access to Internet explorer, this control set and approach may be of some use to you. If you deploy the controls publicly, users surfing with a non-internet explorer browser will still be able to read the text but the effects will be absent. If you do deploy to the public, you may wish to check the user's browser and if it is not IE, suggest to them that the site is best viewed with IE.
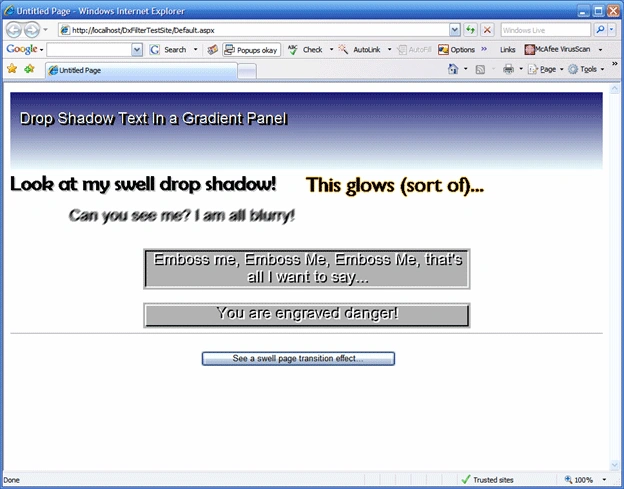
Figure 1: Filter Effects in the Demo Project
Getting Started:
To get started, unzip the included class library and demonstration projects. In examining the contents you will see two projects within a solution. The project entitled, "DxFilterControls" is a class library and it contains the eleven controls previously mentioned. The project entitled, "DxFilterTestSite" is the demonstration web site where the controls are displayed and made viewable in a single default.aspx web page.
Within the DX Filter Controls project, there are eleven separate controls:
- CCBlurredLabel
- CCDropShadow
- CCEmboss
- CCEngrave
- CCGlowingText
- CCGradient
- CCPageTransition_Iris
- CCPageTransition_Pixelate
- CCPageTransition_RadialWipe
- CCPageTransition_GradientWipe
- CCPageTransition_Wheel
As I have mentioned, the first six controls are used to enhance the appearance of text through the application of a Microsoft Direct X filter. Each of these controls was constructed as a container and any text placed into the container directly or within a label will have the filter applied to it so long as it is rendered into a Microsoft Internet Explorer browser.
The first five controls are strictly dedicated to supply some text enhancement filter to the container content. Item six, "CCGradient" is merely a panel with a gradient background and it really does not alter or act directly upon the text within the container, it just provides a gradient backdrop to the text or labels placed into that container.
Controls seven to eleven are page transition effects. You may drop a single page transition control onto a form and set its properties (and there are not many to set). As a result, when the user exits the current page, the next page to open will open with the specified effect. Whilst in this instance, I used the controls to set up a transition effect when traversing to a new page, these transition effects may be configured to call the effect when the container page is loaded, or may even be used to apply the transition effect within a single page to do things like show an effect when replacing an image with a new image.
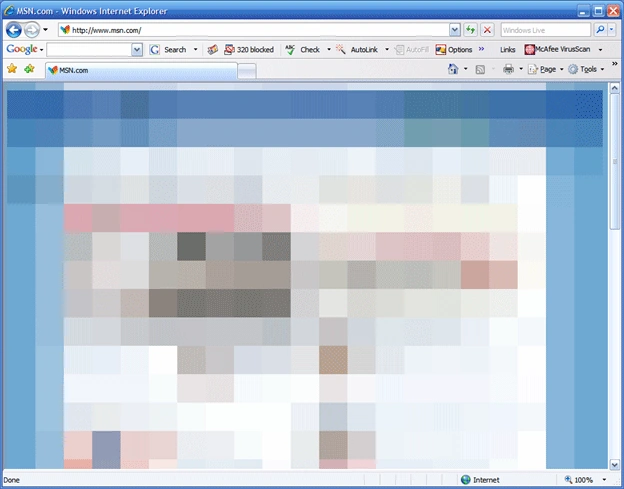
Figure 2: Pixelate Page Transition Effect in Mid Stride
This is not an exhaustive set of controls but I feel they do an adequate job of demonstrating what can be achieved with the filter effects provided through Direct X. You may wish to explore other filter effects by examining the applicable Microsoft documentation available on the web.
Text Enhancement Filter Effect Controls.
Each of the six text enhancement effects contained in the sample control library are all basically written in the same format. Rather than describe each of these very similar controls, I will describe the CCEmboss control. The CCEmboss control inherits from the System.Web.UI.WebControl; to the basic web control I have added a reference to System.Design and have added an import statement to include the System.Web.UI.Design library into the project. This addition is critical to setting up some elements of design time support intended to make the control easier to use at design time. The code is divided into three separate regions: Declarations, Properties, and Rendering. Take a look at the beginning of the class definition:
using System;
using System.Collections.Generic;
using System.ComponentModel;
using System.Text;
using System.Web;
using System.Web.UI;
using System.Web.UI.Design;
using System.Web.UI.WebControls;
[Designer(GetType(EmbossedLabelDesigner))]
[ParseChildren(False)]
public class CCEmboss:WebControl
{
The declarations region follows next and it is pretty simple, it contains a couple of private member variable used to retain the user's selections for this control. You may wish to consult the Microsoft documentation on this filter to see if there are any other properties that you may wish to exploit but the variables included in this class are sufficient to generate the effect.
#Region "Declarations"
Boolean mEnabled;
Single mBias;
#End Region
After the declarations, the property region is written, its contents are limited to providing public access to the private member variable's content; this region looks like this:
#Region "Properties"
[Category("Embossed Label")]
[Browsable(True)]
[Description("Enable or display the embossed effect.")]
public Boolean EmbossEnabled
{
get
{
EnsureChildControls();
return mEnabled;
}
set
{
EnsureChildControls();
mEnabled = value;
}
}
[Category("Embossed Label")]
[Browsable(True)]
[Description("Set the bias for the embossed effect.")]
public Single Bias
{
get
{
EnsureChildControls();
return mBias;
}
set
{
EnsureChildControls();
mBias = value;
}
}
#End Region
#Region "Rendering"
protected override void AddAttributesToRender(HtmlTextWriter writer)
{
writer.AddStyleAttribute(HtmlTextWriterStyle.Filter,"progid:DXImageTransform.Microsoft.Emboss(bias=" & Bias.ToString() & ",enabled = " & EmbossEnabled.ToString() & ");width:" & Width.Value.ToString() & "px");
MyBase.AddAttributesToRender(writer);
}
#End Region
Here we have overridden the AddAttributesToRender subroutine and we are using the HtmlTextWriter to add a style attribute. That attribute is the Direct X filter. You can also see that the properties exposed earlier (bias and enabled) are passed to the subroutine within the filter definition. This is the bit that will add the filter effect to the container at run time.
Trailing this section is the definition of the EmbossedLabelDesigner class; this could have been written into a separate class file however I rather prefer this approach because it keeps the designer code with the target all nice and neat. This code supplies the design time support for the control:
public class EmbossedLabelDesigner: ContainerControlDesigner
{
protected override void AddDesignTimeCssAttributes(System.Collections.IDictionary styleAttributes)
{
CCEmboss embossLbl = CType(Me.Component, CCEmboss);
styleAttributes.Add("filter", "progid:DXImageTransform.Microsoft.Emboss(bias=" & embossLbl.Bias.ToString() & ",enabled = " & embossLbl.Enabled.ToString() & ");width:" & embossLbl.Width.Value.ToString() & "px");
MyBase.AddDesignTimeCssAttributes(styleAttributes);
}
}
Page Transition Effect Controls.
This section, like the previous one, will describe one of the five page transition effect controls provided in the example; due to the similarity between each of the controls, there is no real need to discuss each of the page transition effect controls separately. I will discuss the gradient wipe transition effect control herein; please refer to the sample code provided to see the differences between this control and the others.
The gradient wipe page transition control (CCPageTransitition_GradientWipe) begins in a manner consistent with the text enhancement control already mentioned. The code is divided up into three major regions: Declarations, Properties, and Rendering.
The class declaration section looks like this:
using System;
using System.Collections.Generic;
using System.ComponentModel;
using System.Text;
using System.Web;
using System.Web.UI;
using System.Web.UI.Design;
using System.Web.UI.WebControls;
/// <summary>
/// Transition Effects (Internet Explorer Only)
/// Drop this control onto a web page and when the page is exited, the next page will be displayed
/// using the transition effect (Gradient Wipe)
/// </summary>
public class CCPageTransitition_GradientWipe : WebControl
{
private void CCPageTransitition_GradientWipe_Init(Object sender, System.EventArgs e)
{
Me.Width = 20;
Me.Height = 20;
}
Following the class initialization, I have added the Declarations region. This region is used to store each of the private member variables used within the class. The declarations region looks like this:
#Region "Declarations"
private Single mDuration = 1;
#End Region
#Region "Properties"
[Category("Gradient Wipe Transition")]
[Browsable(True)]
[Description("Set the effect duration (typically 1 or 2)")]
public Single TransitionDuration
{
get
{
return mDuration;
}
{
mDuration = value;
}
}
#End Region
This property is used to set the length of time over which the effect will occur during the page transition. That brings us to the final region in the code, "Rendering":
#Region "Rendering"
protected override void RenderContents(System.Web.UI.HtmlTextWriter writer)
{
try
{
StringBuilder sb;
sb.Append("<meta http-equiv='Page-Exit' ");
sb.Append("content='progid:DXImageTransform.Microsoft.gradientWipe(duration=" & TransitionDuration.ToString() & ")' />");
writer.RenderBeginTag(HtmlTextWriterTag.Div);
writer.Write(sb.ToString());
writer.RenderEndTag();
}
catch (Exception ex)
{
// with no properties set, this will render "Gradient Wipe Transition Control" in a
// a box on the page
writer.RenderBeginTag(HtmlTextWriterTag.Div);
writer.Write("Gradient Wipe Transition Control");
writer.RenderEndTag();
}
}
#End Region
This code is pretty straight forward, the render contents subroutine is overwritten and the new is wrapped in a try-catch block. While I am not processing any errors, in the event of an error, I am just writing out the string "Gradient Wipe Transition Control" into a div as a replacement to a viable control.
The code attempted in the try merely uses a string builder to format the text that we want placed directly into the web page's source at run time. The code contained in the string builder is used to set up the request to associate the page exit event with the generation of the page transition filter effect. You may also note that the duration property is passed to string builder where it is used to set the value of the duration parameter used by the filter.
After the string builder is configured, the contents of the string builder are written to the page. Whenever this or any other page transition control contained in the sample class library is added to a page, the page exit is similarly attributed and as a result whenever the user leaves the page, the next page will be displayed using the transition effect.
Conclusion.
That pretty much wraps this up; do have a look at each of the controls and experiment with them in the test web site. There are other filter effects and page transitions available should you wish to extend the library; similarly, there are other properties for some of the filters discussed herein and you may find those properties useful.
NOTE: THIS ARTICLE IS CONVERTED FROM VB.NET TO C# USING A CONVERSION TOOL. ORIGINAL ARTICLE CAN BE FOUND ON VB.NET Heaven (http://www.vbdotnetheaven.com/).
michaelPosted Jul 25, 2007, 11:52 AM
The Zip file is either incomplete or corrupted .. the default.aspx is empty and the cs files are not compilable..