

Introduction
We can insert a rich text editor in our project using JQuery and ASP.NET MVC 6. We have many open-source libraries like TinyMCE, CKEditor, and Summernote, allowing us to insert text editors in the ASP.NET MVC project. However, I will be using TinyMCE in this article.
In this article, I will describe the following points.
- What is TinyMCE
- Creating an ASP.NET MVC 6 Project
- Installing TinyMCE
- Using TinyMCE in ASP.NET MVC 6 Project
- Formating TinyMCE Text Editor
Prerequisites
- Visual Studio 2022 is installed on your machine
- Basic knowledge of JQuery
What is TinyMCE
TinyMCE is an open-source rich text editor. The output created in this editor is in HTML5 and it can include lists, tables, and other valuable elements. To know more about the TinyMCE please refer here. The below-given image shows a basic UI of the TinyMCE text editor.

Creating An ASP.NET MVC 6 Project
To create an ASP.NET MVC project you need to do the following steps.
- Open Visual Studio 2022 and create a new project as given in the below image,

- Now select ASP.NET Core Web App(Model View Controller) from the project template and click Next as given in the below image.

- Now give the proper name to your project and solution as given below.
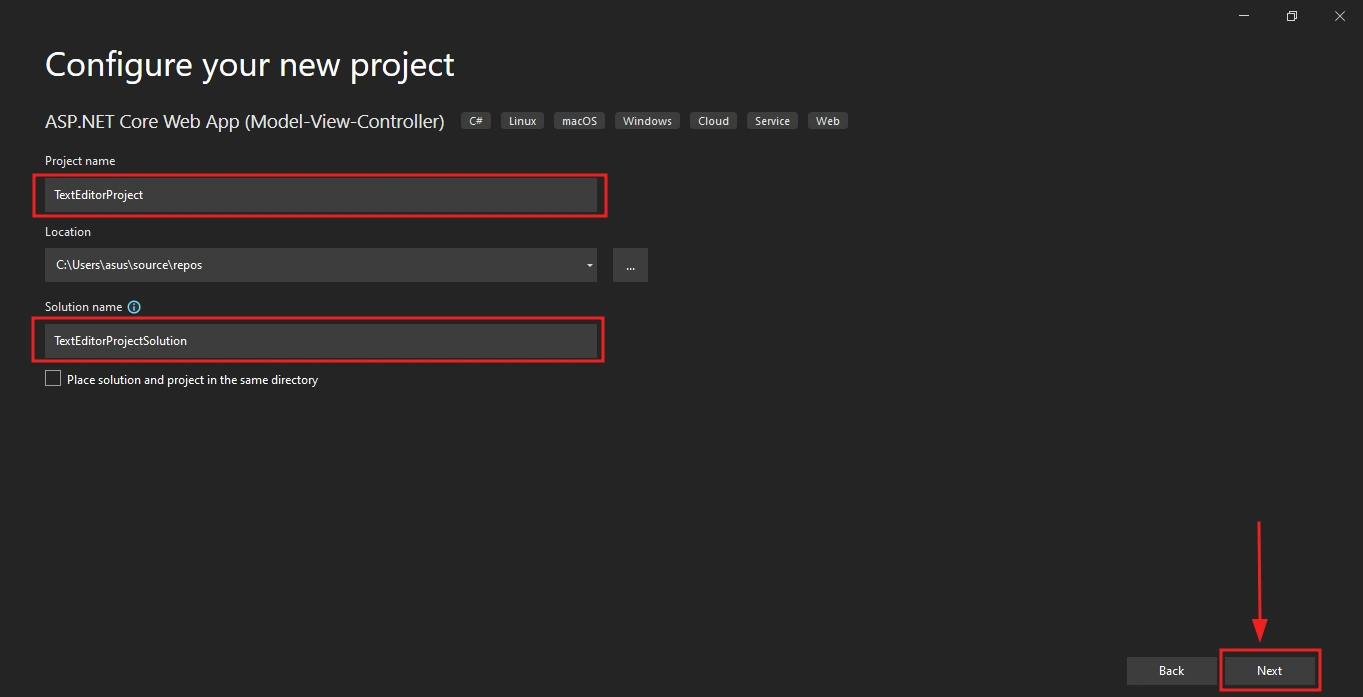
- In this step, you have to select your .NET version which is 6.0(Long-term-support) as given in the below image.

You have successfully created an ASP.NET MVC project. Now you have to install the TinyMCE text editor.
Installing TinyMCE
We can easily install TinyMCE from the official website. To install TinyMCE in our project follow the steps given below.
- Visit the TinyMCN official website here and download the TinyMCE SDK as given below.
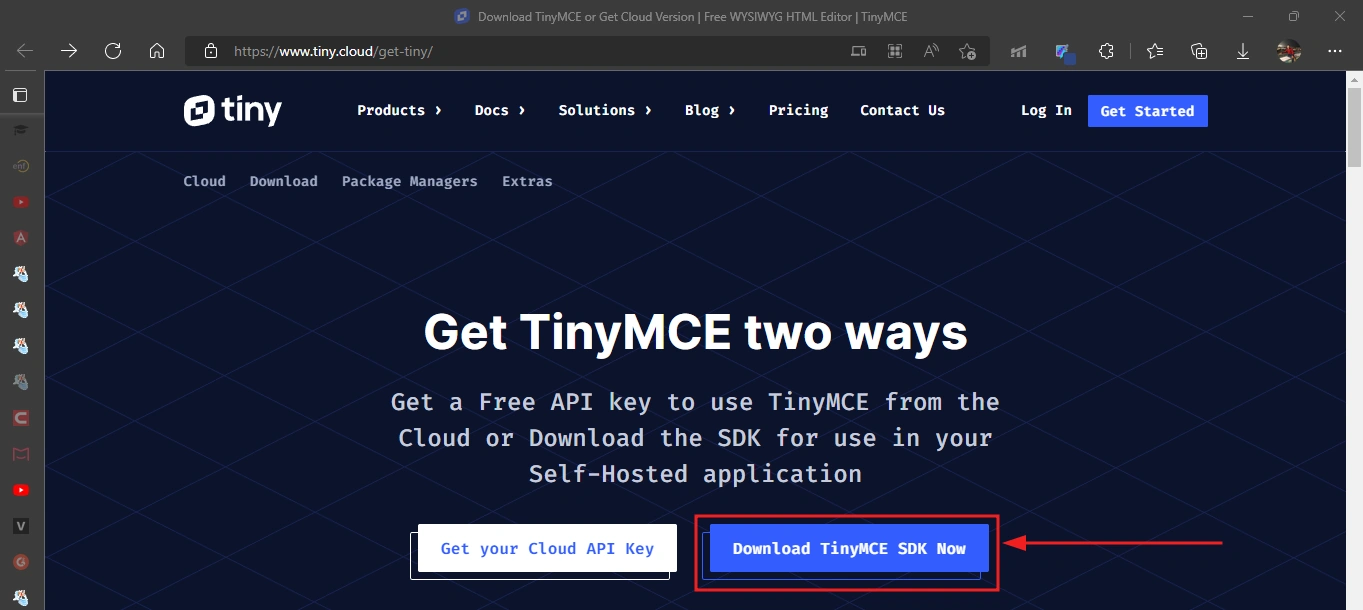
- Unzip the downloaded file and copy the inner tinymce folder in your project inside the wwwroot->js->tinymce as given below.

You have successfully installed TinyMCE SDK and imported it into your project.
Using TinyMCE In ASP.NET MVC Project
Now you have to use this TinyMCE Text Editor in your project using JQuery. To use the text editor first you need to add a Model class and add an HTML form in the Index View of the Home controller. To use TinyMCE Editor follow the below-given steps.
- First, you will add a Model class inside the Models folder as given below.

- Add the below-given Properties in the TextEditor.cs file.
namespace TextEditorProject.Models
{
    public class TextEditor
    {
        public string Title { get; set; }  // for the title of the text
        public string Body { get; set; }  // for the body of the text
    }
}
In the above code, you have added two properties Title and Body for the title of the content and the body will contain the content itself.
- Now add a form in the Index.cshtml file with proper HTML Helper Tags in the Home View.
<form method="POST">

  <div asp-validation-summary="ModelOnly" class="text-danger"> </div>

  <!-- title input -->

  <div class="form-outline mb-4">
  <label class="form-label" asp-for="Title"></label>
  <div>
  <input asp-for="Title" class="form-control" />
  <span asp-validation-for="Title" class="text-danger"></span>
  </div>
  </div>

  <!-- body input -->

  <div class="form-outline mb-4">
      <label class="form-label" asp-for="Body"></label>
      <div>
        <textarea asp-for="Body" class="form-control"></textarea>
        <span asp-validation-for="Body" class="text-danger"></span>
      </div>
  </div>
 <input type="Submit" class="btn btn-primary" value="Create" />
</form>
In the above code, you have added one input for the Title and a Textarea for the body.
-
Now in the _Layout.cshtml file you need to add the tinymce javascript file link as given below.
<script src="~/js/tinymce/tinymce.min.js" referrerpolicy="origin"></script> - The final step is to add jquery code at the end of the Index.cshtml file as given below
@section Scripts{
     <script>
           tinymce.init({
               selector: 'textarea#body'
           });
       </script>
}
In the above code, you have the init method that will initialize the tinymce at the selector textarea.
Output

Formatting TinyMCE Text Editor
The Text Editor you have created is very basic. To make it more interactive you can add a lot of plugins, toolbar, menu, and much more to this which are also provided by the TinyMCE. Now we will add more plugins to this as given below.
<script>
    tinymce.init({
    selector: 'textarea#Body',
    width: 600,
    height: 300,
    plugins: [
      'advlist', 'autolink', 'link', 'image', 'lists', 'charmap', 'preview',
       'anchor', 'pagebreak',
      'searchreplace', 'wordcount', 'visualblocks', 'visualchars', 'code',
      'fullscreen', 'insertdatetime',
      'media', 'table', 'emoticons', 'template', 'help'
    ],
 toolbar: 'undo redo | styles | bold italic | alignleft aligncenter alignright alignjustify | ' +
'bullist numlist outdent indent | link image | print preview media fullscreen | ' +
      'forecolor backcolor emoticons | help',
    menu: {
      favs: { title: 'My Favorites', items: 'code visualaid |
       ' + 'searchreplace | emoticons' }
    },
    menubar: 'favs file edit view insert format tools table help',
    content_css: 'css/content.css'
           });
</script>
In the above code, you have added a lot of plugins, toolbar, menu, and menubar.
Output

As we can see in the above image you have added a lot more functionality to this Text Editor.
Article In a Nutshell
- First, you need to add an ASP.NET MVC Project in Visual Studio 2022.
- You will install TinyMCE SDK from the official website.
- Add tinymce folder to the ASP.NET MVC Project.
- Add the necessary js file link to the _Layout.cshtml file.
- Add the JQuery code to your View to initialize the Text Editor in your View.
Conclusion
In this way, you can add a Rich Text Editor to your ASP.NET MVC Project. We have a lot more Text Editore available but I have used TinyMCE in this article. Text Editors are used mostly for blog websites.
Thank you and Stay Tuned for More
More Articles from my Account
Join the conversation! Your thoughts help the community grow.