
Introduction
This article will demonstrate how easily you can design occasionally-connected applications using ADO .Net Sync services. It's going to be a very basic example in VB .Net showing how easily you can use Sync services within your application. I have taken the template from Code Project and will try to upload it there as well. I am also uploading my presentation in case anyone needs it.
Background
At our organization we have designed an application for the Fire Rescue chiefs who are usually on unit and want the ability to access the application using their laptops and even PDAs. They use Venison cards for broadband access and it works well for the most part, but once in a while they lose the connection and the application dies. The ability to support mobile and remote workers is becoming increasingly important for organizations. The Microsoft Sync framework has been designed to address these issues and gives a great framework to easily design your applications for occasionally-connected architectures. For this article I will use VB .Net as a sample since there are very few VB .Net examples on the net.
Using the Code
I have uploaded the complete source code for the project, at the same time I will go through setting it up step-by-step. Hopefully I'll be able to explain the process in detail.
First you'll have to download the Sync framework from the Microsoft site. The V1 is available for download at:
http://msdn.microsoft.com/en-us/sync/default.aspx
Once the framework has been installed, start Visual Studio 2008 and create a new Windows Forms application.
Now let's add a new item to the project "Local Data Cache"; see:
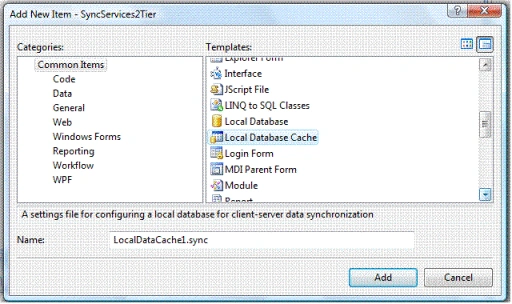
What this is going to do is to create a local SQL CE database that will be used by the client application, and we will eventually write the code to sync up this database with our master database for selected tables. The best part of the Sync framework is it's support for Visual Studio 2008. It provides a nice wizard for the whole setup making our life much easier.
As soon as you click the "Add" button the next screen pops up, which will be used to set up your local cached database. On the screen select "Server Connection". Now if you have previously used the Windows Forms application you may already have a SQL connection set up like in my case, otherwise click the new button and create the connection string for your master SQL Server. For this example I will use our favorite "Adventure Works" database. This is how the second screen looks:
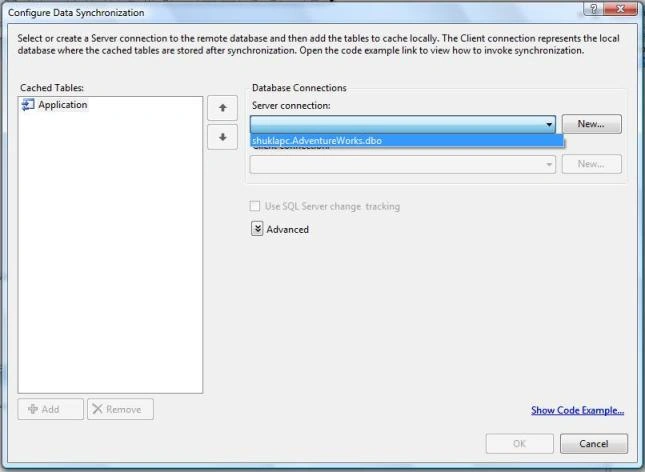
Now that you have given your server connection information, the wizard creates a client connection. This is nothing but the new SQL CE database that you just created. Also now that the wizard is aware of the server database it will allow you to add the tables to be cached. Click the "Add" button on the left bottom of the screen. Once you hit the "Add" button the following screen appears:
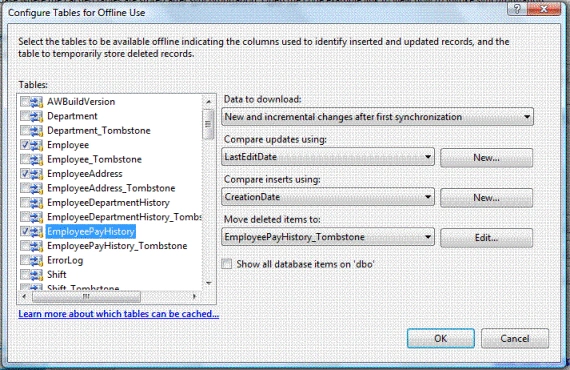
Select the tables that you would like to cache on the client side. Now remember, you do not want to select all the tables, since it's not practical to cache the whole master database on the client machine; usually the client machines in such cases, such as laptops, tablets and PDAs may not have enough storage. In the preceding scenario I have selected 3 of the tables. On the right side of the screen you will get some more setting options. In most cases you would like to keep them to default settings.
The first option asks you what data you want to download; new and incremental changes only after the first synchronization or the entire table each time. Also the sync framework is going to add 2 new columns to your tables to keep track of the last update and new inserts. You can choose existing columns if you are already tracking it. Also it will create a history table named TABLENAME_Tombstone. This is used to keep track of deleted rows. With SQL Server 2008 you would not need either of them as SQL Server has standard change tracking. So with SQL Server 2008 it will not add any additional columns or tombstone table.
Select "OK", and "OK" on the first wizard screen, this will create the local cached database with the tables you selected. On the first wizard screen you also have options to select the server and client project location. In this scenario both will be our current project. In my next article I will try to cover a 3 tier examples using WCF services. And in N tier applications you can select your server and client application to be different. You can optionally select to create synchronization components for the client only or server only. By default it's client and server.
After hitting ok on this screen the wizard will create a local database (.sdf); in our case it created AdventureWorks.sdf. It will then prompt you with following screen allowing you to select tables to be added to your dataset. This will allow easy creation of a grid on the form with a typed dataset.
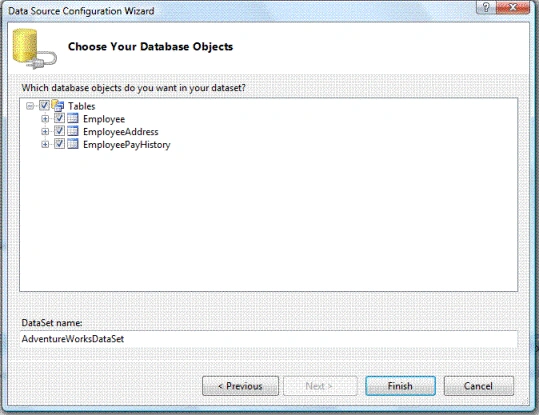
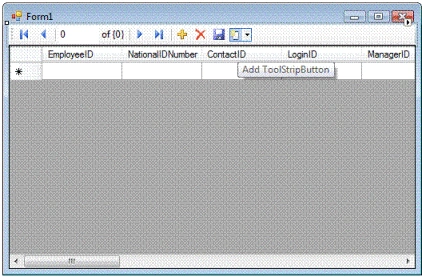
As you can notice I have selected all the 3 tables. After clicking Finish it will create a dataset for the project. You can open the dataset and add some more tables from the Server Explorer, but those tables will not be cached on the client machine. They will be available to use in the application but the application will go back to the server each time those tables are accessed. For this demo we'll keep it simple and not add any more tables, as the main purpose of the demo is to see the sync framework in action. Now go back to your form and open your data sources (show data sources under data menu). Select Employee table and select Data grid view, and drag the table on form. This should add the GridView to the form with all the navigation controls. I really like this part of the design; just drag and drop and you are ready to go.
Mahesh ChandPosted Sep 21, 2012, 10:06 AM
Nice Vishal. Thank for sharing. Just curious, if you used this in an iPhone or Android app? Does this also apply to the apps that are connecting frequently?