

Introduction
As the title specifies “Learn tiny bit of C# in 7 days” I will be writing article for the same, the intended focus is towards the beginners so that they can easily grasp the C# Language concepts and become C# developer after reading the articles. So let’s get started with Day 1. In case you feel I have left the very important topic feel free to comment and any corrective measures and implementation are most welcomed.
Day1 Contents
- Introduction
- Agenda
- Creating Your First Program
- Console Programs
- Escape Sequencing
- Exceptional Handling
- Arrays
- For Each Loop
Introduction
C# is object oriented programming language which allows us to build large variety applications. It was developed by Microsoft within .NET framework. C# is one of the many languages that are supported by .NET framework. Its development team is led by Anders Hejlsberg. The Current version is C# 6.0, which was released on July 20, 2015.
What’s the agenda?
As the name specifies learn C#, so we will be going to learn tiny bit C# in 7 days, so that you are foundation is strong and you be prepared to devote next 5 years how to apply it to make something useful or make an impact on the World. For the first day we will cover small but important topics that will keep our foundation of C#. We will move ahead and discuss how to real time applciation using C#.
Creating Your First Program
As you are reading about C# so I hope that you will familiar with Visual Studio IDE. A rich, integrated development environment for creating stunning applications for Windows, Android, and iOS, as well as modern web applications and cloud services. I will be helping you creating your first C# Program step by step.
Step 1: Open Visual Studio.
In case if you don’t have Visual Studio you can download from the following link:
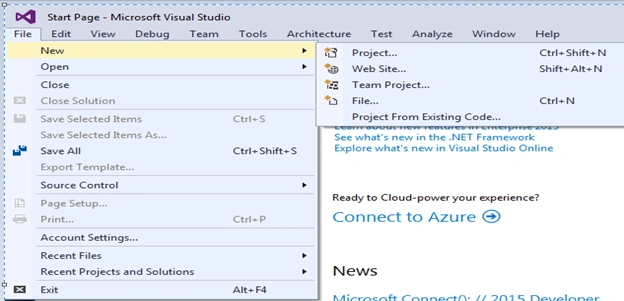
Step 2: Create New Project, click on File, New, then Project.
Step 3: Select Visual C#.
You can see the following set of options available with Visual C# using these components we can develop our respective applications.
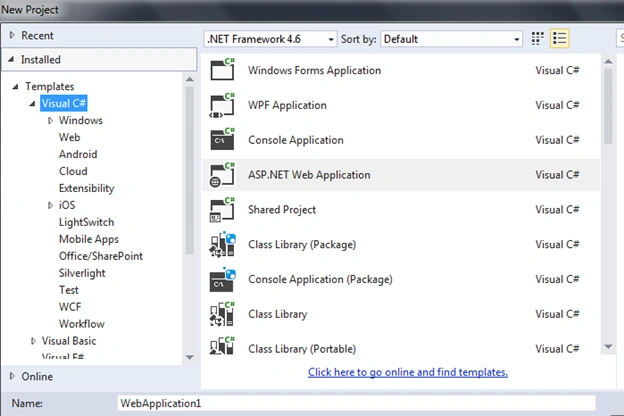
Right now we will select Console Application and name our Project as CSharpStepByStep. We will implement the C # concepts using Console Application because it simplifies the learning process of C#. Once the loading of classes and required component need for visual studio project get loaded we will have our Program.cs file as in the following code snippet:
- using System;
- using System.Collections.Generic;
- using System.Linq;
- using System.Text;
- using System.Threading.Tasks;
- namespace CSharpStepByStep
- {
- class Program
- {
- static void Main(string[] args)
- {
- }
- }
- }
- using System;
- class Program
- {
- static void Main()
- {
- }
- }
- using System;
- class Program
- {
- static void Main()
- {
- Console.WriteLine("Learn C# Step by Step");
- }
- }
- using System;
- class Program
- {
- static void Main()
- {
- Console.WriteLine("Learn C# Step by Step");
- Console.ReadKey();
- }
- }

Let’s focus little in depth for the above code to understand it better.
Using Sytem:
This line signifies that in our program we are going to make use of System Namespace. So you might be thinking what the hell Namespace is. Namespace is a collection of classes, when we use our Console.WriteLine or Console.ReadLine you may have seen the following

That specify the Console class is present in the System Namespace, if we remove the Using System Namespace we would get the following compile time error,

That means compiler don’t know where do Console exist. We can add the fully conventional keyword System.Console class name before using its function as in the following code snippet,
- class Program
- {
- static void Main()
- {
- System.Console.WriteLine("Learn C# Step by Step");
- System.Console.ReadLine();
- }
- }
Every line of code should be inside a Class, we will be discussing about class once we go ahead.
- class Program
- {
- static void Main()
- {
- System.Console.WriteLine("Learn C# Step by Step");
- System.Console.ReadLine();
- }
- }
Is an entry point function which tells the compiler from where the execution is going to start.
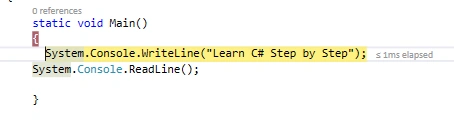
Once the program get executed it enter the entry point function and execute the sets of instructions.
Note: When you want to see the flow of program you can insert a breakpoint using F9 and see your program flow line by line.
Console Programs
In this topic we will be enhancing our first program by taking input from the User and displaying the desired results to the User.
As we have learned to write to Console we write Console.WriteLine, so when we want to read the User Input we use Console.ReadLine(); This function reads the next lines of characters from the standard input stream as shown in the above figure. In order to read the User Input we have to read the User Input in a variable *note variable is a location in memory which is used to store data used in Application. Once the value is stored in variable we will display the User entered value concatenated with to learn C #Step by Step as shown below:
- using System;
- class Program
- {
- static void Main()
- {
- Console.WriteLine("Learn C# Step by Step"); //printing to the Console
- Console.WriteLine("Enter your Name"); //printing to the Console
- string UserName = Console.ReadLine(); //Reading User Input
- Console.WriteLine("Welcome " + UserName + " to Learn C# Step by Step"); //printing user entered concatenated with other string.
- Console.ReadLine();
- }
- }
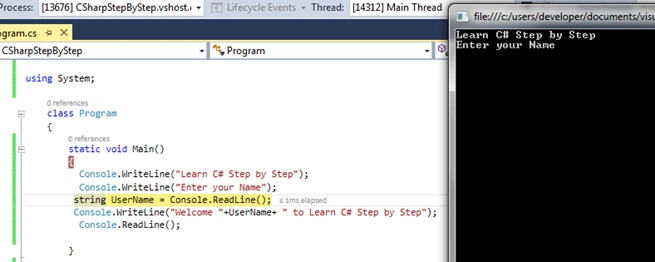
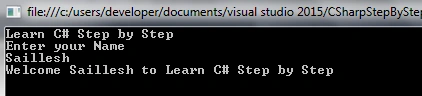
As we can see that Console.WriteLine has been printed to the console window, now yellow shaded lines read the User Input and stores it into variable called UserName and in next line we write the variable value along with string as shown below.
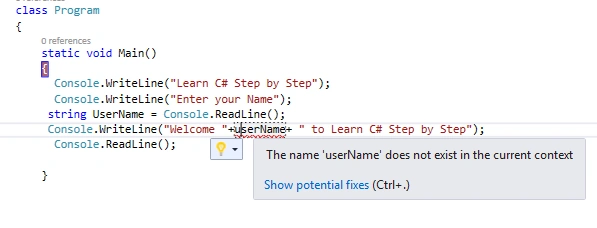
C# is a case sensitive language i.e.
The word case sensitive means the text is sensitive to capitalization of letters or words.
Example:
Class and class are two different word because of C of first being Caps. You can see the following figure for more elaboration.
Escape Sequencing
Sometimes we need to add Character combinations consisting of a backslash (\) followed by a letter in our programs. Foe example, we want our output to have been like this “Hello Readers” along with double quotes. In order to do that we make use of Escape Sequencing in C#, as defined here the escape sequence character in C# is (\ ). This backslash says to compiler whatever precedes me treat them as a regular character.
- using System;
- class Program
- {
- static void Main()
- {
- Console.WriteLine("\"Hello Readers\"");
- Console.WriteLine("\\heelo reader\\");
- Console.ReadLine();
- }
- }

You can read the chart of Escape sequence from this link.
Exception Handling
Exceptional handling the way of passing control from one part to another i.e. if there is any exception in our program we can catch the same pass the control to another. As you may be aware of Exception Handling I want to sum up the definition of Exception as Exception is the error that occurs when a program is running. So here we will learn how to handle the Exception and how we can respond it to the User in a user friendly manner.
Example: Divide by Zero Exception

So in order to do Exceptional Handling we need two things.
Try, Catch and finally, we can see in above figure from where our Exception was raised or program crashed. Showing the actual unhandled exception will annoy the user as they are cryptic and do not make sense to the end user. We can tell the compiler that I am excepting to get error in this line and in case you get exception can you just throw the Exception into the Catch as in the following code snippet.
- using System;
- class Program
- {
- static void Main()
- {
- int a = 10;
- int b = 0;
- int result;
- try
- {
- result = a / b;
- Console.WriteLine("\n Result after division is ", result);
- Console.ReadLine();
- }
- catch (Exception ex)
- {
- Console.WriteLine("Divisor should be greater than 0");
- Console.ReadLine();
- }
- }
- }

An exception Class has several useful properties (we will learn more about properties as we go ahead) that provide valuable information about the Exception.
- Message: Describes the current exception details.
- StackTrace: Provide the call stack to the line number in the method where the exception occurred.
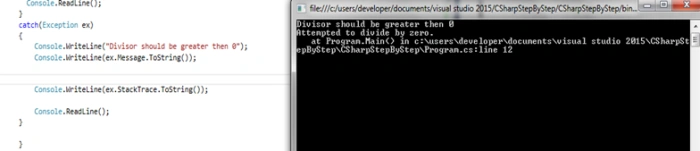
What if rather than using Exception class we use DivideByZeroException which is a child class of Exception. System.Exception is base class of Exception,
- DivideByZeroException Inherits from ArithmeticException
- ArithmeticException Inherits from SystemException
- SystemException Inherits from Exception
Now using DivideByZeroException:
- catch (DivideByZeroException ex)
- {
- Console.WriteLine("Divisor should be greater then 0");
- Console.WriteLine(ex.Data.ToString());
- Console.WriteLine(ex.Message.ToString());
- Console.WriteLine(ex.StackTrace.ToString());
- Console.ReadLine();
- }

But this catch block will only handle DivideByZeroException so in order to catch other Exception we can include another catch block and use base exception type as shown below.
Now I am trying to read the content of the file and if any exception occurs while reading the same exception will be handled via Exception class else if while dividing we get divide by zero exception that will be handled by DivideByZero Exception class.
- using System;
- using System.IO;
- class Program
- {
- static void Main()
- {
- int a = 10;
- int b = 0;
- int result;
- try
- {
- StreamReader obj = new StreamReader(@ "C:\Users\Developer\Documents\Article\.net Framework\Product Ke");
- Console.WriteLine(obj.ReadToEnd());
- obj.Close();
- result = a / b;
- }
- catch (DivideByZeroException ex)
- {
- Console.WriteLine("Divisor should be greater than 0");
- Console.ReadLine();
- }
- catch (Exception ex)
- {
- Console.WriteLine(ex.Message.ToString());
- Console.ReadLine();
- }
- }
- }
In above code as soon as the Exception occurs the handle is transferred to the Exception class neglecting all other statement after that would result in object occupying the memory. So in order to close the same we will do it in finally block as shown below.
- using System;
- using System.IO;
- class Program
- {
- static void Main()
- {
- int a = 10;
- int b = 0;
- int result;
- StreamReader obj = null;
- try
- {
- obj = new StreamReader(@ "C:\Users\Developer\Documents\Article\.net Framework\Product Ke");
- Console.WriteLine(obj.ReadToEnd());
- result = a / b;
- }
- catch (DivideByZeroException ex)
- {
- Console.WriteLine("Divisor should be greater then 0");
- }
- catch (Exception ex)
- {
- Console.WriteLine(ex.Message.ToString());
- }
- finally
- {
- if (obj != null)
- {
- obj.Close();
- }
- Console.WriteLine("I am finally block");
- Console.ReadLine();
- }
- }
- }

Inner Exceptions
Once while executing our Program we face some exception so we handle the exception in catch block, what if we want to do some operation inside catch block. For example, Writing exception to a text file, etc. In order to do these operations we may face some other Inner Exception inside a catch block so let’s see how we handle the Inner Exceptions. Now as I have mentioned I want to log the Exception to a text file with exception message, trace and data and time.
- using System;
- using System.IO;
- class Program
- {
- static void Main()
- {
- int a = 10;
- int b = 0;
- int result;
- try
- {
- result = a / b;
- }
- catch (Exception ex)
- {
- string Filepath = @ "C:\Users\Developer\Documents\Article\.net Framework\Exception.txt";
- if (File.Exists(Filepath))
- {
- StreamWriter objException = new StreamWriter(Filepath);
- objException.Write(DateTime.Now + " " + ex.Message + " " + ex.StackTrace);
- }
- else
- {
- throw new FileNotFoundException("File not found " + Filepath, ex.Message);
- }
- Console.WriteLine(ex.Message.ToString());
- }
- }
- }

What if while writing the Exception I face another exception, so in order to handle that we use Throw Exception as shown above.

Arrays
Array is a group of similar data types, Eg. We want to store 10 integers. As this article is focused on C# I will not be going in depth of Arrays. I will help you how to declare and use Arrays in c#.
Syntax of Declaring an Array
- int[] intArr = new int[3]; //size to specified
- (name of array)
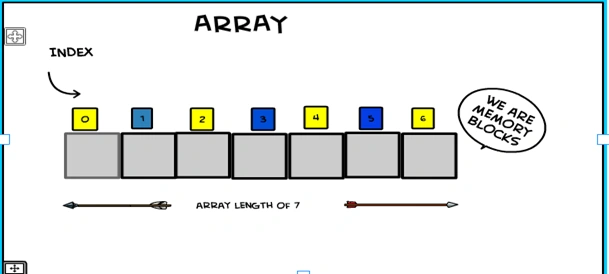
Example:
- using System;
- using System.Collections.Generic;
- using System.Linq;
- using System.Text;
- using System.Threading.Tasks;
- namespace Arrays
- {
- class Program
- {
- static void Main(string[] args)
- {
- int[] intArr = new int[10];
- for (int i = 0; i < 10; i++) //looping threw I and assigning I value to array
- {
- intArr[i] = i;
- }
- Console.WriteLine("The Arrays consist of following values");
- for (int i = 0; i < 10; i++)
- {
- Console.WriteLine(intArr[i]);
- }
- Console.ReadLine();
- }
- }
- }
- Arrays are strongly typed; they don’t allow storing other data type apart from declared data type.
- 2D arrays are used to represent matrices.
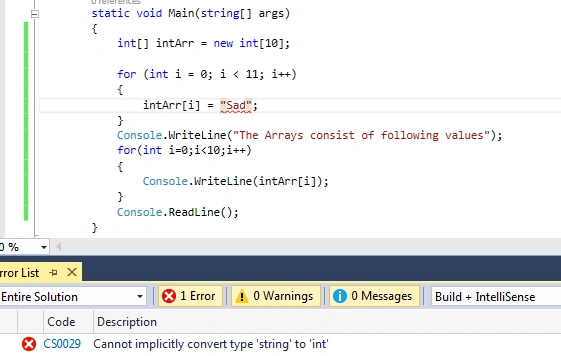
Figure1: Arrays are strongly typed i.e. it can only accept the value of declared datatype.
Disadvantages:
- Once we declare the array size it cannot be changed.
- Since the array size is fixed so if we insert less value the memory is wasted and more than System.IndexOutOfRangeException will happen.
Foreach Loop
For each loop is used to iterate through the collection, doesn’t includes initialization, termination and increment / decrement characteristics as in other loops.
Advantages:
- No need to know the size of the Collection.
- Loops are easier to write and it is least error prone loop.
Note: Code Snippet for foreach Loop is foreach and then press tab.
Example:
Syntax: foreach(datatype same a collection Datatype name in Collection).
- {
- //statements
- }
- using System;
- using System.Collections.Generic;
- using System.Linq;
- using System.Text;
- using System.Threading.Tasks;
- namespace Arrays
- {
- class Program
- {
- static void Main(string[] args)
- {
- int[] intArr = new int[10];
- //creating a collection of int array
- for (int i = 0; i < 10; i++)
- {
- intArr[i] = i;
- }
- Console.WriteLine("The Array consist of following values");
- //intArr is a collection
- foreach(int Value in intArr)
- {
- Console.WriteLine(Value);
- }
- Console.ReadLine();
- }
- }
- }
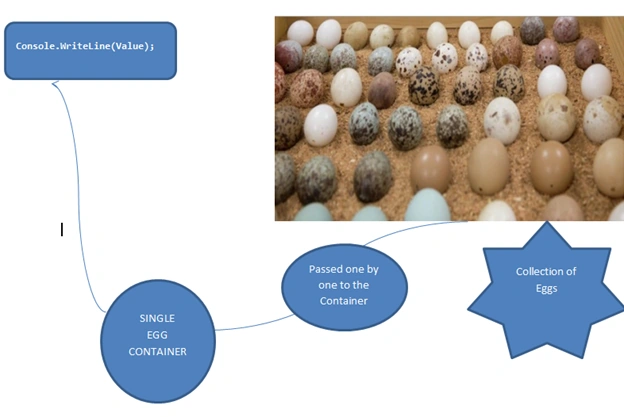
Figure Demonstrating how For Each loop flows
As we move ahead we learn more benefits of using for each loop.
Conclusion
Here we complete our day 1. In day 2 we will talk about Namespaces, Classes, Inheritance, Access Modifiers, Properties, Interface and Abstract Class. So keep reading, keep learning.
If any confusion you can comment for the same. Any feedback and added information is heartily welcomed.
Mahesh AllePosted Jun 15, 2016, 6:27 AM
Good article. This is very explanatory and easily understandable.
Pankaj Kumar ChoudharyPosted May 13, 2016, 10:50 PM
Nice Series That showing your knowledge level of C# programming.......
Mohammad KhalidPosted May 13, 2016, 2:20 AM
Good article .. Keep posting. These kind of stuff helps new comer ..
Kuppurasu NagarajPosted Apr 9, 2016, 10:46 AM
Nice article..
Jee KariraPosted Apr 1, 2016, 2:16 AM
Awesome.....Keep it Up..!!! - Saillesh Sir
sreenivasa kPosted Mar 17, 2016, 10:10 PM
amazing. accept my greetings
Asfend YarPosted Feb 28, 2016, 11:52 AM
very nice
Jainish ShahPosted Feb 1, 2016, 1:53 AM
Very nice
Akash VarshneyPosted Dec 29, 2015, 6:34 AM
Good one !!
Kumar VivekPosted Dec 19, 2015, 11:27 AM
which software you use to create cartoon character
Ankur MistryPosted Dec 4, 2015, 1:35 PM
nice
Eduardo VolpiPosted Nov 25, 2015, 6:27 AM
Nice, keep it up!
PEDRO RENE GONZALEZPosted Nov 25, 2015, 5:16 AM
Great Jobs man!!
Upendra Pratap ShahiPosted Nov 25, 2015, 4:28 AM
nice one...good..keep it up...refreshing for experience..
Ajay GandhiPosted Nov 25, 2015, 3:53 AM
Nice
Josu LopezPosted Nov 25, 2015, 3:40 AM
Nice
Prasham SabadraPosted Nov 25, 2015, 2:24 AM
Good one. Thanks for Sharing :)
Raja TPosted Nov 25, 2015, 1:16 AM
Nice one, Thanks for sharing
Shiju JacobPosted Nov 24, 2015, 11:30 PM
Nice ...