

Introduction
This is an introduction to Raspberry Pi 3 Model B. We will explore what Raspberry Pi 3 has to offer in terms of its features and performance. I would like to introduce Raspberry Pi as the world’s most inexpensive and powerful Single-Board Computer. Ever since the launch of Raspberry Pi in 2012, we have seen several versions of it. This is the world’s cheapest microprocessor unit specially built for learners and makers. We can easily learn how software and hardware work together without worrying about damage/cost.
In this article, we will connect a Push Button and an LED to Raspberry Pi 3. We will be reading the status of the Push button and control an LED using GPIO.
This is a headed sample, so please ensure that your device is in headed mode by running this command: "setbootoption.exe" headed (changing the headed/headless state will require a reboot).
Also, be aware that the GPIO APIs are only available on Windows IoT Core, so this article cannot run on your desktop.
Requirements
- Raspberry Pi 2 or 3 Model B
- Windows 10 IoT Core operating system (Raspberry Pi)
- Windows 10 operating system
- Visual studio Universal windows platform (UWP)
- Windows IoT Remote Client App Windows Store
- LED and PushButton
Raspberry Pi GPIO Pin Diagram
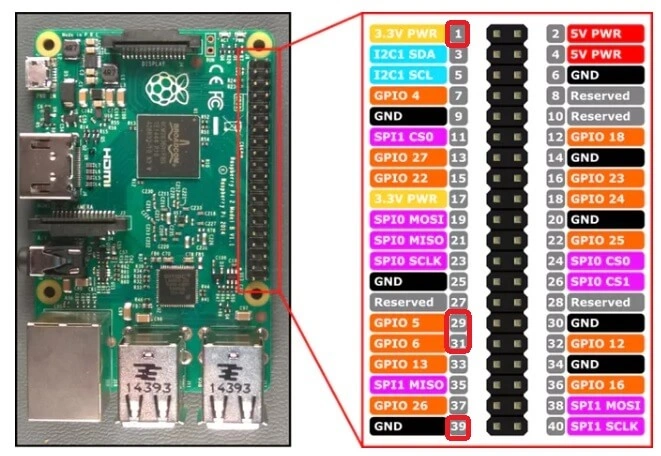
Pi 3 Image - In-built Wireless Network (WIFI) And Bluetooth(BT)
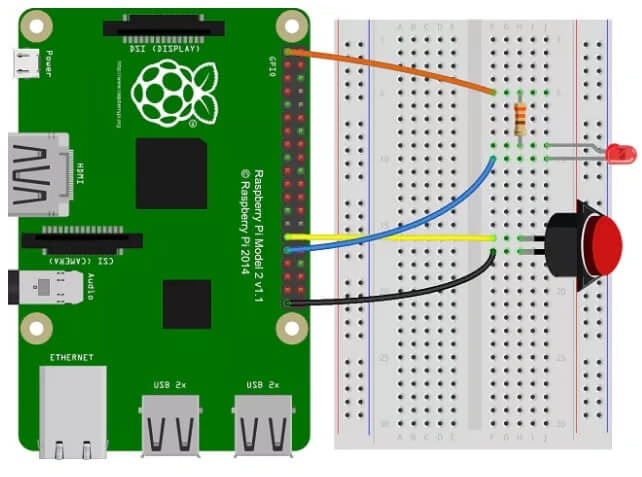
LED on and off using the PushButton Circuit diagram.
Step 1
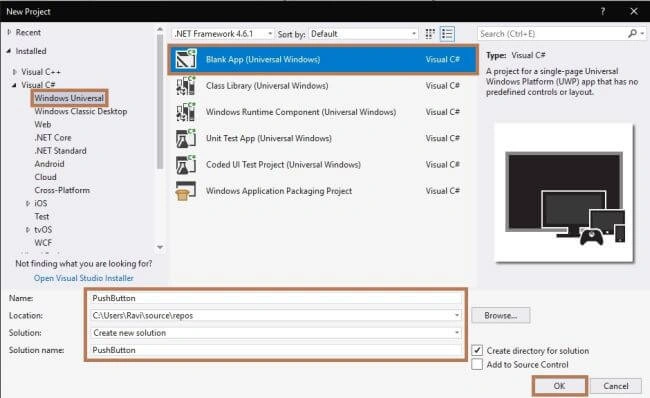
Open Visual Studio and go to File>>New>>Project Select Visual C#>>Windows Universal>>Blank App (Windows Universal).
Step 2
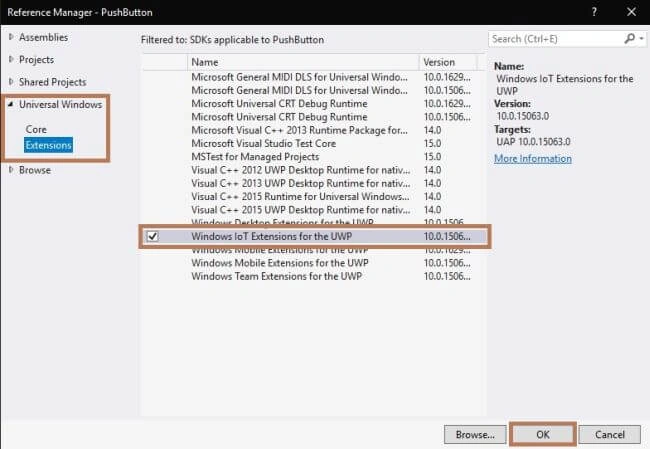
After the project creation, add the following reference packages for your projects. Open Solution Explorer, right-click to project name, and select Add >> References.
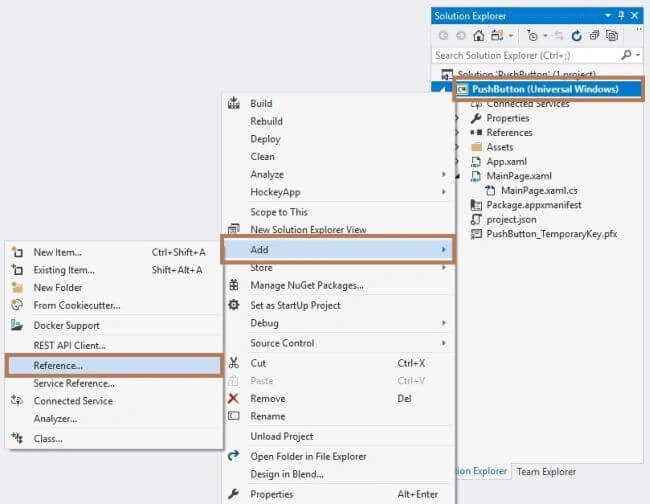
Now, select the following reference packages followed by the selection of your project; then click OK.
- Windows IoT Extensions for the UWP
Step 3
Next, open Solution Explorer >> Project Name >> MainPage.xaml. Select the MainPage. The XAML code will appear. Just the following code. Create the layout of the Grid, StackPanel, and Ellipse.
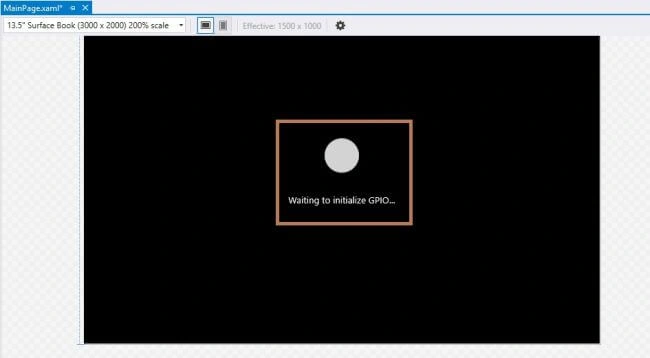
XAML Code
- <Page
- x:Class="PushButton.MainPage"
- xmlns="https://schemas.microsoft.com/winfx/2006/xaml/presentation"
- xmlns:x="https://schemas.microsoft.com/winfx/2006/xaml"
- xmlns:local="using:PushButton"
- xmlns:d="https://schemas.microsoft.com/expression/blend/2008"
- xmlns:mc="https://schemas.openxmlformats.org/markup-compatibility/2006"
- mc:Ignorable="d">
- <Grid Background="{ThemeResource ApplicationPageBackgroundThemeBrush}">
- <StackPanel HorizontalAlignment="Center" VerticalAlignment="Center">
- <Ellipse x:Name="ledEllipse" Fill="LightGray" Stroke="White" Width="100" Height="100" Margin="10"/>
- <TextBlock x:Name="GpioStatus" Text="Waiting to initialize GPIO..." Margin="10,50,10,10" TextAlignment="Center" FontSize="26.667" />
- </StackPanel>
- </Grid>
- </Page>
Next, open Solution Explorer >> Project Name >> MainPage.xaml.cs. Select the MainPage.cs. The C sharp code will appear. Just the following code.
C# Code
- using System;
- using Windows.Devices.Gpio;
- using Windows.UI.Core;
- using Windows.UI.Xaml;
- using Windows.UI.Xaml.Controls;
- using Windows.UI.Xaml.Media;
- namespace PushButton
- {
- public sealed partial class MainPage: Page
- {
- public MainPage()
- {
- InitializeComponent();
- InitGPIO();
- }
- private void InitGPIO()
- {
- var gpio = GpioController.GetDefault();
- if (gpio == null)
- {
- GpioStatus.Text = "There is no GPIO controller on this device.";
- return;
- }
- buttonPin = gpio.OpenPin(BUTTON_PIN);
- ledPin = gpio.OpenPin(LED_PIN);
- ledPin.Write(GpioPinValue.High);
- ledPin.SetDriveMode(GpioPinDriveMode.Output);
- if (buttonPin.IsDriveModeSupported(GpioPinDriveMode.InputPullUp))
- buttonPin.SetDriveMode(GpioPinDriveMode.InputPullUp);
- else
- buttonPin.SetDriveMode(GpioPinDriveMode.Input);
- buttonPin.DebounceTimeout = TimeSpan.FromMilliseconds(50);
- buttonPin.ValueChanged += buttonPin_ValueChanged;
- GpioStatus.Text = "GPIO pins initialized correctly.";
- }
- private void buttonPin_ValueChanged(GpioPin sender, GpioPinValueChangedEventArgs e)
- {
- if (e.Edge == GpioPinEdge.FallingEdge)
- {
- ledPinValue = (ledPinValue == GpioPinValue.Low) ? GpioPinValue.High : GpioPinValue.Low;
- ledPin.Write(ledPinValue);
- }
- var task = Dispatcher.RunAsync(CoreDispatcherPriority.Normal, () =>
- {
- if (e.Edge == GpioPinEdge.FallingEdge)
- {
- ledEllipse.Fill = (ledPinValue == GpioPinValue.Low) ? redBrush : grayBrush;
- GpioStatus.Text = "Button Pressed";
- }
- else
- {
- GpioStatus.Text = "Button Released";
- }
- });
- }
- private const int LED_PIN = 6;
- private const int BUTTON_PIN = 5;
- private GpioPin ledPin;
- private GpioPin buttonPin;
- private GpioPinValue ledPinValue = GpioPinValue.High;
- private SolidColorBrush redBrush = new SolidColorBrush(Windows.UI.Colors.Red);
- private SolidColorBrush grayBrush = new SolidColorBrush(Windows.UI.Colors.LightGray);
- }
- }
Step 4
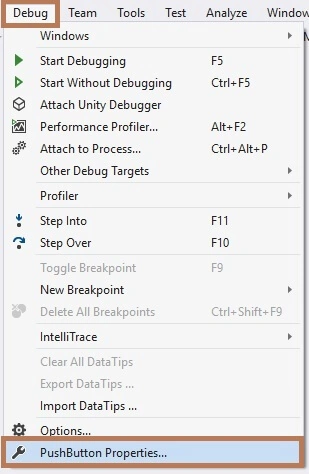
In this step, click on Debug >> Project Properties.
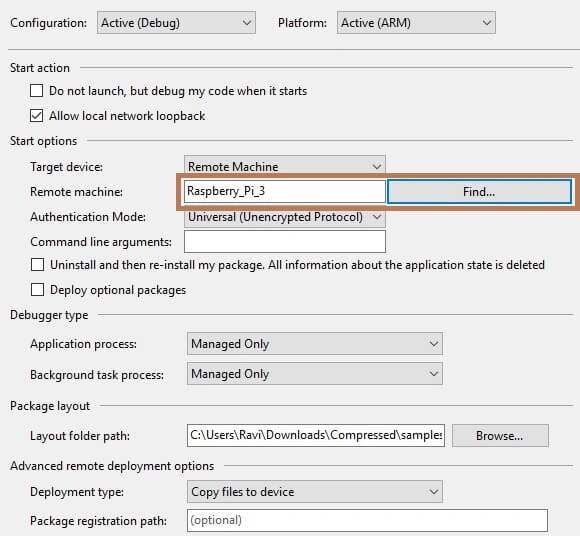
After that, open the Properties Box and connect the Raspberry Pi and Visual Studio to the same network and connect the IP Address or Device name to the remote machine.
Step 5
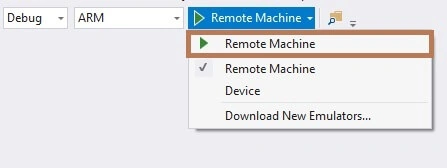
In this step, click on the ARM and Remote Machine.

Output
SUMMARY
In this article, you learned how to control an LED using Raspberry Pi 3 and Visual Studio on the Universal Windows Platform.
If you have any questions/ feedback/ issues, please write in the comment box.
Abdullah DemirerPosted Oct 19, 2020, 12:29 PM
Hi bro, I want to make a project similiar tio your project.I searched some websites, it seems sufficient for my Raspberry pi 3 project, but you recommended Raspberry pi 3 B. this project can't be done with raspberry pi 3?
Stéphane GolbaPosted Nov 6, 2018, 2:43 PM
Pretty fun sample
Hadshana KamalanathanPosted Jul 21, 2018, 10:21 AM
Thanks for sharing...
Thắng Trương HữuPosted Apr 12, 2018, 3:09 AM
Hello, i want to create a window app in my laptop. And then i use this app to control RPI: turn on/off led, send data through RJ45. Can it be done?
Dominik ZaczynskiPosted Apr 9, 2018, 10:02 PM
This monitor it connection to raspberry or remote
Munish APosted Apr 7, 2018, 9:47 PM
Nice article, yaar....................
Sagar Pandurang KapPosted Jan 14, 2018, 11:46 PM
Superb Yaar.Its just fabulous.Keep sharing..