

In this article, we discuss the basics of logging with NLog and step-by-step implementation using .NET Core 6.
Agenda
- Introduction of Logging
- Benefits of Logging
- NLog in .NET Core
- Step-By-Step Implementation
Prerequisites
- Visual Studio 2022
- Basics of C# and .NET Core
- .NET Core 6 SDK
Introduction of Logging
In technical terms, logging is the practice of recording events and capturing other information that is generated by the application during its operations. Logging helps developers and administrators of the system understand and diagnose different issues and monitor the behavior of the application. These records mean log entries that are typically stored in a file or database and that help us to troubleshoot, analyze, and monitor the behavior of the system.
Benefits of Logging
Logging is an important thing in the software development life cycle, and there are several benefits to logging.
- User Activity Tracking: Logs can capture different actions of users within the application, and that helps us understand the behavior of users. It also helps us in many ways to improve the system and for other analytical purposes.
- Historical Data: Log data provides historical data and transactions of events, which helps us track changes over time and maintain important records of different events.
- Monitoring and Performance Analysis: Logs help to monitor application performance, and developers or administrators can analyze data and user patterns that help us optimize performance and improve system efficiency.
- Debugging and Troubleshooting: In the software development cycle, sometimes applications do not behave as expected. In that case, logging plays an important role in identifying what happened with the system by providing valuable information for developers or administrators.
- Security: Logging also helps while investigating security incidents and events related to them, like when someone is doing suspicious activity and attempts to use an application. With the help of a log, the security team analyzes records and responds to them properly based on events.
NLog in .NET Core
- NLog is a flexible and extensible logging framework for .NET Core Applications.
- It is designed to be easily configured and customizable for a wide range of logging scenarios.
- NLog supports various log targets, including files, databases, consoles, etc.
- It captures the log messages in the application and helps us monitor and troubleshoot issues.
Step-By-Step Implementation
Step 1. Install the following NuGet package from the manager.
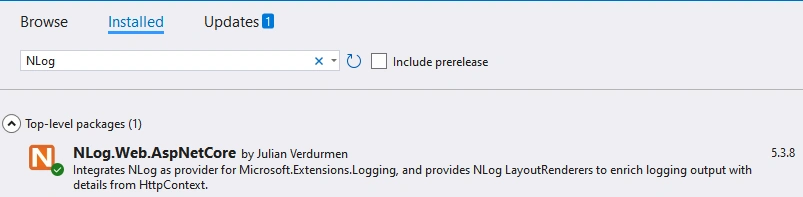
Step 2. Add nlog.config file manually in the project and put all the configuration inside the same like file path, database connection string if you want to store log in database, etc.
<?xml version="1.0" encoding="utf-8" ?>
<nlog xmlns="http://www.nlog-project.org/schemas/NLog.xsd"
      xmlns:xsi="http://www.w3.org/2001/XMLSchema-instance">

  <targets>
    <target name="file" xsi:type="File" fileName="logs/${shortdate}.log"
            layout="${longdate} ${uppercase:${level}} ${message} ${exception:format=ToString}" />
  </targets>

  <rules>
    <logger name="*" minlevel="Trace" writeTo="file" />
  </rules>

</nlog>
The NLog configuration file is an XML file that defines how the logging functionality behaves in the application. It allows you to specify and configure various settings, such as log targets, rules, and filters.
The following are the main components of the NLog configuration file.
- '<nlog>' - The root element configuration file is nlog; it contains the entire configuration of NLog.
- '<targets>' - The target element specifies where the log messages should be sent, such as to the database, console, or files.
- '<rules>' - The rule element defines the logging rule and determines which log message should be sent to specific targets based on the logger’s name and log levels.
- '<loggger>' - The logger element is used within the rules section, and it is used to define the rule for a specific logger. In the logger element, name attribute specifies the logger’s name pattern to match, log level, etc.
Step 3. Weather Forecast class with required properties.
namespace NLogDemo
{
    public class WeatherForecast
    {
        public DateTime Date { get; set; }

        public int TemperatureC { get; set; }

        public int TemperatureF => 32 + (int)(TemperatureC / 0.5556);

        public string? Summary { get; set; }
    }
}
Step 4. Weather Forecast controller with action method and logger injection in the constructor for logging purposes.
using Microsoft.AspNetCore.Mvc;

namespace NLogDemo.Controllers
{
    [ApiController]
    [Route("[controller]")]
    public class WeatherForecastController : ControllerBase
    {
        private static readonly string[] Summaries = new[]
        {
        "Freezing", "Bracing", "Chilly", "Cool", "Mild", "Warm", "Balmy", "Hot", "Sweltering", "Scorching"
    };

        private readonly ILogger<WeatherForecastController> _logger;

        public WeatherForecastController(ILogger<WeatherForecastController> logger)
        {
            _logger = logger;
        }

        [HttpGet(Name = "GetWeatherForecast")]
        public IEnumerable<WeatherForecast> Get()
        {
            _logger.LogInformation("Requesting Weather Forecast Details...");

            return Enumerable.Range(1, 5).Select(index => new WeatherForecast
            {
                Date = DateTime.Now.AddDays(index),
                TemperatureC = Random.Shared.Next(-20, 55),
                Summary = Summaries[Random.Shared.Next(Summaries.Length)]
            })
            .ToArray();
        }
    }
}
Step 5. Register required NLog services.
using NLog.Extensions.Logging;

var builder = WebApplication.CreateBuilder(args);

// Configure NLog
builder.Services.AddLogging(logging =>
{
    logging.ClearProviders();
    logging.SetMinimumLevel(LogLevel.Trace);
});

// Add NLog as the logger provider
builder.Services.AddSingleton<ILoggerProvider, NLogLoggerProvider>();

builder.Services.AddControllers();
// Learn more about configuring Swagger/OpenAPI at https://aka.ms/aspnetcore/swashbuckle
builder.Services.AddEndpointsApiExplorer();
builder.Services.AddSwaggerGen();

var app = builder.Build();

// Configure the HTTP request pipeline.
if (app.Environment.IsDevelopment())
{
    app.UseSwagger();
    app.UseSwaggerUI();
}

app.UseHttpsRedirection();

app.UseAuthorization();

app.MapControllers();

app.Run();
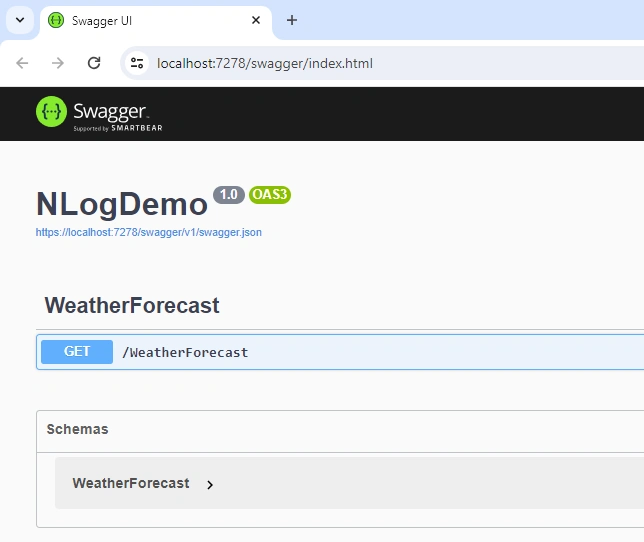
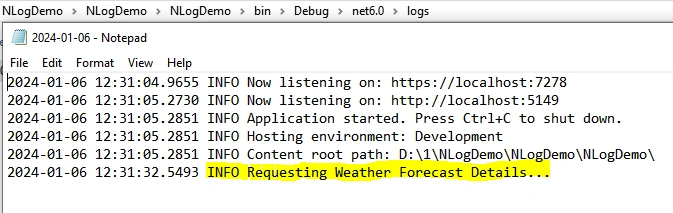
Step 6. Run the application and execute the application endpoint with the help of Swagger, and in the log file, we can see our log entries with details. If any error occurs while registering the services in the program class, then the logger is also capturing the same as shown below.
If we want to customize and structure the log or upload it to cloud blob storage as per requirement, then that customization is also possible with Nlog.
GitHub: https://github.com/Jaydeep-007/NLogDemo
Conclusion
In this article, we looked into the basics of logging and its benefits in real-time with step-by-step implementation with the help of .NET Core 6 Weather Forecast API and Nlog configuration.
Join the conversation! Your thoughts help the community grow.