

Introduction
Today we are going to learn about Microservice architecture and its implementation using Ocelot API Gateway in ASp.Net Core - 3.1. We all know the benifits of using Microservices for large scale applications.
Microservice Architecture - Overview
There are two possible ways to build and structure the applications:
- Monolith Architecture
- Microservices Architecture
Monolith Architecture
Monolith is like a big container, wherein all the software components of an app are assembled and tightly coupled; i.e each component fully depends on each other. There are advantages and disadvantages in Monolith. Compared to Microservices the advantages are less in Monolith Architecture.
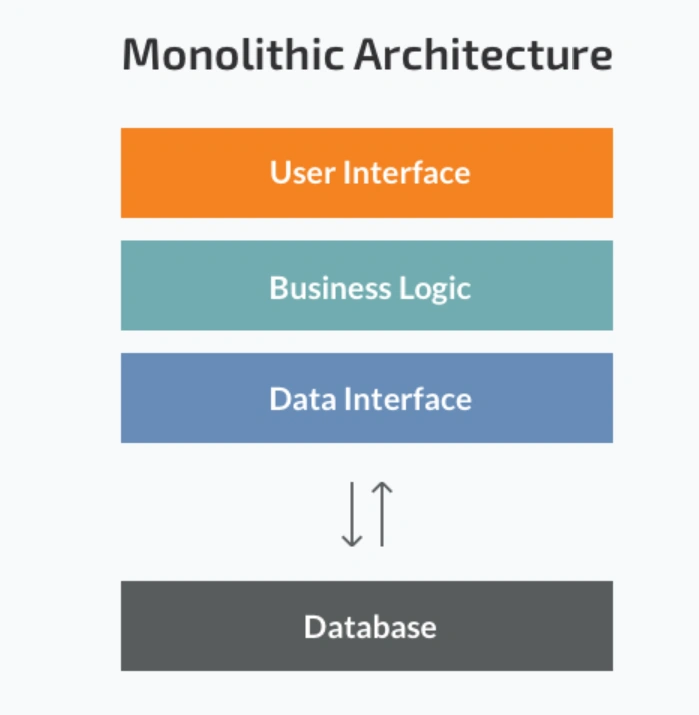
Disadvantage
Slow Development
If we modify any module or any component we need to redeploy the whole application instead of updating part of it. It consumes more time in slow development.
Unreliable
If one service goes down then the entire application stops working because all the services of the application are connected to each other.
Large and Complex Applications
For large scale applications it is difficult for maintenance because they are dependent on each other.
It consumes more memory where each component will access the whole data and it makes more memory consumption and also rebuilds the application. In addition to that we need to change the whole application and it makes the process a bit diffcult.
Microservices Architecture
Microservices Architecture refers to a technique that gives modern developers a way to design highly scalable, flexible applications by decomposing the application into discrete services that implement specific business functions. These services, often referred to as "Loosely Coupled," can be built, deployed and scaled independently.
The following picture is from Microsoft Docs which shows the microservices architecture style.

Microservices Creation
Create a Blank Solution
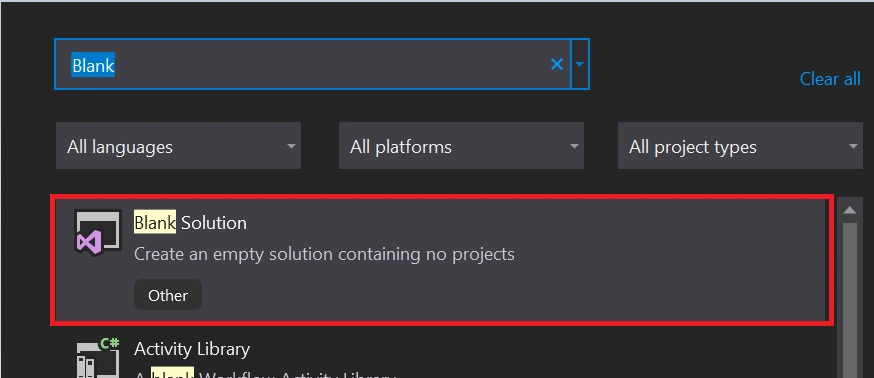
Create a New Solution Folder with the name as Microservices
-> Right Click on Microservices Folder
-> Click on Add
-> Click on New Project
Create a Customer Microservice
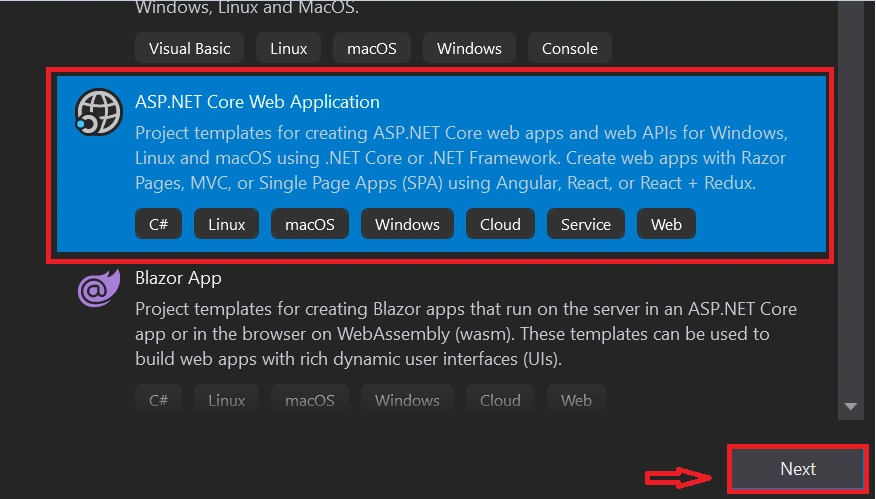
-> Enter the project name
-> Choose API as template and we are going with .Net Core 3.1 Version.
-> Click on Create
Create the Product Microservice
- > Follow the same process as we did for Customer Microservice.
Create the API Gateway
-> Choose Empty as template with the same .Net Core 3.1 Version.
Folder Structure

Configuring the Ocelot API Gateway
This is how the Ocelot API Gateway Works in our project.

To know about the Ocelot and its features go through this link Ocelot API Gateway
Install the package under the Gateway.WebAPI
- Install-Package Ocelot
Add Configuration settings in Startup.cs
Startup.cs
- using System;
- using System.Collections.Generic;
- using System.Linq;
- using System.Threading.Tasks;
- using Microsoft.AspNetCore.Builder;
- using Microsoft.AspNetCore.Hosting;
- using Microsoft.AspNetCore.Http;
- using Microsoft.Extensions.DependencyInjection;
- using Microsoft.Extensions.Hosting;
- using Ocelot.DependencyInjection;
- using Ocelot.Middleware;
- namespace Gateway.WebApi
- {
- public class Startup
- {
- // This method gets called by the runtime. Use this method to add services to the container.
- // For more information on how to configure your application, visit https://go.microsoft.com/fwlink/?LinkID=398940
- public void ConfigureServices(IServiceCollection services)
- {
- services.AddOcelot();
- }
- // This method gets called by the runtime. Use this method to configure the HTTP request pipeline.
- public async void Configure(IApplicationBuilder app, IWebHostEnvironment env)
- {
- if (env.IsDevelopment())
- {
- app.UseDeveloperExceptionPage();
- }
- app.UseRouting();
- app.UseEndpoints(endpoints =>
- {
- endpoints.MapControllers();
- });
- await app.UseOcelot();
- }
- }
- }
Create configuration.Json File under the Gateway.WebAPI to define the Routes which are necessary for Microservices.
configuration.Json
- {
- "Routes": [
- {
- "DownstreamPathTemplate": "/api/product",
- "DownstreamScheme": "https",
- "DownstreamHostAndPorts": [
- {
- "Host": "localhost",
- "Port": 44337
- }
- ],
- "UpstreamPathTemplate": "/gateway/product",
- "UpstreamHttpMethod": [ "POST", "PUT", "GET" ]
- },
- {
- "DownstreamPathTemplate": "/api/product/{id}",
- "DownstreamScheme": "https",
- "DownstreamHostAndPorts": [
- {
- "Host": "localhost",
- "Port": 44337
- }
- ],
- "UpstreamPathTemplate": "/gateway/product/{id}",
- "UpstreamHttpMethod": [ "GET", "DELETE" ]
- },
- {
- "DownstreamPathTemplate": "/api/customer",
- "DownstreamScheme": "https",
- "DownstreamHostAndPorts": [
- {
- "Host": "localhost",
- "Port": 44373
- }
- ],
- "UpstreamPathTemplate": "/gateway/customer",
- "UpstreamHttpMethod": [ "POST", "PUT", "GET" ]
- },
- {
- "DownstreamPathTemplate": "/api/customer/{id}",
- "DownstreamScheme": "https",
- "DownstreamHostAndPorts": [
- {
- "Host": "localhost",
- "Port": 44373
- }
- ],
- "UpstreamPathTemplate": "/gateway/customer/{id}",
- "UpstreamHttpMethod": [ "GET", "DELETE" ]
- }
- ],
- "GlobalConfiguration": {
- "BaseUrl": "http://localhost:44382"
- }
- }
DownstreampathTemplate - Defines the route of actual endpoint of Microservice
DownstreamScheme - scheme of Microservice, HTTPS
DownstreamHostsandPorts - Host and Port of Microservice will define here.
UpstreampathTemplate - The path at which the client will request the Ocelot API Gateway
UpstreamHttpmethod - The Supported HTTP Methods to the API Gateway. Based on the incoming method,Ocelot sends a similar HTTP method request to microservices as well.
Let's test the application and this will run under the Gateway.WebAPI Port number which we already defined in the configuration.json file
launchsettings.json (Gateway API)
- {
- "iisSettings": {
- "windowsAuthentication": false,
- "anonymousAuthentication": true,
- "iisExpress": {
- "applicationUrl": "http://localhost:51733",
- "sslPort": 44382
- }
- },
- "profiles": {
- "IIS Express": {
- "commandName": "IISExpress",
- "launchBrowser": true,
- "environmentVariables": {
- "ASPNETCORE_ENVIRONMENT": "Development"
- }
- },
- "Gateway.WebApi": {
- "commandName": "Project",
- "launchBrowser": true,
- "applicationUrl": "https://localhost:5001;http://localhost:5000",
- "environmentVariables": {
- "ASPNETCORE_ENVIRONMENT": "Development"
- }
- }
- }
- }
-> Right Click on solution
-> Click on properties

Run the Project to check the results.
Output
Product Microservice - end point

Customer Microservice - end point

Note
I also implemented Swagger in this to check the result of individual Microservices.
I hope this article helps you!
Keep Learning!!!
Nikhil VairatPosted Jul 17, 2024, 12:05 PM
How to set dynamic port no in this example ?
susanta sahooPosted Aug 5, 2022, 11:45 AM
Great Article Jay..Can you please post some article , communication between two or more microservices..
Ajay RaoPosted Mar 23, 2022, 3:03 AM
Is it possible to call and route an react web application via OCELOT, though OCELOT says its an API gateway technology. i want to expose only the OCELOT gateway by deploying it in a DMZ and deploy my react-web-app (based on react/redux) and RESTful web services (based on DOTNET CORE) behind the firewall and the database on a independent server behind the firewall. we tried but the request is not going through when we try to access the react-web-application
Nitin KurlePosted Jul 27, 2021, 6:25 AM
Hello Jay, How should we host this application on AWS? Any idea or link?
Sai KPosted Mar 25, 2021, 4:39 AM
Good One Jay.
Mayank MishraPosted Oct 19, 2020, 1:47 AM
Good article but you missed program.cs change in above article .ConfigureAppConfiguration((hostingContext, config) => { config .SetBasePath(hostingContext.HostingEnvironment.ContentRootPath) .AddJsonFile("configuration.json", optional: false, reloadOnChange: true); });
SriPosted Sep 21, 2020, 11:57 AM
Very nice article
DevaraPosted Sep 21, 2020, 11:15 AM
Thanks for Sharing ,Keep up the good work !
Hamid KhanPosted Sep 17, 2020, 2:30 AM
Very good explanation........Thanks for sharing.........Keep posting