

In this article, we will cover mobile alerts in Xamarim.Forms. For any mobile app, it’s important to define with the user or the client or the product owner if we work in an Agile context (Scrum), for Android and for iOS. Even if we work in a single shared project, we need to know what every environment can offer in native apps.
ToastsIt’s a simple plugin: Toasts.Forms.Plugin that we can use inside Xamarin.forms project. I advise starting with it because it’s similar to native toast or notification API's especially for iOS developers.
Notifications are placed in the center line to be close to the native platform with some changes in design and it allows the developer to make sound and badges.
Notification in Native environmentiOS uses UNNotificationRequest object to manage notifications.
Android uses -
- Snackbar that display a simple message and disappears after a lapse of time. (https://developer.android.com/reference/android/support/design/widget/Snackbar.html)
- Builder if we use at least Lollipop version, where you can set the title and a small or large icon.(https://developer.android.com/reference/android/app/Notification.Builder.html)
- UWP/WinRT uses ToastNotification: it includes text or image.
(https://docs.microsoft.com/en-us/uwp/api/windows.ui.notifications.toastnotification)
We add this plugin from NuGet Package Manager Console in Visual Studio 2017 on each platform, even your portable library, because it uses the Dependency Service.
Install-Package Toasts.Forms.Plugin -Version 3.3.2
Or we just open the Search Toasts.Forms.Plugin in Nuget Package Manager and we click on Install,
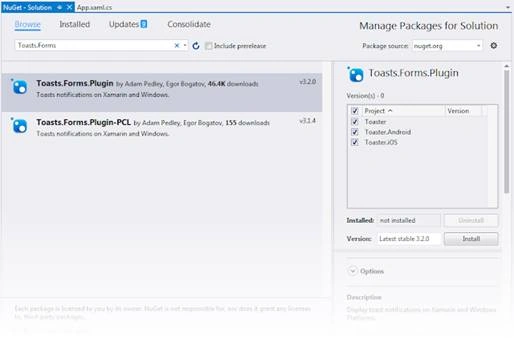
So, for every project, we will add these references in MainActivity.CS or MainPage.cs
- using Xamarin.Forms;
- using Plugin.Toasts;
For Android, this code will be added in the end of MainActivity.OnCreate, to register the dependency and initialize it,
- DependencyService.Register<ToastNotification>();
- ToastNotification.Init(this);
We do the same for the other platforms.
For iOS, we have to add a request permission to display the notifications.
- // Request Permissions
- if (UIDevice.CurrentDevice.CheckSystemVersion(10, 0))
- {
- // Request Permissions
- UNUserNotificationCenter.Current.RequestAuthorization(UNAuthorizationOptions.Alert | UNAuthorizationOptions.Badge | UNAuthorizationOptions.Sound, (granted, error) =>
- {
- // Deal with the problem
- });
- }
- else if (UIDevice.CurrentDevice.CheckSystemVersion(8, 0))
- {
- var notificationSettings = UIUserNotificationSettings.GetSettingsForTypes(
- UIUserNotificationType.Alert | UIUserNotificationType.Badge | UIUserNotificationType.Sound, null);
- app.RegisterUserNotificationSettings(notificationSettings);
- }
Now, we are able to call a notification anywhere in the app, for example, let’s go back to the main page in Portable Project to start a simple example.
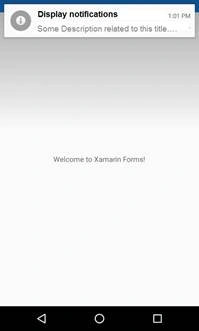
We start by defining the notification options like the title and description. This is the interface INotificationOptions.
Imed KilleniPosted May 18, 2018, 1:30 PM
Nice article! Thank you for sharing!
Ishrak El AndaloussiPosted May 18, 2018, 5:08 AM
I see no added value in your article you just copy what exists in the plugin github https://github.com/EgorBo/Toasts.Forms.Plugin
Kartik PawarPosted Apr 26, 2018, 12:34 AM
Nice article... Thanks for sharing...
Logesh PalaniPosted Apr 25, 2018, 11:39 AM
Nice Article :) Thank you. Change your title Xamarim to Xamarin