
In this article I describe Palindrome Numbers in a Windows Store app. We will begin with a brief explanation of Palindrome Numbers.
Palindrome Number
A number that is equal to itself when reversed is called a Palindrome Number.
Example: 121, 131, 11 etc.
Now let us create a Palindrome Number app in Windows Store.
Step 1
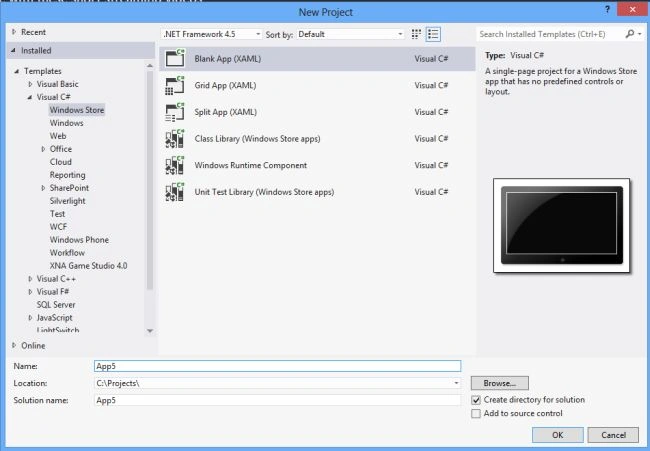
First of all you have to create a new Windows Store Application.
- Open Visual Studio 2012
- "File" -> "New" -> "Project..."
- Choose "Template" -> "Visual C#" -> "Window Store app"
- Choose "Blank App (XAML)" then rename the application
Step 2
Write the following XAML code in "Mainpage.Xaml" (that is available in Solution Explorer):
<Page
x:Class="Palindrome_number_app.MainPage" xmlns="http://schemas.microsoft.com/winfx/2006/xaml/presentation"
xmlns:x="http://schemas.microsoft.com/winfx/2006/xaml"
xmlns:local="using:armstrong_app"
xmlns:d="http://schemas.microsoft.com/expression/blend/2008"
xmlns:mc="http://schemas.openxmlformats.org/markup-compatibility/2006"
mc:Ignorable="d">
<Grid Background="Blue">
<Grid.RowDefinitions>
<RowDefinition Height="38*"/>
<RowDefinition Height="23*"/>
<RowDefinition Height="31*"/>
<RowDefinition Height="32*"/>
<RowDefinition Height="63*"/>
<RowDefinition Height="581*"/>
</Grid.RowDefinitions>
<Grid.ColumnDefinitions>
<ColumnDefinition Width="161*"/>
<ColumnDefinition Width="349*"/>
<ColumnDefinition Width="856*"/>
</Grid.ColumnDefinitions>
<TextBlock Text="Check Number is Palindrome numbers or not" FontFamily="Arial" FontSize="14" FontWeight="ExtraBold" Foreground="Red" Grid.Column="1" Grid.Row="1" Grid.ColumnSpan="2"></TextBlock>
<TextBlock Text="Enter Number:" FontFamily="Arial" FontSize="15" FontWeight="ExtraBold" Foreground="Red" Grid.Column="1" Grid.Row="2"></TextBlock>
<TextBox x:Name="Textbox1" Width="150" Height="32" VerticalAlignment="Top" Grid.Column="2" Grid.Row="2" HorizontalAlignment="Left" Grid.RowSpan="2" />
<TextBlock Text="Number is:" FontFamily="Arial" FontSize="15" FontWeight="ExtraBold" Foreground="Red" Grid.Column="1" Grid.Row="3"></TextBlock>
<TextBlock x:Name="text2" FontFamily="Arial" FontSize="15" FontWeight="ExtraBold" Foreground="Red" Grid.Column="2" Grid.Row="3" Margin="5,0,782,0" Height="32" VerticalAlignment="Bottom" />
<Button Content="Click" Click="Button1_click" Grid.Column="2" Grid.Row="4" FontSize="15" Foreground="Red" Background="Yellow" Width="137" Height="38" Margin="0,15,0,10" ></Button>
</Grid>
</Page>
Step 3
Now write the following C# code for the button within "Mainpage.Xaml.cs".
using System;
using System.Collections.Generic;
using System.IO;
using System.Linq;
using Windows.Foundation;
using Windows.Foundation.Collections;
using Windows.UI.Xaml;
using Windows.UI.Xaml.Controls;
using Windows.UI.Xaml.Controls.Primitives;
using Windows.UI.Xaml.Data;
using Windows.UI.Xaml.Input;
using Windows.UI.Xaml.Media;
using Windows.UI.Xaml.Navigation;
namespace Palindrome_number_app
{
public sealed partial class MainPage : Page
{
public MainPage()
{
this.InitializeComponent();
}
protected override void OnNavigatedTo(NavigationEventArgs e)
{
}
private void Button1_click(object sender, RoutedEventArgs e)
{
int num = Convert.ToInt32(Textbox1.Text);
int rev = 0;
int num1 = num;
while (num > 0)
{
int r = num % 10;
num = num / 10;
rev = rev * 10 + r;
}
if (rev == num1)
{
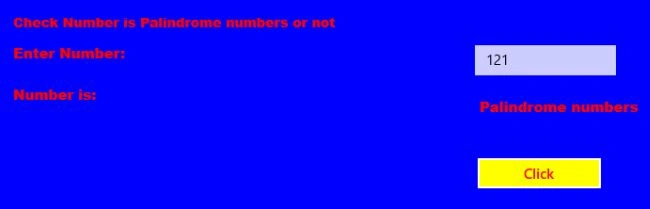
text2.Text = "Palindrome numbers";
}
else
{
text2.Text = "Not Palindrome numbers";
}
}
}
}
Step 4
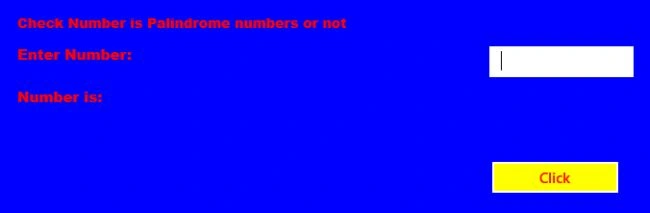
Run the Palindrome app.
Join the conversation! Your thoughts help the community grow.