

Windows 8 Apps provide a frames feature for navigation among pages in the single application. You can create multiple pages for your Windows 8 Apps and support the user navigating among the pages within the app. In Metro apps navigation will be implemented with the help of a navigate method of the frame class.
The Navigate function has two overloaded methods; the first one takes one argument that is the name of the page we want to navigate and the other overloaded method takes two arguments; one is the name of the page and the second is the parameter of the object type that we want to pass during navigation.
Today we are going to use the second overloaded method of the navigate function that takes two arguments.
In this artilce we are going to learn how to pass multiple values among pages on navigation in an application in Windows 8 Apps.
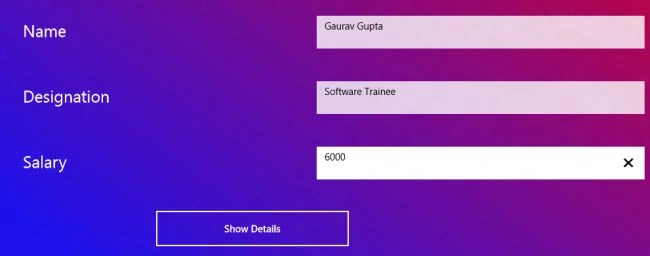
Here we design two pages. We fill the information on first page and navigate to second page, then the second page will show all information that are fill in the first page.
Steps to followed:
Step 1 First, we will create a new blank Windows Store Application.
- Open Visual Studio 2012.
- File -> New -> Project
- Choose Template -> Visual C# ->Windows Store
- Select Blank Application
- Rename the application.
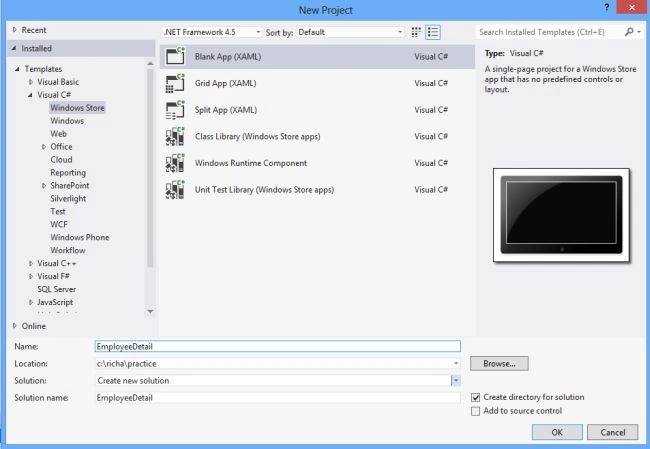
Step 2 In the MainPage.xaml file we design a form to be filled in by the user:
<Page
x:Class="App9.MainPage"
IsTabStop="false"
xmlns="http://schemas.microsoft.com/winfx/2006/xaml/presentation"
xmlns:x="http://schemas.microsoft.com/winfx/2006/xaml"
xmlns:local="using:App9"
xmlns:d="http://schemas.microsoft.com/expression/blend/2008"
xmlns:mc="http://schemas.openxmlformats.org/markup-compatibility/2006"
mc:Ignorable="d">
<Grid Margin=" 30,40">
<Grid.Background>
<LinearGradientBrush EndPoint="0.5,1" StartPoint="0.9,0">
<GradientStop Color="red"/>
<GradientStop Color="#FF1B11EE" Offset="1"/>
</LinearGradientBrush>
</Grid.Background>
<Grid.ColumnDefinitions>
<ColumnDefinition Width="500"> </ColumnDefinition>
<ColumnDefinition Width="500"></ColumnDefinition>
</Grid.ColumnDefinitions>
<Grid.RowDefinitions>
<RowDefinition Height="100"></RowDefinition>
<RowDefinition Height="100"></RowDefinition>
<RowDefinition Height="100"></RowDefinition>
<RowDefinition Height="100"></RowDefinition>
<RowDefinition></RowDefinition>
</Grid.RowDefinitions>
<TextBlock Text="Name" Grid.Column="0" Grid.Row="0" FontSize="25" Margin="52,35,75,65" Grid.RowSpan="2"/>
<TextBox x:Name="name" Grid.Row="0" Grid.Column="1" Height="50" ></TextBox>
<TextBlock Text="Designation" Grid.Column="0" Grid.Row="1" FontSize="25" Margin="52,35,65,65" Grid.RowSpan="2"/>
<TextBox x:Name="desig" Grid.Row="1" Grid.Column="1" Height="50" ></TextBox>
<TextBlock Text="Salary" Grid.Column="0" Grid.Row="2" FontSize="25" Margin="52,35,81,65" Grid.RowSpan="2"/>
<TextBox x:Name="sal" Grid.Row="2" Grid.Column="1" Height="50" ></TextBox>
<Button x:Name="button" Grid.Row="3" Grid.ColumnSpan="2" Click="myclick" Width="300" Content="Show Details" Height="60" Margin="252,20,0,20"></Button>
</Grid>
</Page>
Step 3 In this step we add a page to an app that supports navigation:
- Select Project > Add New Item. The Add New Item dialog box opens.
- Pick the Windows Metro style template type.
- In the center pane, select Basic Page.
- Click Add.
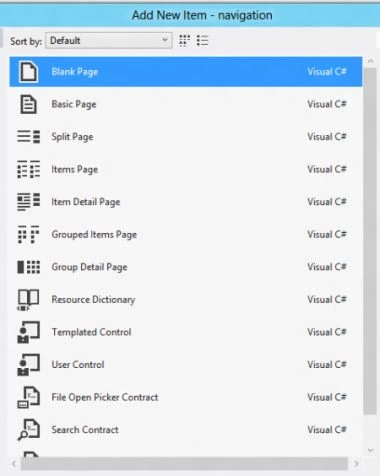
Step 4 The BlankPage1.xaml file is as in the following code:
<Page
x:Class="App9.BlankPage1"
IsTabStop="false"
xmlns="http://schemas.microsoft.com/winfx/2006/xaml/presentation"
xmlns:x="http://schemas.microsoft.com/winfx/2006/xaml"
xmlns:local="using:App9"
xmlns:d="http://schemas.microsoft.com/expression/blend/2008"
xmlns:mc="http://schemas.openxmlformats.org/markup-compatibility/2006"
mc:Ignorable="d" Loaded="Page_Loaded_1">

Gaurav GuptaPosted Sep 4, 2012, 5:00 AM
I use this class to bind the data of textboxes from UI, so I will able to send multiple values to the next page by sending the object of this class. Hope you understand.....
Romain MrpopoeditedPosted Jul 25, 2012, 3:15 PMEdited Jul 25, 2012, 3:16 PM
Just a quick question. What means for you "Step 5 Here we define a class that has three properties?" and how to do that? Thx