

Introduction
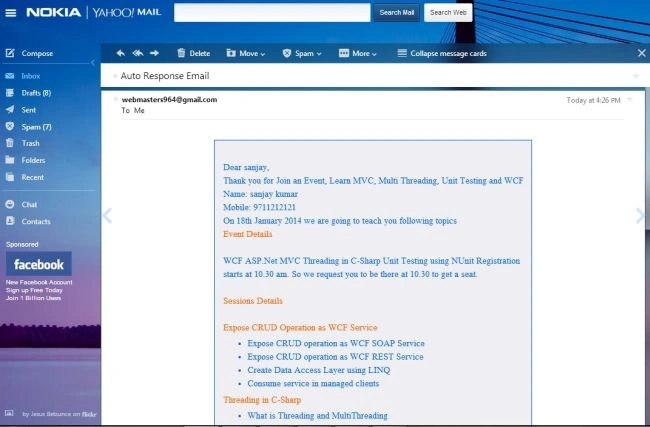
This article explains how to Auto Respond Email sent; once the end-user has registered, a confirmation email will be sent to the registrant to confirm the registration.
Use:
- ASP .NET web page
- Create HTML Email Templates
- JavaScript validation
- MySQL Database
First, for the previous article read and use the following ”Table Structure for Table (Event)”.
- CREATE TABL EIF NOTEXISTS `Event` (
- `Firstname` Varchar(100)NOTNULL,
- `Lastname` Varchar(100)NOTNULL,
- `Email` Varchar(25)NOTNULL,
- `Mobile` Varchar(12)NOTNULL
- )ENGINE=InnodbDEFAULTCHARSET=Latin1;
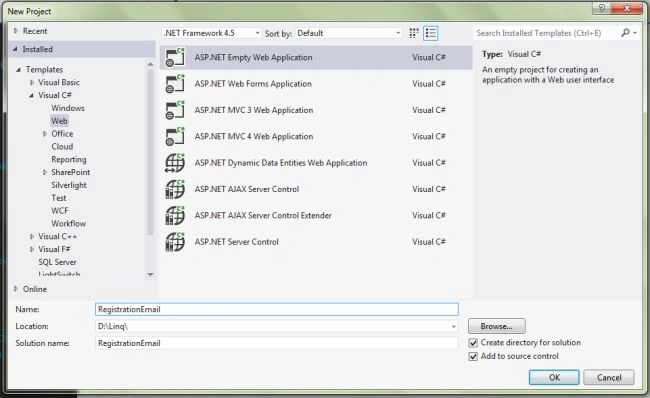
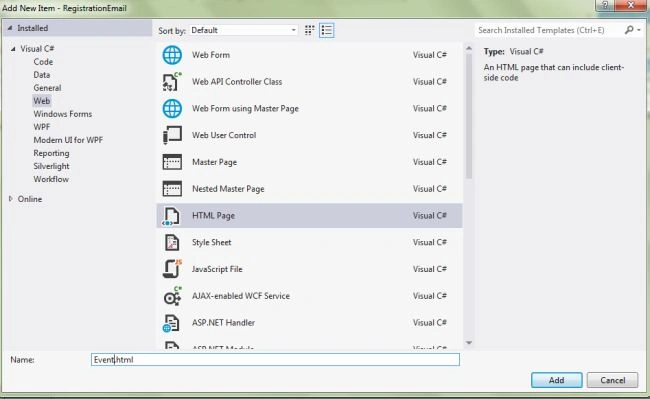
Step 2: Go to Solution Explorer then right-click on your application then select "Add New Item" then select "Html Page" and name it “Event.html”.
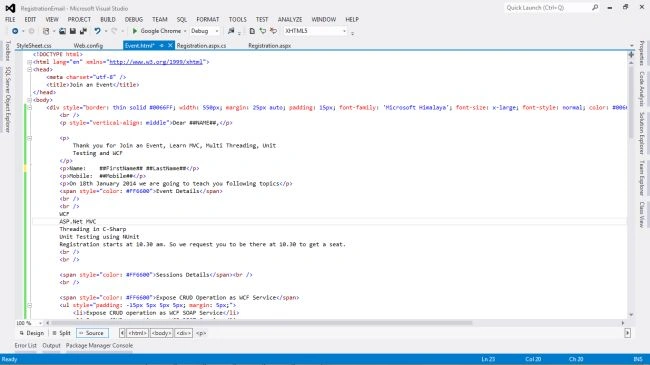
Step 3: Use the following Source code for the “Event.Html” in the Design Page View.
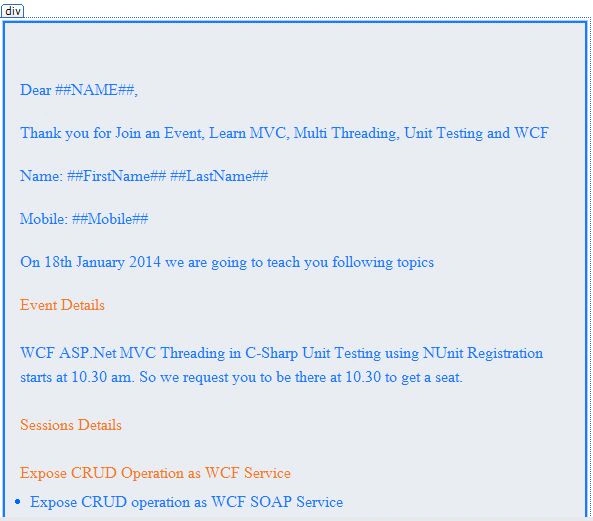
Step 4: Design the HTML page with the following markup: “Event.Html”.
Step 5: Now in the design “Registration.aspx“ design the web page with the following source code. I have also implemented the JavaScript validations on the First Name, Last Name, Email ID and the Mobile fields.
Registration.aspx
- <%@ Page Language="C#" AutoEventWireup="true" CodeBehind="Registration.aspx.cs"
- Inherits="RegistrationEmail.Registration" Title="Registration & Email Sending" %>
- <!DOCTYPE html>
- <html xmlns="http://www.w3.org/1999/xhtml">
- <head runat="server">
- <title>Registration web form with HTML Email Template</title>
- <link href="StyleSheet.css" rel="stylesheet" />
- <script type="text/javascript">
- function validationCheck() {
- var summary = "";
- summary += isvalidFirstname();
- summary += isvalidLastname();
- summary += isvalidEmail();
- summary += isvalidMobileno();
- if (summary != "") {
- alert(summary);
- return false;
- }
- else {
- return true;
- }
- }
- function isvalidFirstname() {
- var id;
- var temp = document.getElementById("<%=txtFirstName.ClientID %>");
- id = temp.value;
- if (id == "") {
- return ("Please enter First Name" + "\n");
- }
- else {
- return "";
- }
- }
- function isvalidLastname() {
- var id;
- var temp = document.getElementById("<%=txtLastName.ClientID %>");
- id = temp.value;
- if (id == "") {
- return ("Please enter Last Name" + "\n");
- }
- else {
- return "";
- }
- }
- function isvalidEmail() {
- var id;
- var temp = document.getElementById("<%=txtEmailID.ClientID %>");
- id = temp.value;
- var re = /\w+([-+.']\w+)*@\w+([-.]\w+)*\.\w+([-.]\w+)*/;
- if (id == "") {
- return ("Please Enter Email" + "\n");
- }
- else if (re.test(id)) {
- return "";
- }
- else {
- return ("Email should be in the form [email protected]" + "\n");
- }
- }
- function isvalidMobileno() {
- var id;
- var temp = document.getElementById("<%=txtMobile.ClientID %>");
- id = temp.value;
- var re;
- re = /^[0-9]+$/;
- var digits = /\d(10)/;
- if (id == "") {
- return ("Please Enter Mobile no" + "\n");
- }
- else if (re.test(id)) {
- return "";
- }
- else {
- return ("Phone no should be digits only" + "\n");
- }
- }
- </script>
- </head>
- <body>
- <form id="form1" runat="server">
- <div class="page">
- <div class="center">
- <table style="width: 100%"; >
- <tr>
- <td colspan="3">
- <h3>Registration web form with HTML Email Template</h3>
- </td>
- </tr>
- <tr>
- <td>First Name:</td>
- <td>
- <asp:TextBox ID="txtFirstName" runat="server" CssClass="txt"></asp:TextBox></td>
- <td> </td>
- </tr>
- <tr>
- <td>Last Name:</td>
- <td>
- <asp:TextBox ID="txtLastName" runat="server" CssClass="txt"></asp:TextBox></td>
- <td> </td>
- </tr>
- <tr>
- <td>Email ID:</td>
- <td>
- <asp:TextBox ID="txtEmailID" runat="server" CssClass="txt"></asp:TextBox></td>
- <td> </td>
- </tr>
- <tr>
- <td>Mobile:</td>
- <td>
- <asp:TextBox ID="txtMobile" runat="server" CssClass="txt"></asp:TextBox></td>
- <td> </td>
- </tr>
- <tr>
- <td></td>
- <td colspan="2">
- <asp:Button ID="btnSubmit" runat="server" Text="Submit" OnClick="btnSubmit_Click"
- CssClass="button" /></td>
- </tr>
- </table>
- </div>
- </div>
- </form>
- </body>
- </html>
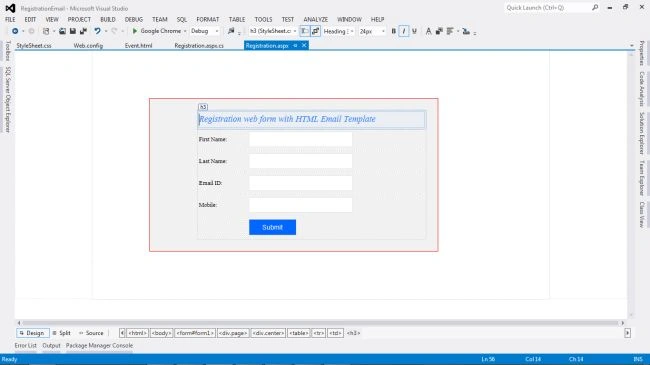
Step 6: Now, in the code behind file “Registration.aspx.cs“ use the following code.
Registration.aspx.cs
- using System;
- using System.Collections.Generic;
- using System.Linq;
- using System.Web;
- using System.Web.UI;
- using System.Web.UI.WebControls;
- using System.Data;
- //Using namespaces
- using MySql.Data.MySqlClient;
- using System.Configuration;
- using System.Text;
- using System.Net;
- using System.Net.Mail;
- namespace RegistrationEmail
- {
- public partial class Registration : System.Web.UI.Page
- {
- #region MySqlConnection Connection
- MySqlConnection conn = new
- MySqlConnection(ConfigurationManager.ConnectionStrings["ConnectionString"].ConnectionString);
- #endregion
- protected void Page_Load(object sender, EventArgs e)
- {
- Try
- {
- if (!Page.IsPostBack)
- {
- btnSubmit.Attributes.Add("onclick", "javascript:return validationCheck()");
- }
- }
- catch (Exception ex)
- {
- ShowMessage(ex.Message);
- }
- }
- /// <summary>
- /// This function is used for show message.
- /// </summary>
- /// <param name="msg"></param>
- void ShowMessage(string msg)
- {
- ClientScript.RegisterStartupScript(Page.GetType(), "validation", "<script language='javascript'>alert('" + msg + "');</script>");
- }
- /// <summary>
- /// This Function is used TextBox Empty.
- /// </summary>
- void clear()
- {
- txtFirstName.Text = string.Empty; txtLastName.Text = string.Empty; txtEmailID.Text = string.Empty; txtMobile.Text = string.Empty;
- txtFirstName.Focus();
- }
- #region This code user to Email Sending Server.MapPath "Event.html" mailbody.Replace using html email templates
- private void SendMail()
- {
- string filename = Server.MapPath("~/Event.html");
- string mailbody = System.IO.File.ReadAllText(filename);
- mailbody = mailbody.Replace("##NAME##", txtFirstName.Text);
- mailbody = mailbody.Replace("##FirstName##", txtFirstName.Text);
- mailbody = mailbody.Replace("##LastName##", txtLastName.Text);
- mailbody = mailbody.Replace("##Mobile##", txtMobile.Text);
- string to = txtEmailID.Text;
- string from = "[email protected]";
- MailMessage message = new MailMessage(from, to);
- message.Subject = "Auto Response Email";
- message.Body = mailbody;
- message.BodyEncoding = Encoding.UTF8;
- message.IsBodyHtml = true;
- SmtpClient client = new SmtpClient("smtp.gmail.com", 587);
- System.Net.NetworkCredential basicCredential = new System.Net.NetworkCredential("[email protected]", "Password");
- client.EnableSsl = true;
- client.UseDefaultCredentials = true;
- client.Credentials = basicCredential;
- try
- {
- client.Send(message);
- ShowMessage("Email Sending successfully...!");
- }
- catch (Exception ex)
- {
- ShowMessage(ex.Message);
- }
- }
- #endregion
- #region This Code used to Insert data and Send Email
- protected void btnSubmit_Click(object sender, EventArgs e)
- {
- Try
- {
- conn.Open();
- MySqlCommand cmd = new MySqlCommand("Insert into event (FirstName,LastName,Email,Mobile) values (@FirstName,@LastName,@Email,@Mobile)", conn);
- cmd.Parameters.AddWithValue("@FirstName", txtFirstName.Text);
- cmd.Parameters.AddWithValue("@LastName", txtLastName.Text);
- cmd.Parameters.AddWithValue("@Email", txtEmailID.Text);
- cmd.Parameters.AddWithValue("@Mobile", txtMobile.Text);
- cmd.ExecuteNonQuery();
- cmd.Dispose();
- ShowMessage("Registered successfully......!");
- SendMail();
- clear();
- }
- catch (MySqlException ex)
- {
- ShowMessage(ex.Message);
- }
- Finally
- {
- conn.Close();
- }
- }
- #endregion
- }
- }
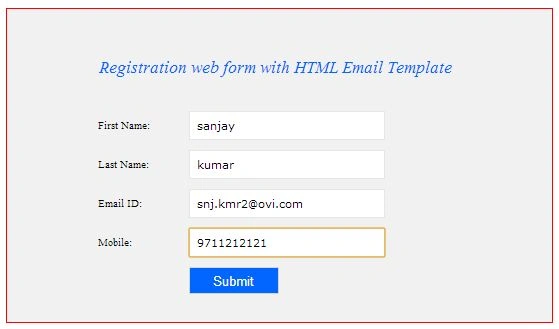
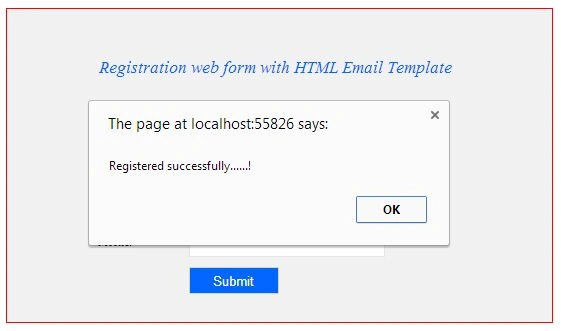
Step 8: Now, show in the Message box “Registered Successfully”.
Step 9: Now "Email Account Open" - > "View Email".
I hope this article is useful. If you have any other questions then please provide your comments below.
Laxmidhar SahooPosted Feb 22, 2020, 4:39 AM
Thanks for a good usefull article
vimal rajPosted Apr 11, 2018, 2:37 AM
Hi, i am vimal, when i click submit button informations are stored in my php my admin local host, but i am struggle in sendind email process, when i am debugg my query in sendmail() method try { (after this line code will move to chatch)client.Send(message); ShowMessage("Email Sending successfully...!"); } catch (Exception ex) { ShowMessage(ex.Message); }
Atish AdakmolPosted Sep 1, 2017, 6:54 AM
Very Helpful sir...thanks for your guidance.....
Mohanasundari PPosted Aug 13, 2015, 2:04 AM
how can i do the same code in asp .net web application not in mvc
Manoj KumarPosted Jul 20, 2015, 9:03 AM
that is very helpful thanks.