

Introduction
Before going in detail of this article I would like to introduce you the technologies used in the example.
Jquery: JQuery is a JavaScript Library, it greatly simplifies JavaScript programming.
Web Services: A web service is the communication platform between two different platform applications that allows using their web method.
JSON:
- JSON stands for JavaScript Object Notation
- JSON is a lightweight data-interchange format
- JSON is language independent *
- JSON is "self-describing" and easy to understand
Note: For better understanding of jQuery you must have the knowledge of CSS and JavaScripts.
Descriptions
Here are the files we have to create:
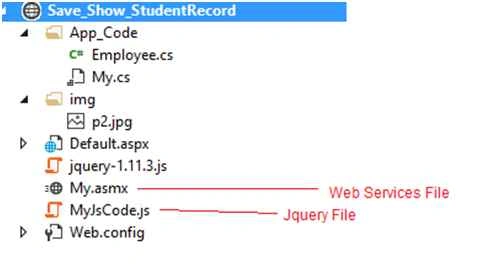
Step 1: Create an HTML Page Design Page:
- <!DOCTYPE html>
- <html xmlns="http://www.w3.org/1999/xhtml">
- <head>
- <title></title>
- <script src="jquery-1.11.3.js"></script>
- <script src="MyJsCode.js"></script>
- <style type="text/css">
- .auto-style1 {
- width: 72px;
- }
- .auto-style2 {
- width: 53px;
- }
- </style>
- </head>
- <body style="background-color:ActiveBorder">
- <form id="form1" style="height: 500px; width: 500px;background-image:url('img/p2.jpg'); border:solid;
- border-collapse:collapse;margin-top:120px; margin-left:400px;">
- <div id="div1" style="height: 170px; width: 500px;">
- <p style="margin-left:100px; font-family:Algerian;">Enter Name and Salary Below !</p>
- <table id="tbl1" border="1" style="margin-left: 130px; margin-top: 30px">
- <tr>
- <td>Name</td>
- <td>
- <input id="txtname" type="text" /></td>
- </tr>
- <tr>
- <td>Salary</td>
- <td>
- <input id="txtsalary" type="text" /></td>
- </tr>
- <tr>
- <td colspan="2">
- <input id="btnSave" type="button" value="Save" style="margin-left: 10px; width: 150px" />
- </td>
- </tr>
- </table>
- <br />
- </div>
- <div id="div2" style="height: 250px; width: 500px">
- <p style="margin-left:150px; font-family:Algerian;">Employee Records</p>
- <table id="tbl2" border="1" style="border-collapse: collapse; margin-left: 135px; width: 200px;">
- <thead>
- <tr>
- <th class="auto-style2">ID</th>
- <th>Name</th>
- <th class="auto-style1">Salary</th>
- </tr>
- </thead>
- <tbody>
- </tbody>
- </table>
- </div>
- </form>
- </body>
- </html>
Step 2: After designing the Web Page, let's create a table in SQL Server to save data.
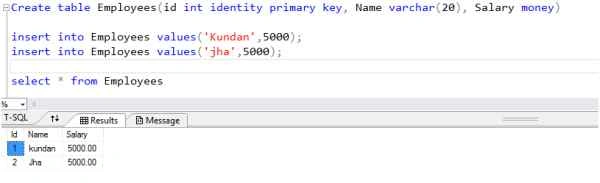
Step 3: Create a user defined type (or class) to accept the user value:
- public class Employee
- {
- public int ID { get; set; }
- public string Name { get; set; }
- public int Salary { get; set; }
- }
Step 4: We have created a web service having two Web Methods with ADO.NET class to communicate with SQL Server from HTML Page.
- public class My : System.Web.Services.WebService
- {
- string CS = ConfigurationManager.ConnectionStrings["MyCon"].ConnectionString;
- //Below method will accept employee type object and save it DB.
- [WebMethod]
- public void saveData(Employee emp1)
- {
- SqlConnection _con = new SqlConnection(CS);
- SqlCommand _cmd = new SqlCommand("insert into Employees values(@name,@salary)", _con);
- _cmd.Parameters.AddWithValue("@name", emp1.Name);
- _cmd.Parameters.AddWithValue("@salary", emp1.Salary);
- _con.Open();
- int i = _cmd.ExecuteNonQuery();
- _con.Close();
- }
- //This method has used to select the employee record and store in collection.
- [WebMethod]
- public void GetEmployeeRecord()
- {
- List<Employee> _li = new List<Employee>();
- SqlConnection _con = new SqlConnection(CS);
- SqlCommand _cmd = new SqlCommand("select * from Employees", _con);
- _con.Open();
- SqlDataReader dr = _cmd.ExecuteReader();
- while (dr.Read())
- {
- Employee emp = new Employee();
- emp.ID = Convert.ToInt32(dr[0]);
- emp.Name = dr[1].ToString();
- emp.Salary = Convert.ToInt32(dr[2]);
- _li.Add(emp);
- }
- _con.Close();
- //JavaScriptSerializer class has used to convert list collection to JSON array.
- JavaScriptSerializer js = new JavaScriptSerializer();
- Context.Response.Write(js.Serialize(_li));
- }
- }
Web Services will look like.
Step 5: Finally, create a javascript file for jQuery functions.
Here we have created two functions like webservices:
- //TO Save the User Data
- $(document).ready(function () {
- $("#btnSave").click(function () {
- var employee = {};
- employee.Name = $("#txtname").val();
- employee.Salary = $("#txtsalary").val();
- $.ajax({
- url: 'My.asmx/saveData',
- method: 'post',
- contentType: 'application/json;Charset=utf-8',
- data: '{emp1:' + JSON.stringify(employee) + '}',
- success: function () {
- show();
- $("#txtname").val("");
- $("#txtsalary").val("");
- },
- error: function (err) {
- alert("Please Enter Name and Salary");
- }
- });
- });
- });
- //TO Display the Records
- function show() {
- $.ajax({
- url: 'My.asmx/GetEmployeeRecord',
- dataType: "json",
- method: 'post',
- success: function (data) {
- var employee = $("#tbl2 tbody");
- employee.empty();
- $(data).each(function (index, emp) {
- employee.append('<tr><td>' + emp.ID + '</td><td>' + emp.Name + '</td><td>' + emp.Salary + '</td></tr>');
- });
- },
- error: function (err) {
- alert(err);
- }
- });
- }
To successfully execution of jQuery codes, please download the latest jQuery script file form jquery.com.
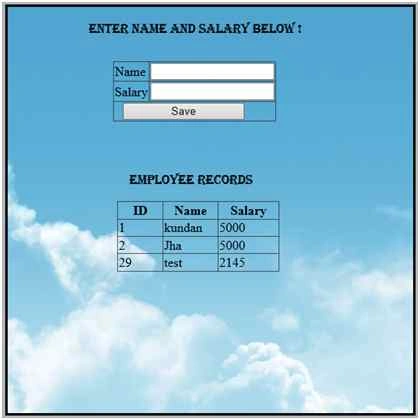
Output:
Hope you liked this article.
Santhakumar MunuswamyPosted Oct 18, 2015, 5:37 AM
Good one
Chandu KumawatPosted Oct 16, 2015, 3:51 AM
nice 1
RakeshPosted Oct 8, 2015, 1:28 AM
Good one
Ankit BansalPosted Oct 8, 2015, 12:51 AM
nice one..
Sujeet SumanPosted Oct 8, 2015, 12:51 AM
Nice Article.....................
Nilesh JadavPosted Oct 7, 2015, 9:44 PM
Thanks for the share !
Kundan JhaPosted Oct 7, 2015, 3:36 PM
thanks......
Muhammad Aqib ShehzadPosted Oct 7, 2015, 3:14 PM
good one
Rajeesh MenothPosted Oct 7, 2015, 1:16 PM
Nice!