

Today we are going to learn how to set User Account Picture through Windows Store Apps.
In this article I will create a Windows Store application that allows the user to set the user account picture of the system.
Here are the steps to be followed.
Step 1
Create a Windows Store Application using C#.
Step 2
In this step I will design my page.
<Page
x:Class="SetAccountPicture.MainPage"
xmlns="http://schemas.microsoft.com/winfx/2006/xaml/presentation"
xmlns:x="http://schemas.microsoft.com/winfx/2006/xaml"
xmlns:local="using:SetAccountPicture"
xmlns:d="http://schemas.microsoft.com/expression/blend/2008"
xmlns:mc="http://schemas.openxmlformats.org/markup-compatibility/2006"
mc:Ignorable="d">
<Grid >
<Grid.Background>
<LinearGradientBrush EndPoint="0.5,1" StartPoint="0.5,0">
<GradientStop Color="Black"/>
<GradientStop Color="#FFC9B9B9" Offset="1"/>
</LinearGradientBrush>
</Grid.Background>
<StackPanel Orientation="Vertical" Margin="40,100,0,0">
<Button x:Name="setImageButton" Content="Set image" Click="SetImage_Click" Height="69" HorizontalAlignment="Center" Width="188"/>
<Image x:Name="accountPic" Visibility="Visible" AutomationProperties.Name="LargeImage placeholder" Width="448" Height="448" Margin="0,50,10,0" HorizontalAlignment="Center"/>
<TextBlock x:Name="status" FontSize="30" Margin="0,30,10,0" HorizontalAlignment="Center" ></TextBlock>
</StackPanel>
</Grid>
</Page>
In the preceding code I use a button and a label to show status messages.
Step 3
Here I included some namespaces to perform the task efficiently; they are:
using Windows.Storage;
using Windows.Storage.Pickers;
using Windows.Storage.Streams;
using Windows.System.UserProfile;
using Windows.UI.Core;
using Windows.UI.Xaml.Media;
using Windows.UI.Xaml.Media.Imaging;
Step 4
In the button's click event I put the C# code for getting the image using FileOpenPicker and make that image as the user Account picture.
Getting the image with FileOpenPicker:
FileOpenPicker imagePicker = new FileOpenPicker
{
ViewMode = PickerViewMode.Thumbnail,
SuggestedStartLocation = PickerLocationId.PicturesLibrary,
FileTypeFilter = { ".jpg", ".jpeg", ".png", ".bmp" }
};
StorageFile imageFile = await imagePicker.PickSingleFileAsync();
Here I use the SetAccountPictureAsync method of the UserInformation class. I use using Windows.System.UserProfile for the namespace to access this class. SetAccountPictureAsync() accepts 3 storageFile objects for setting the small image, large image, and video. But here I only use the second parameter; see:
SetAccountPictureResult result = await UserInformation.SetAccountPicturesAsync(null, imageFile, null);
Note: Setting the Account Picture will fail if the user disallows it in PC Settings.
The SetAccountPictureAsync() returns SetAccountPictureResult. Using this I will check the result of whether my task is completed successfully or not and show this message for the user.
Step 5
Here is the full code of MainPage.XAML.cs file:
using System;
using System.Collections.Generic;
using System.IO;
using System.Linq;
using Windows.Foundation;
using Windows.Foundation.Collections;
using Windows.Storage;
using Windows.Storage.Pickers;
using Windows.Storage.Streams;
using Windows.System.UserProfile;
using Windows.UI.Core;
using Windows.UI.Xaml;
using Windows.UI.Xaml.Controls;
using Windows.UI.Xaml.Controls.Primitives;
using Windows.UI.Xaml.Input;
using Windows.UI.Xaml.Media;
using Windows.UI.Xaml.Media.Imaging;
namespace SetAccountPicture
{
public sealed partial class MainPage : Page
{
public MainPage()
{
this.InitializeComponent();
}
protected override void OnNavigatedTo(NavigationEventArgs e)
{
}
private async void SetImage_Click(object sender, RoutedEventArgs e)
{
FileOpenPicker imagePicker = new FileOpenPicker
{
ViewMode = PickerViewMode.Thumbnail,
SuggestedStartLocation = PickerLocationId.PicturesLibrary,
FileTypeFilter = { ".jpg", ".jpeg", ".png", ".bmp" }
};
StorageFile imageFile = await imagePicker.PickSingleFileAsync();
if (imageFile != null)
{
SetAccountPictureResult result = await UserInformation.SetAccountPicturesAsync(null, imageFile, null);
if (result == SetAccountPictureResult.Success)
{
status.Text = "Account Picture Succussfully Updated";
PictureChanged();
}
else
{
status.Text = " Error in setting Account Picture Succussfully";
}
}
}
private async void PictureChanged()
{
StorageFile image = UserInformation.GetAccountPicture(AccountPictureKind.LargeImage) as StorageFile;
if (image != null)
{
try
{
IRandomAccessStream imageStream = await image.OpenReadAsync();
BitmapImage bitmapImage = new BitmapImage();
bitmapImage.SetSource(imageStream);
accountPic.Source = bitmapImage;
}
catch
{
}
}
}
}
}
Step 6
Now the application is ready to run. Build and Run it. Click on the Set Image button to pick an image to be set.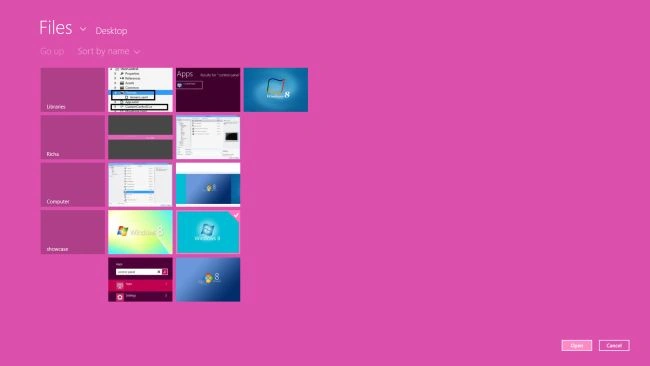
Your Account picture has been changed or saved.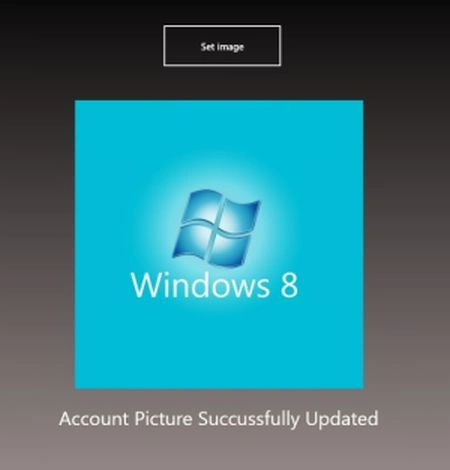
Join the conversation! Your thoughts help the community grow.