

Introduction
Parts:
- Arduino Mega 2560
- Sound Sensor
- BreadBoard
- HookUp Wires
- LED-3.
SoundSensor:
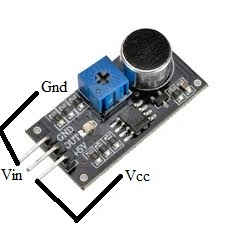
Figure 1: Sound Sensor
- The sound sensor can easily find the sound.
- It can detect the sound of the environment.
- They can have the standard of three pins in the sensor.
Connection:
- The Gnd pin can be connected to the Gnd of the Arduino Mega 2560.
- The Vcc pin can be connected to the Vcc of the Arduino Mega 2560.
- The Vin pin can be connected to the Analog pin of A1 to the Arduin oMega 2560.
Connection from the LED to the ArduinoMega2560:
First LED connection:
- Positive pin = 13
- Negative Pin = Gnd.
Second LED connection:
- Positive pin = 12
- Negative Pin = Gnd.
Third LED connection:
- Postive pin = 11
- Negative Pin = Gnd
Explanation:

- The sound is produced and then automatically the LED is ON.
- It can have the level of noise at places.
Uses:
- Home
- School/colleges
- Forest.....etc
Programming:
Output:
- int soundSensorPin = A1;
- int soundReading = 0;
- int soundThreshold = 500;
- int intensity[3] =
- {
- 0,
- 0,
- 0
- };
- int LEDPins[3] =
- {
- 13,
- 12,
- 11
- };
- int numberOfPins = 3;
- int currentPin = 0;
- int fadeCounter = 0;
- int fadeDelay = 50;
- boolean switcher = true;
- void setup()
- {
- pinMode(soundSensorPin, INPUT);
- for (int i = 0; i < numberOfPins; i++)
- {
- pinMode(LEDPins[i], OUTPUT);
- }
- }
- void loop()
- {
- soundReading = analogRead(soundSensorPin);
- if (soundReading > soundThreshold)
- {
- if (switcher)
- {
- aboveThreshold(currentPin);
- switcher = true;
- }
- } else
- {
- if (switcher)
- {
- belowThreshold();
- switcher = true;
- }
- }
- }
- void aboveThreshold(int cPin)
- {
- switcher = false;
- if (intensity[cPin] < 10)
- {
- intensity[cPin] = 255;
- delay(50);
- currentPin = currentPin + 1;
- }
- if (currentPin == numberOfPins)
- {
- currentPin = 0;
- }
- }
- void belowThreshold()
- {
- switcher = false;
- fadeCounter++;
- if (fadeCounter == fadeDelay)
- {
- fadeCounter = 0;
- for (int i = 0; i < numberOfPins; i++)
- {
- analogWrite(LEDPins[i], intensity[i]);
- }
- for (int i = 0; i < numberOfPins; i++)
- {
- intensity[i]--;
- if (intensity[i] < 0)
- {
- intensity[i] = 0;
- }
- }
- }
- }
Figure 2: Output
Read more articles on Arduino:
Sr KarthigaPosted Feb 29, 2016, 7:46 PM
thank you asfend sir
Sr KarthigaPosted Feb 29, 2016, 7:46 PM
thank you asfend sir
Sr KarthigaPosted Feb 29, 2016, 7:46 PM
hank you asfend sir
Asfend YarPosted Feb 29, 2016, 2:22 PM
Sr Karthiga post single comment on our posts
Asfend YarPosted Feb 29, 2016, 2:21 PM
good and nice share
Sr KarthigaPosted Feb 16, 2016, 9:49 PM
Thank you santhakumar sir
Santhakumar MunuswamyPosted Feb 16, 2016, 3:07 PM
Thanks for nice work
Sr KarthigaPosted Feb 15, 2016, 7:15 AM
thank you raja sir
Sr KarthigaPosted Feb 15, 2016, 7:15 AM
thank you sibeesh sir
Sr KarthigaPosted Feb 15, 2016, 7:14 AM
Thank you Shubham sir
Sr KarthigaPosted Feb 15, 2016, 7:14 AM
Thank you Mohammed sir
Raja TPosted Feb 15, 2016, 3:05 AM
Nice,Thanks for sharing
Sibeesh VenuPosted Feb 15, 2016, 12:36 AM
Nice Share
Shubham KumarPosted Feb 15, 2016, 12:30 AM
Interesting +1
Mohammed IbrahimPosted Feb 14, 2016, 11:25 PM
nice
Sr KarthigaPosted Feb 13, 2016, 8:12 PM
Thank you gowtham sir
Sr KarthigaPosted Feb 13, 2016, 8:11 PM
Thank you kumaresh sir
Sr KarthigaPosted Feb 13, 2016, 8:11 PM
Thank you Yadav Sir
Gowtham KPosted Feb 13, 2016, 11:37 AM
Good One
Kumaresh RajalingamPosted Feb 13, 2016, 10:20 AM
Good one
Praveen KumarPosted Feb 13, 2016, 8:46 AM
So impressive!
Sr KarthigaPosted Feb 13, 2016, 7:54 AM
Thank you Pankaj kumar Sir
Pankaj Kumar ChoudharyPosted Feb 13, 2016, 7:48 AM
Nice Job Sr Karthiga keep It up..........