

Step 1
- Start the Excel application.
- On the Home tab choose the Cells style to change the header background and sheet background style so it looks as in the following diagram.
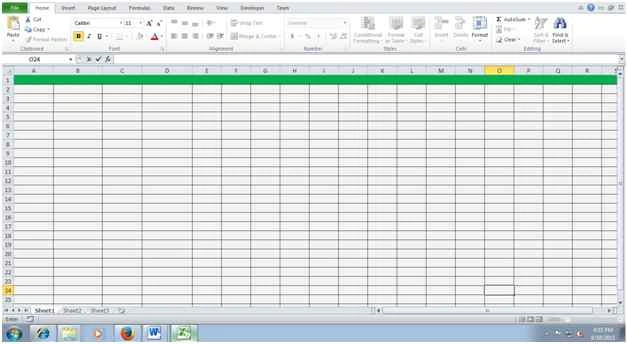
Figure 1: Excel Spreadsheet
- Save the Workbook with file extension “xlsx”.
- Open Notepad.
- Add the code shown below.
- <! DOCTYPE html>
- <html>
- <head>
- <style>
- table, td, th {
- border: 1px solid green;
- }
- th {
- background-color: green;
- color: white;
- }
- fieldset {
- border: #00cc00 2px solid;
- padding: 10px;
- Color: green;
- }
- </style>
- <script language="vbscript" type="text/vbscript">
- Sub Export()
- Dim mytable
- Dim mytable1
- Dim tab
- Dim n
- Dim j
- Set objExcel = CreateObject("Excel.Application")
- Set objWorkbook = objExcel.Workbooks.Open("C:\Users\Karthikeyan.K\Desktop\Book1.xlsx")
- objExcel.Application.Visible =True
- objWorkbook.Windows(1).Visible =True
- set XlSheet =objWorkbook.Sheets(1)
- XlSheet.Activate
- Set tab=document.getElementsByTagName("table")(0)
- mytable = document.getElementsByTagName("table")(0).rows.length
- mytable1= document.getElementsByTagName("table")(0).rows(0).cells.length
- For n = 0 to (mytable-1)
- For j = 0 To (mytable1-1)
- XlSheet.Cells (n + 1, j + 1).Value = tab.Rows(n).Cells(j).innertext
- Next
- Next
- MsgBox "Data Exported Successfully",vbInformation
- objWorkbook. Save
- objWorkbook. Close
- Set objWorkbook = Nothing
- Set objExcel = Nothing
- End Sub
- </script>
- </head>
- <body>
- <form>
- <fieldset>
- <Center>
- <img src="C:\Users\Karthikeyan.K\Desktop\excel_file-128.png" alt="face" height="128" width="128">
- <br>
- <br>
- <table>
- <tr>
- <th>Firstname</th>
- <th>Lastname</th>
- </tr>
- <tr>
- <td>Karthik</td>
- <td>K</td>
- </tr>
- <tr>
- <td>Mithu</td>
- <td>M</td>
- </tr>
- <tr>
- <td>Vinith</td>
- <td>R</td>
- </tr>
- <tr>
- <td>Menon</td>
- <td>A</td>
- </tr>
- </table>
- <br>
- <input type="button" onclick="Export ()" value="Export" /> <br>
- </Center>
- </fieldset>
- </form>
- </body>
- </html>
- Save the file with the extension “.htm”.
Step 2
Follow the procedure to turn on or turn off VBScript in your Internet Explorer:
- Choose Internet Options from the Tools menu.
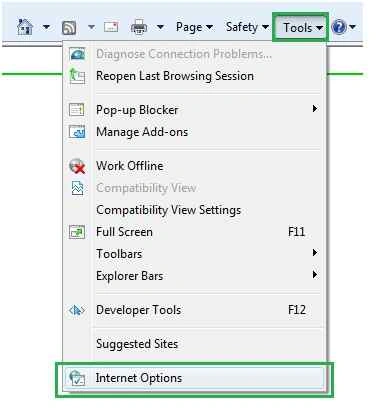
Figure 2
- Select security tab from the dialog box.
- Click the Custom Level button.
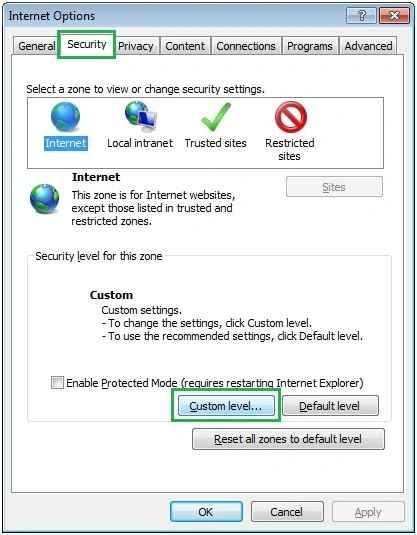
Figure 3
- Scroll down until you find the Scripting option.
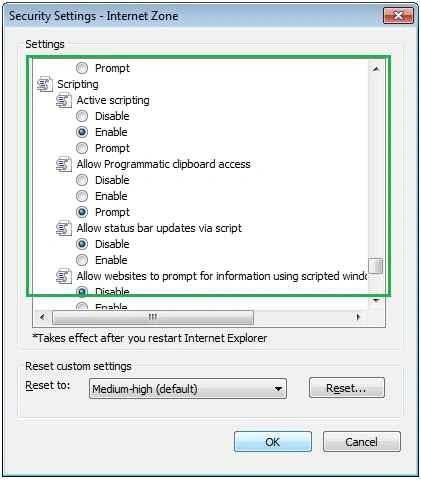
Figure 4
- Select the Enable radio button under Active scripting.
- Finally click OK and get out.
Output
- Open the HTML document.
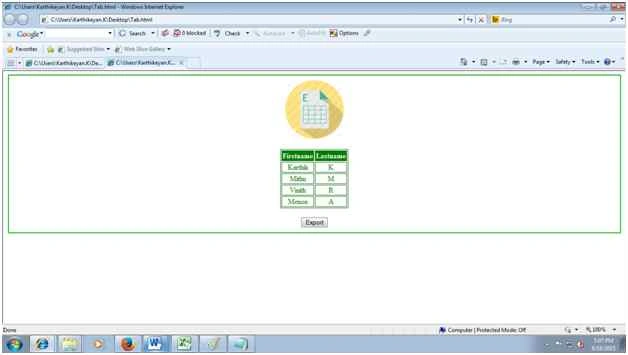
Figure 5: User data table
- Press the Export button.
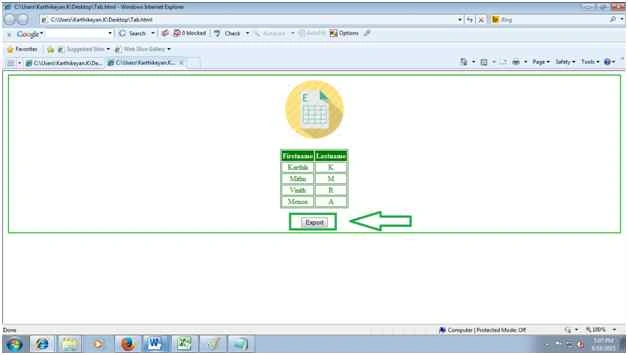
Figure 6: Export user data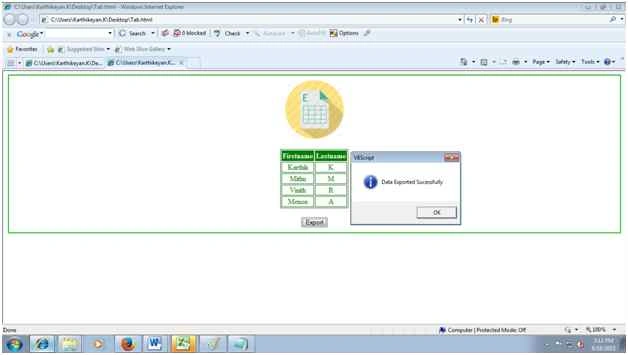
Figure 7: Data Exported Successfully
- Open the Workbook to check sheet1's data.
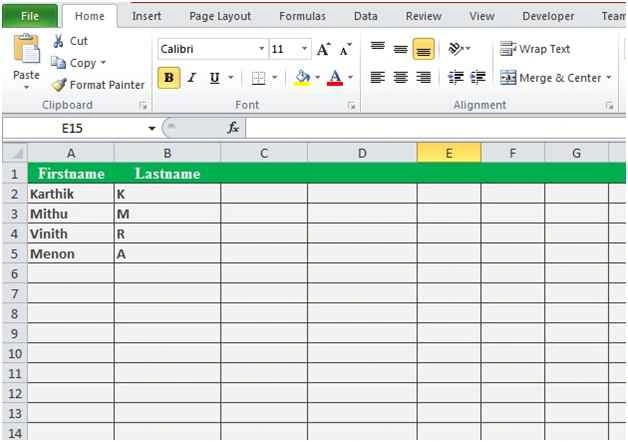
Figure 8: User data sheet
Conclusion
Thanks for reading! I hope you liked this article. Please provide your valuable suggestions.
Lars SchmidtPosted Feb 27, 2018, 4:28 AM
Hi Karthikeyan, thank you for this code. it works perfectly. I would like to ask how to extract only form entry into an existing excel sheet as an additional line underneath existing entries there. Thanks so much for your help!!! Best regards Lars
Karthikeyan KPosted Feb 1, 2016, 10:24 AM
Thanks for reading
Karthikeyan KPosted Feb 1, 2016, 10:24 AM
Hi Vijay VBScript only run in Internet Explorer..
Vijay BhaskarPosted Jan 31, 2016, 4:25 PM
Karthik.. thank you.. you have written wonderful article.. does it work on internet explorer only or on any browser also.. Please can you tell me..
Gowtham RajamanickamPosted Jan 5, 2016, 7:27 AM
Good article
Karthikeyan KPosted Aug 20, 2015, 1:46 AM
Thank you Vipul sir
Vipul MalhotraPosted Aug 19, 2015, 7:49 AM
nice
Karthikeyan KPosted Aug 19, 2015, 7:23 AM
Thank you Sandeep sir
Karthikeyan KPosted Aug 19, 2015, 7:22 AM
Thank you Sibeesh sir
Sandeep KumarPosted Aug 19, 2015, 7:08 AM
Nice Article sir :)
Sibeesh VenuPosted Aug 19, 2015, 6:54 AM
Nice Share
Karthikeyan KPosted Aug 19, 2015, 3:12 AM
Thank you Gowtham sir
Gowtham KPosted Aug 19, 2015, 2:54 AM
Good One
Karthikeyan KPosted Aug 19, 2015, 2:12 AM
Thank you Rajeesh sir
Karthikeyan KPosted Aug 19, 2015, 2:12 AM
Thank you Vaikesh sir
Karthikeyan KPosted Aug 19, 2015, 2:11 AM
Thank you Sumit sir
Sumit JoshiPosted Aug 19, 2015, 1:33 AM
Nice Share.
Vaikesh K PPosted Aug 19, 2015, 1:21 AM
Good one
Karthikeyan KPosted Aug 19, 2015, 12:23 AM
Thank you Nilesh sir
Rajeesh MenothPosted Aug 19, 2015, 12:22 AM
Good Karthikeyan K
Nilesh JadavPosted Aug 19, 2015, 12:16 AM
Nice one Karthikeyan K.
Karthikeyan KPosted Aug 18, 2015, 11:16 PM
Thank you Santhakumar sir...
Santhakumar MunuswamyPosted Aug 18, 2015, 2:28 PM
Good one