

Introduction
The approach shown is based on the use of Windows based authentication in
conjunction with a web site configured to deny anonymous authentication and to
require Windows based authentication.
The example shown would be useful on a company intranet site in which it was,
for example, necessary to restrict access to certain parts of the available
functionality based upon the member's role. For example, you might be working
with an application that has administrative and general users; the
administrative users might have additional application rights such as the
ability to delete records. If one were to check for group membership in the
administrator's group, the application can show or hide such functionality by
getting the currently logged in user and checking whether or not that user is a
group member.
There are other ways to accomplish the same sort of thing and to accomplish
control level locking and the other approaches can be a bit more surgical;
however, this is approach is quite easy and may be used to good effect.
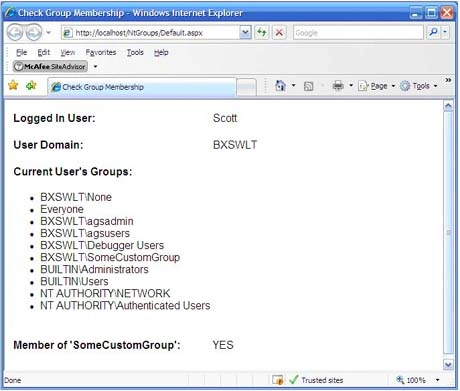
Figure 1: Example Web Site showing results of a Group Membership Test
Getting Started:
In order to get started, unzip the included project and save it. Open IIS and
create a virtual directory for the project and then, once it exists, right click
on the web site and select "Properties". When the properties dialog box open,
select the Directory Security tab and then click on the button called, "Edit"
(Figure 2); this will open the "Authentication Methods" dialog box (Figure 3).
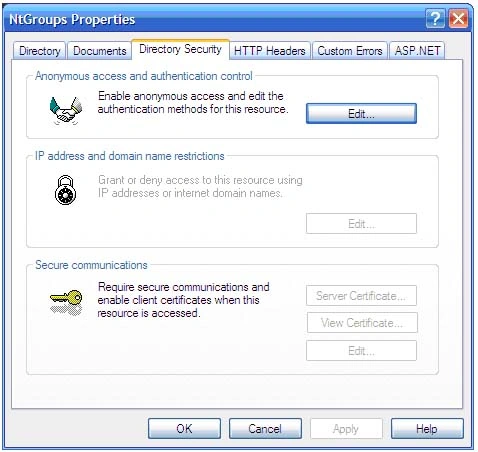
Figure 2: Edit the Anonymous Access and Authentication Settings

Figure 3: Authentication Methods
From the "Authentication Methods" dialog box, remove the check mark from
"Anonymous Access" to disable the feature and check "Integrated Windows
Authentication". This will force the site to require Windows Authentication
which in most instances is transparent but running the application from a test
instance on your local server will likely result in the display of a login
dialog.
Once the settings are made, you can OK the dialog and close up the IIS control
panel.

Figure 4: Solution Explorer
The solution contains a single web application project with a single page called
"Default". In this case, all of the code necessary to run the demo is contained
in the Default page's code behind file.
Code: Default Page
The default page contains a simple table used to display the results of a couple
of quick tests; during operation, it will look like the screen shot shown in
Figure 1. The markup for the page is little more than a simple table along with
a bullet list and some labels used to display the user information.
The class begins with the default imports (all of the imports are set by
default):
Imports System.Collections
Following the imports, the class declaration is shown:
Partial Class _Default
Inherits System.Web.UI.Page
Following the class
declaration, the page load event handler is provided. The section is annotated
to describe the action within Page Load:
Protected Sub Page_Load(ByVal sender As Object, ByVal e As System.EventArgs) Handles Me.Load
'
collect the user domain and identity
Dim arr As String()
= _
System.Web.HttpContext.Current.Request.
LogonUserIdentity.Name.Split("\")
'
update the display to show
'
the captured domain and user
If (arr.Length
> 0) Then
lblDomain.Text = arr(0).ToString()
lblUser.Text = arr(1).ToString()
End If
'
clear the list of groups
BulletedListOfGroups.Items.Clear()
'
set the member of group label to no
'
as a default
lblMemberOfGroup.Text
= "NO"
'
create an arraylist and populate
'
it with the list of groups that
'
the current user belongs to
Dim al As New ArrayList()
al = GetGroups()
'
check to see if the user belongs
'
to a specific group and create
'
a list of all of the user's groups
Dim s As String
For Each s In al
'
add this one to the list
BulletedListOfGroups.Items.Add(s)
'
check to see if the user
'
belongs to a specific group
If (s
= "BXSWLT\SomeCustomGroup") Then
'
change the label to show
'
there was a match
lblMemberOfGroup.Text = "YES"
End If
Next
End Sub
The only
other code contained in the default page's code behind is used to capture a
collection of groups of which the user is a member. The captured group list is
used in a simple test to see if the user is a member of a particular group in
the page load handler:
Public Function GetGroups() As ArrayList
Dim groups As New ArrayList()
Dim group As System.Security.Principal.IdentityReference
For Each group In
System.Web.HttpContext.Current.Request.LogonUserIdentity.Groups
groups.Add(group.Translate(GetType(
System.Security.Principal.NTAccount)).ToString())
Next
Return groups
End Function
End Class
Code: Web.Config
This web.config file is in the default configuration; you need only check to
make sure of the type of authentication specified for the application:
<authentication mode="Windows"/>
Make
sure that the authentication mode is set to Windows.
That sums up all the code necessary to make this simple check for group
membership.
Summary
The article is pretty short and simple. The intent was only to show an easy
approach to determining whether or not a user is a member of a group in the
context of a web application running with Windows NT Authentication. The
approach may be useful as a means for controlling access to the entire
application or parts of the application restricted from general use.
Join the conversation! Your thoughts help the community grow.