
Xamarin ToolbarItem
Xamarin Forms Toolbar is an abstraction of the extensions you can add to the NavigationBar on each platform. ToolbarItems are the individual items you add to the NavigationBar. The difficult part with this abstraction, is the need for it to be separate or included in the navigation bar.
Two Type of order in toolbar
- Primary Toolbar
- secondary toolbar
What is a Primary and secondary Toolbar?
Step 1
Go to the Visual Studio
Click File -> New -> Project
Click C# -> Cross Platform -> Cross Platform App(Xamarin.Forms.Portable).
Enter the Application Name, then Click ok.
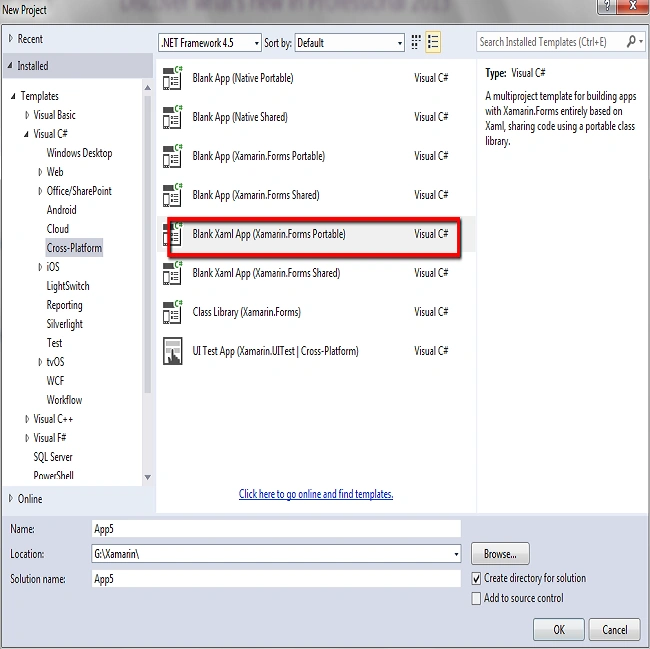
Step 2
In this step go to Solution Explorer -> Portable Class Library, then Click Xaml, Insert the code given below the Xaml Page, then save it.
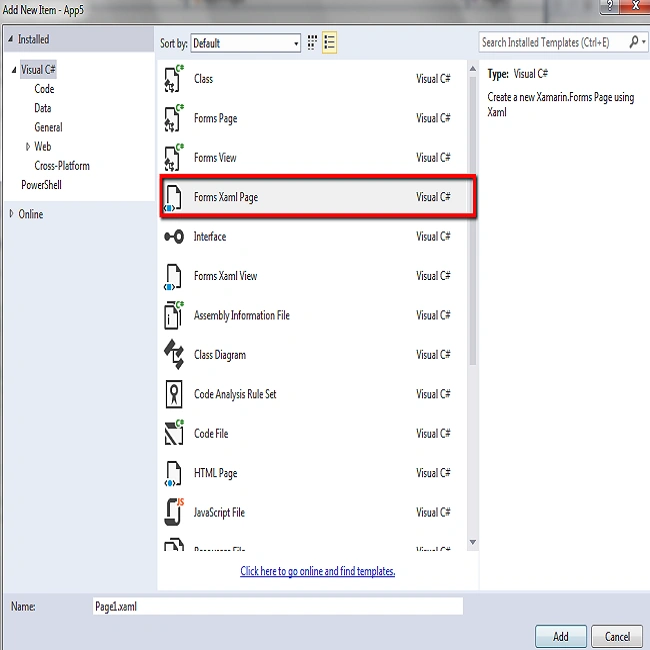
Step 3
Open App.Xaml.cs and set Page name
- public App()
- {
- InitializeComponent();
- MainPage = new Page1();
- }
Step 4
Open Page1.Xaml and add code in this page.
- <?xml version="1.0" encoding="utf-8" ?>
- <ContentPage xmlns="http://xamarin.com/schemas/2014/forms"
- xmlns:x="http://schemas.microsoft.com/winfx/2009/xaml"
- x:Class="App5.Page1"
- BackgroundColor="White">
- <ContentPage.ToolbarItems>
- <ToolbarItem Text ="Item 1"
- Priority="0" Order="Primary" />
- <ToolbarItem Text ="Item 2"
- Priority="1" Order="Primary" />
- <!--<ToolbarItem Text ="Item 2"
- Priority="1" Order="Secondary" />-->
- </ContentPage.ToolbarItems>
- </ContentPage>
Step 5
Open Page1.Xaml.cs and add code in this page.(You also toolbar code in cs page)
- using System;
- using System.Collections.Generic;
- using System.Linq;
- using System.Text;
- using System.Threading.Tasks;
- using Xamarin.Forms;
- namespace App5
- {
- public partial class Page1 : ContentPage
- {
- public Page1()
- {
- InitializeComponent();
- /* When toolbar item code is write cs page */
- // var Item1 = new ToolbarItem
- //{
- // Text = "Item 1"
- //};
- // var Item2 = new ToolbarItem
- // {
- // Text = "Item 2",
- // Order = ToolbarItemOrder.Secondary
- // };
- // this.ToolbarItems.Add(Item1);
- // this.ToolbarItems.Add(Item2);
- }
- }
- }
Step 6
Click build menu, then go to Configuration Manager
Configure your Android, Windows, IOS Depoly & Build Setting, then Click Close.
Step 7
In this step
Select build & Depoly Option, then Click to Start your the application
Now, go to Run option, choose Debug from the list of Android or IOS or UWP simulators, which are available. You can choose any one simulator and run it.
Step 8
Output
After a few seconds, the app will start running on your Android simulator. You will see your app working successfully.
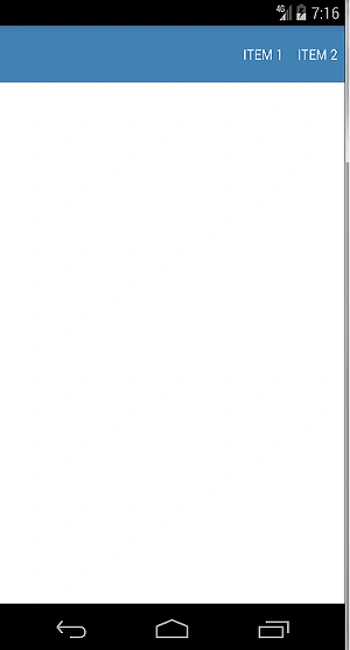
- <?xml version="1.0" encoding="utf-8" ?>
- <ContentPage xmlns="http://xamarin.com/schemas/2014/forms"
- xmlns:x="http://schemas.microsoft.com/winfx/2009/xaml"
- x:Class="App5.Page1"
- BackgroundColor="White">
- <ContentPage.ToolbarItems>
- <ToolbarItem Text ="Item 1"
- Priority="0" Order="Primary" />
- <!--<ToolbarItem Text ="Item 2"
- Priority="1" Order="Primary" />-->
- <ToolbarItem Text ="Item 2"
- Priority="1" Order="Secondary" />
- </ContentPage.ToolbarItems>
- </ContentPage>
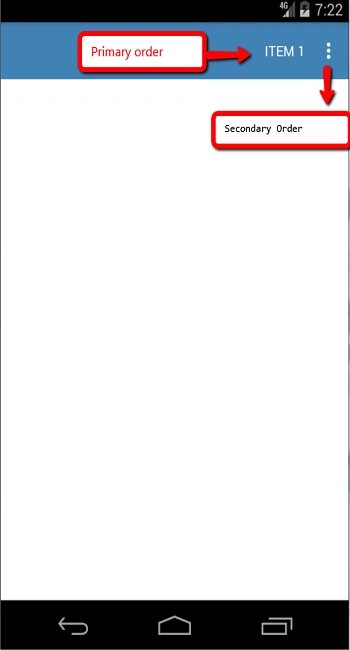

jeevan kothamasuPosted Dec 13, 2017, 6:23 AM
Tool bar items not visible on my screen
Thiruppathi RPosted May 18, 2017, 12:30 AM
Nice article for xamarin...