

This article shows how to upload a photo image with other details in an ASP.NET and C# application and display the details in a GridView. This is a simple web application for beginners to learn C#, ASP.NET and .Net controls. This will show how to upload and retrieve an image with other information from a database and display it in a GridView.
The following sample demonstrates step-by-step.
- Create a table in a database with the following fields:
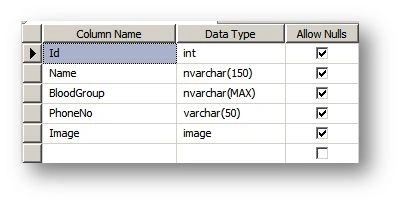
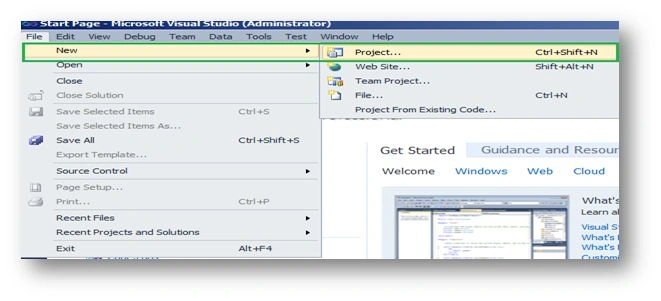
- In Visual Studio select "File" -> "New" -> "Project..." as in the following:
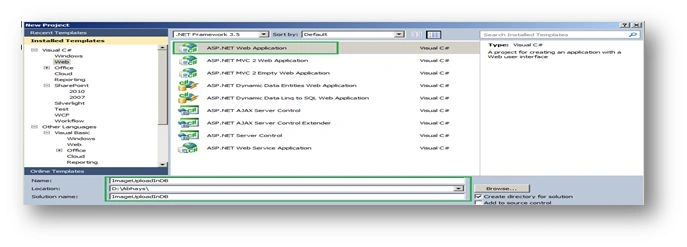
- Create a project and an ASP.NET WebApplication named ImageUploadInDB as below:
- Open the default.aspx and modify the code as below:
- <%@ Page Language="C#" AutoEventWireup="true" CodeBehind="Default.aspx.cs" Inherits="ImageUploadInDB._Default" %>
- <!DOCTYPE html PUBLIC "-//W3C//DTD XHTML 1.0 Transitional//EN" "http://www.w3.org/TR/xhtml1/DTD/xhtml1-transitional.dtd">
- <html xmlns="http://www.w3.org/1999/xhtml">
- <head runat="server">
- <title></title>
- </head>
- <body>
- <form id="form1" runat="server">
- <div>
- <table>
- <tr>
- <td colspan="2">
- <h2>Employee Details</h2>
- </td>
- </tr>
- <tr>
- <td>ID</td>
- <td><asp:TextBox ID="txtID" runat="server" Width="211px"></asp:TextBox></td>
- </tr>
- <tr>
- <td>Name</td>
- <td><asp:TextBox ID="txtName" runat="server" Width="211px"></asp:TextBox></td>
- </tr>
- <tr>
- <td>BloodGroup</td>
- <td><asp:TextBox ID="txtBloodGroup" runat="server" Width="211px"></asp:TextBox></td>
- </tr>
- <tr>
- <td>Emergency Contact No.</td>
- <td><asp:TextBox ID="txtContactNo" runat="server" Width="211px"></asp:TextBox></td>
- </tr>
- <tr>
- <td>Photo:</td>
- <td><asp:FileUpload ID="fileuploadEmpImage" runat="server" Width="180px" /></td>
- </tr>
- <tr>
- <td colspan="2"><asp:Button ID="btnSubmit" runat="server" Text="Save" OnClick="btnSubmit_Click" /></td>
- </tr>
- </table>
- </div>
- <div>
- <asp:GridView ID="grdEmployee" runat="server" AutoGenerateColumns="false">
- <Columns>
- <asp:BoundField HeaderText="Name" DataField="Name" />
- <asp:BoundField HeaderText="Blood Group" DataField="BloodGroup" />
- <asp:BoundField HeaderText="Phone No" DataField="PhoneNo" />
- <asp:BoundField HeaderText="Image" DataField="Image" Visible="false" />
- <asp:TemplateField HeaderText="Image">
- <ItemTemplate>
- <asp:Image ID="Image1" runat="server" ImageUrl='<%# "EmployeeImageHandler.ashx?Id="+ Eval("Id") %>'
- Height="150px" Width="150px" />
- </ItemTemplate>
- </asp:TemplateField>
- </Columns>
- </asp:GridView>
- </div>
- </form>
- </body>
- </html>
- Open the Default.aspx.cs and modify the code as below:
- using System;
- using System.Web;
- using System.Web.UI;
- using System.Data.SqlClient;
- using System.Data;
- namespace ImageUploadInDB
- {
- public partial class _Default : System.Web.UI.Page
- {
- protected void Page_Load(object sender, EventArgs e)
- {
- if (!Page.IsPostBack)
- {
- BindGridData();
- }
- }
- protected void btnSubmit_Click(object sender, EventArgs e)
- {
- //Condition to check if the file uploaded or not
- if (fileuploadEmpImage.HasFile)
- {
- //getting length of uploaded file
- int length = fileuploadEmpImage.PostedFile.ContentLength;
- //create a byte array to store the binary image data
- byte[] imgbyte = new byte[length];
- //store the currently selected file in memeory
- HttpPostedFile img = fileuploadEmpImage.PostedFile;
- //set the binary data
- img.InputStream.Read(imgbyte, 0, length);
- int id = Convert.ToInt32(txtID.Text);
- string name = txtName.Text;
- string bloodGroup = txtBloodGroup.Text;
- string phoneNo = txtContactNo.Text;
- //Connection String
- SqlConnection connection = new SqlConnection(@"Data Source=.\SQLEXPRESS;Initial Catalog=CMS;Integrated Security=True");
- //Open The Connection
- connection.Open();
- SqlCommand cmd = new SqlCommand("INSERT INTO Employee (Id,Name,BloodGroup,PhoneNo,Image) VALUES (@id,@Name,@BloodGroup,@ContactNo,@imagedata)", connection);
- cmd.Parameters.Add("@id", SqlDbType.Int).Value = id;
- cmd.Parameters.Add("@Name", SqlDbType.VarChar,150).Value = name;
- cmd.Parameters.Add("@BloodGroup", SqlDbType.NVarChar, 250).Value = bloodGroup;
- cmd.Parameters.Add("@ContactNo", SqlDbType.VarChar, 50).Value = phoneNo;
- cmd.Parameters.Add("@imagedata", SqlDbType.Image).Value = imgbyte;
- int count = cmd.ExecuteNonQuery();
- //Close The Connection
- connection.Close();
- if (count == 1)
- {
- //BindGridData();
- txtID.Text = string.Empty;
- txtName.Text = string.Empty;
- txtBloodGroup.Text = string.Empty;
- txtContactNo.Text = string.Empty;
- ScriptManager.RegisterStartupScript(this, this.GetType(), "alertmessage", "javascript:alert('Record added successfully')", true);
- //call the method to bind the grid
- BindGridData();
- }
- }
- }
- private void BindGridData()
- {
- SqlConnection connection = new SqlConnection(@"Data Source=.\SQLEXPRESS;Initial Catalog=CMS;Integrated Security=True");
- SqlCommand command = new SqlCommand("SELECT Id,Name,BloodGroup,PhoneNo,Image from [Employee]", connection);
- SqlDataAdapter daimages = new SqlDataAdapter(command);
- DataTable dt = new DataTable();
- daimages.Fill(dt);
- grdEmployee.DataSource = dt;
- grdEmployee.DataBind();
- }
- }
- }
- Add a new file in solution
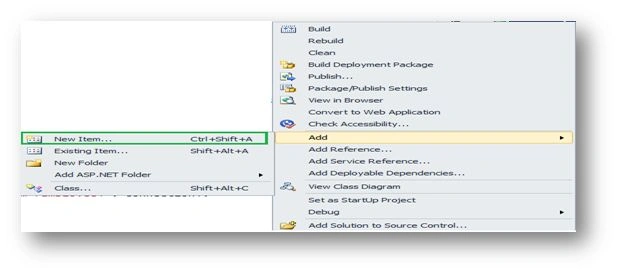
- Add the Generic Handler and name it EmployeeImageHandler.ashx.

- Modify the code of the Generic Handler class as below:
- using System;
- using System.Collections.Generic;
- using System.Linq;
- using System.Web;
- using System.Data.SqlClient;
- namespace ImageUploadInDB
- {
- /// <summary>
- /// Summary description for EmployeeImageHandler
- /// </summary>
- public class EmployeeImageHandler : IHttpHandler
- {
- public void ProcessRequest(HttpContext context)
- {
- string imageid = context.Request.QueryString["Id"];
- SqlConnection connection = new SqlConnection(@"Data Source=.\SQLEXPRESS;Initial Catalog=CMS;Integrated Security=True");
- connection.Open();
- SqlCommand command = new SqlCommand("select Image from Employee where Id=" + imageid, connection);
- SqlDataReader dr = command.ExecuteReader();
- dr.Read();
- context.Response.BinaryWrite((Byte[])dr[0]);
- connection.Close();
- context.Response.End();
- }
- public bool IsReusable
- {
- get
- {
- return false;
- }
- }
- }
- }
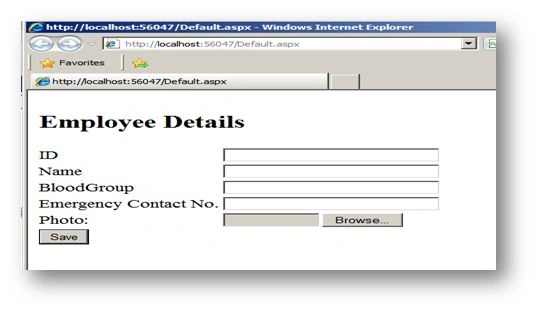
- Run the code, the page will be opened as below:
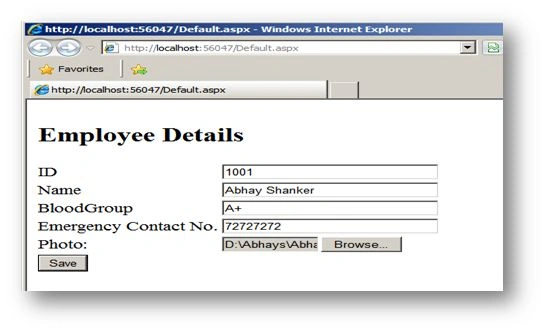
- Make an entry in all fields and add an image as below:
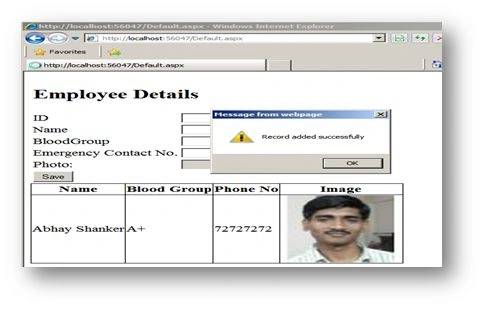
- Click the Save button, a message will be prompt and the record wil be saved and shown in the GridView as below
In this article I explained step-by-step how to upload an image with other details to a database and show the image in a GridView.
Khusbu RaniPosted Oct 30, 2015, 2:16 AM
what type of database?
Upendra Pratap ShahiPosted Sep 17, 2015, 7:18 AM
good one
macky kumarPosted Feb 3, 2015, 6:36 AM
sir if m not upload any image then default image show.....please add the code.
Sai Prasad AnumoluPosted Aug 10, 2014, 8:03 AM
hi How to retrieve image from datanase. I need Outline updation .....LIke Each recode what is process