

This article will guide you through all the steps required to upload a file to Azure blob storage.
In order to start with this, one must have a valid Azure subscription and an editor to write Python code.
Let’s start by creating an Azure container.
Creating Azure Storage Account And Container
You can use your existing Azure container for executing this flow or you can create a new one using the steps mentioned below:
- Login to Azure portal using link https://portal.azure.com
- Search for ‘storage accounts’ in the top search bar and it will open a new page where you need to click on Create button as shown below:
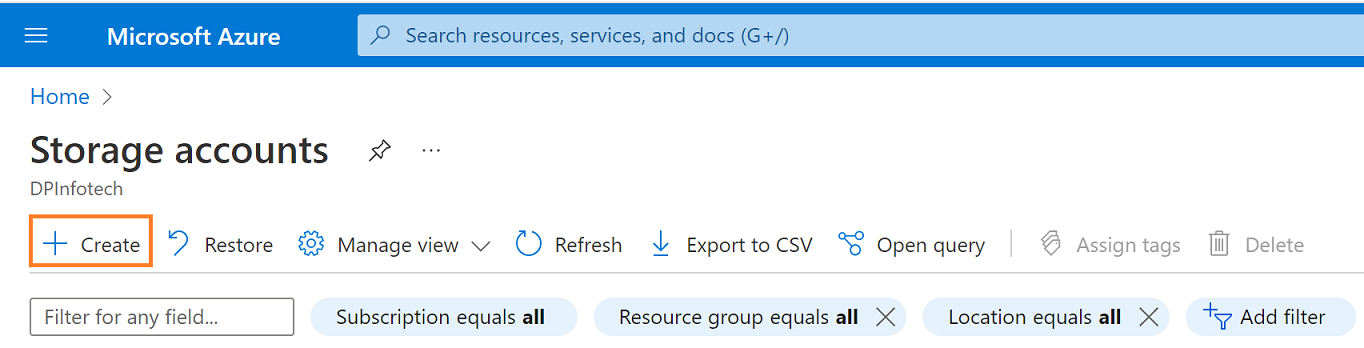
Furnish all the required details and click on Create. Doing this will create an Azure storage account for you. I’ve created a storage account named testupload01 following the same process.
- Click on a newly created storage account (for me, it is testupload01) and select Containers from the left-side blade as shown below and follow the steps as defined in sequence:
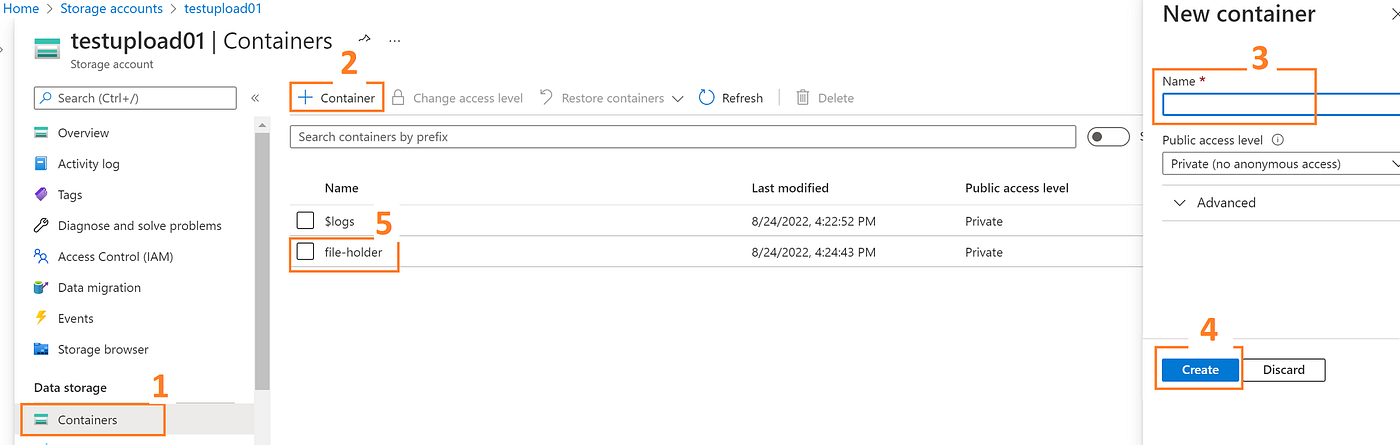
- If everything is configured correctly, you will see that a container is created and listed as shown at point 5. Here my container name is file-folder and this will hold the file, which we will upload in our next step.
Installing Required Python Package
Like every other Python application, we need to install and import the required package. Here is the command to import:
pip install azure-storage-blob
Python Code To Upload A File To Azure Blob
The code written below is straight forward and self-explanatory, but if you still need an explanation about each line, I would recommend you to watch my video recording on YouTube. The link to my recording is placed at the bottom of this article.
from azure.storage.blob import BlobServiceClient

storage_account_key = "GRAB_IT_FROM_AZURE_PORTAL"
storage_account_name = "GRAB_IT_FROM_AZURE_PORTAL"
connection_string = "GRAB_IT_FROM_AZURE_PORTAL"
container_name = "GRAB_IT_FROM_AZURE_PORTAL"

def uploadToBlobStorage(file_path,file_name):
   blob_service_client = BlobServiceClient.from_connection_string(connection_string)
   blob_client = blob_service_client.get_blob_client(container=container_name, blob=file_name)
   with open(file_path,”rb”) as data:
      blob_client.upload_blob(data)
      print(f”Uploaded {file_name}.”)

# calling a function to perform upload
uploadToBlobStorage('PATH_OF_FILE_TO_UPLOAD','FILE_NAME')
File In Azure Blob
Executing the above lines of code successfully will display your newly uploaded file in a container as shown below:

Hope you enjoyed reading this article. If you feel that any of the points are unclear, do watch my video here.
Koshila SenadhiraPosted Dec 1, 2022, 11:17 AM
Interesting Article!