

Introduction
If you want to implement a SQLite database application for Windows Phone 8.0, my previous article might help. This article explains "SQLite support in Windows Phone Store 8.1". This article is compared with my previous article, so that we can easily understand the changes in WP8.0 and WP8.1 to setup SQLite environment.
Requirements
- This sample is targeted for the Windows Phone Store 8.1 OS. So make sure you've downloaded and installed the Windows Phone 8.1 SDK. For more information, see Get the SDK.
- I assume you will test your app in the Windows Phone emulator. If you want to test your app on a phone, you need to take some additional steps. For more info, see Register your Windows Phone device for development.
- This article assumes you're using Microsoft Visual Studio Express 2013 for Windows.
Table of Contents
Some extensions need to be installed to interact with Sqlite from your WP8.1 app. And now it is very easy to set up the SQLite environment in our apps. So this article covers SQLite at the beginners level like this.
- How to set up the SQLite environment
- How to perform all the SQLite CRUD operations
- How to bind SQLite data to a listbox
- How to explore "SQLite" database data
Description
SQLite is a very lightweight database. In this tutorial I'll explain how to write classes to handle all the SQLite operations. So let's start with the preceding hierarchy that was previously discussed in the "Table of Contents".
1. How to set up the SQLite environment
Sqlite is not available directly in Windows Phone. Don't worry however since it is now very easy to set up SQLite in Windows Phone apps. We need to use only two steps (instal SQLite for Windows Phone SDK and instal the sqlite-net-wp8 package).
1.1 Installing SQLite for Windows Phone SDK
It's worth noting that the current version (3.8.8.0) has a flaw in the package metadata that prevents it from showing in the Visual Studio 2013 "Tools | Extensions and Updates" page. You need to go to the web page, download and install the VSIX package by yourself: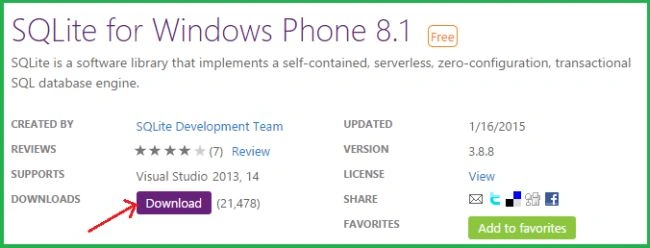
Click on Download and you can open it directly when downloading, authorize installation and click install when ready.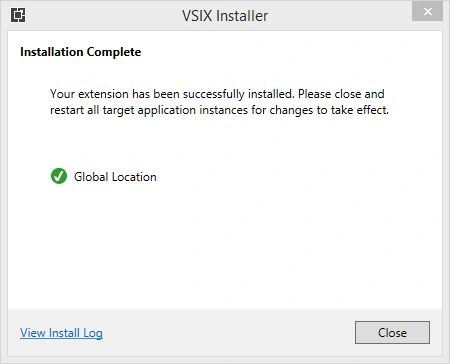
Open Microsoft Visual Studio Express 2013 for Windows and then create a new project of type Blank App (for example SQLiteWp8.1).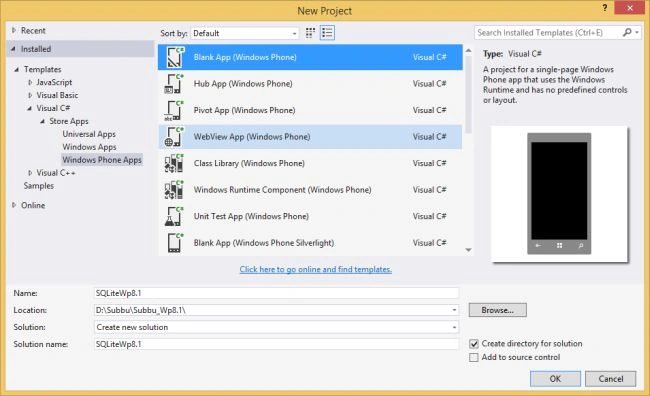
Open Solution Explorer then right-click on the "References" folder of your current project.
Then add the reference to the "SQLite for Windows Phone 8.1" library: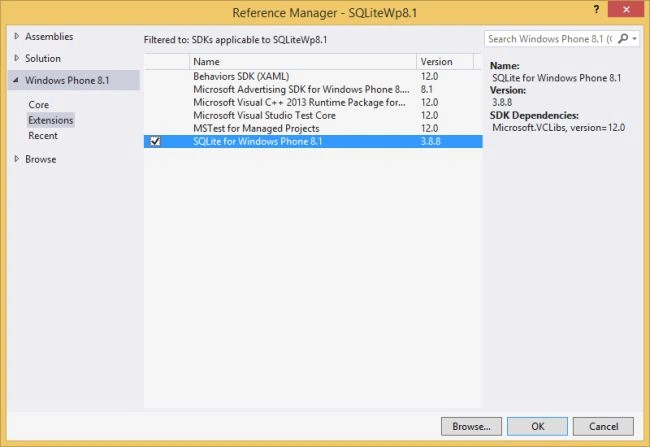
When done, you can see that the proper references to SQLite and the Visual C++ 2013 Runtime have been added to respective project: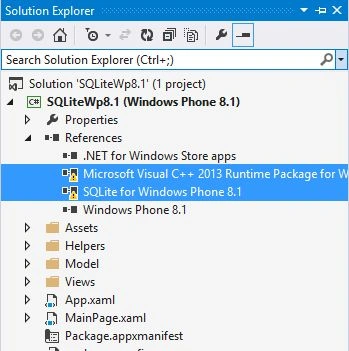
You may have already noticed that the references show warning symbols. To resolve that the next thing to do is, before compiling the solution, change the architecture of the target platform. This is because the SQLite engine is written in C ++ and the default target platform set in the project is "Any CPU". This mode is not supported. To do this in the main menu of Visual Studio we must use the command "Compile", then go to the "Configuration Manager", as shown in the figure.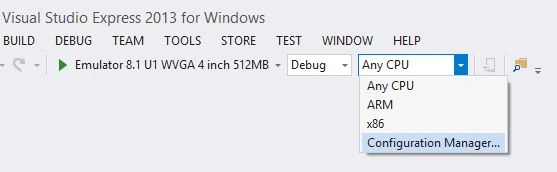
In the Configuration Manager dialog, we have several choices of platforms, "Any CPU" (the default), "ARM", "x64" and "x86".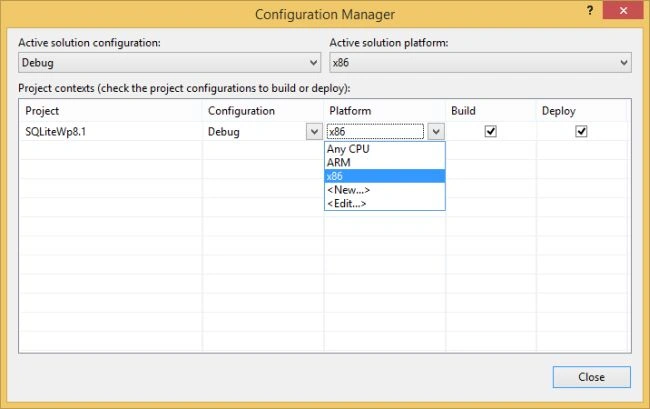
We need to select the target platform second, where we are trying the application. If we use a tablet, or a phone with ARM processor, we need to select the ARM platform. If we are using the emulator or in the case of Windows Phone, a PC in the case of Windows, we must select x86 or x64, everything depends on your processor if 32 or 64 bits. In my case, I tried the sample application on a emulator with Windows Phone OS 8.1, so I chose the x86 configuration.
1.2 Installing SQLite-net package:
After installing the library for SQLite, we need the SQLite-net NuGet package. With this library, we will be able to do all the operations that are normally done in a database, such as Insert, Delete, Update and run search queries. SQLite-net also offers an approach typical of ORM. This package provides the two helper classes SQLite.cs and SQLiteAsync.cs, so to install it right-click on your project (in other words in my case the project name is SQLiteWp8.1) then click on "Manage NuGet Packages" and search for "SQLite-net" then click on the "Install" button. Then we should see the following dialog:
*SQLite net
***Wow now the entire SQLite is set up and the process is complete, so now we will work with all the CRUD operations***
2. How to perform all the SQLite CRUD operations
Note: From this step on-ward, most of the content will be the same as in my previous article. Please note that a few changes were made in this article.
So its time to perform all the SQLite Create, Read, Update, Delete (CRUD) operations. So my thought for this sample is to make a single "DatabaseHelperClass.cs" class for the entire application and handle the SQLite operations with this helper class. Let's first see my table structure.
Here I am trying to create table named "Contacts" in the "ContactsManager.sqlite" database. So my class "Contacts" has all the getter and setter methods (Id, Name, PhoneNumber, CreatedDate) to maintain a single contact as an object.
C# Code
- public class Contacts
- {
- //The Id property is marked as the Primary Key
- [SQLite.PrimaryKey, SQLite.AutoIncrement]
- public int Id { get; set; }
- public string Name { get; set; }
- public string PhoneNumber { get; set; }
- public string CreationDate { get; set; }
- public Contacts()
- {
- //empty constructor
- }
- public Contacts(string name, string phone_no)
- {
- Name = name;
- PhoneNumber = phone_no;
- CreationDate = DateTime.Now.ToString();
- }
- }
- //This class for perform all database CRUD operations
- public class DatabaseHelperClass
- {
- SQLiteConnection dbConn;
- //Create Tabble
- public async Task<bool> onCreate(string DB_PATH)
- {
- try
- {
- if (!CheckFileExists(DB_PATH).Result)
- {
- using (dbConn = new SQLiteConnection(DB_PATH))
- {
- dbConn.CreateTable<Contacts>();
- }
- }
- return true;
- }
- catch
- {
- return false;
- }
- }
- private async Task<bool> CheckFileExists(string fileName)
- {
- try
- {
- var store = await Windows.Storage.ApplicationData.Current.LocalFolder.GetFileAsync(fileName);
- return true;
- }
- catch
- {
- return false;
- }
- }
- // Retrieve the specific contact from the database.
- public Contacts ReadContact(int contactid)
- {
- using (var dbConn = new SQLiteConnection(App.DB_PATH))
- {
- var existingconact = dbConn.Query<Contacts>("select * from Contacts where Id =" + contactid).FirstOrDefault();
- return existingconact;
- }
- }
- // Retrieve the all contact list from the database.
- public ObservableCollection<Contacts> ReadContacts()
- {
- using (var dbConn = new SQLiteConnection(App.DB_PATH))
- {
- List<Contacts> myCollection = dbConn.Table<Contacts>().ToList<Contacts>();
- ObservableCollection<Contacts> ContactsList = new ObservableCollection<Contacts>(myCollection);
- return ContactsList;
- }
- }
- //Update existing conatct
- public void UpdateContact(Contacts contact)
- {
- using (var dbConn = new SQLiteConnection(App.DB_PATH))
- {
- var existingconact = dbConn.Query<Contacts>("select * from Contacts where Id =" + contact.Id).FirstOrDefault();
- if (existingconact != null)
- {
- existingconact.Name = contact.Name;
- existingconact.PhoneNumber = contact.PhoneNumber;
- existingconact.CreationDate = contact.CreationDate;
- dbConn.RunInTransaction(() =>
- {
- dbConn.Update(existingconact);
- });
- }
- }
- }
- // Insert the new contact in the Contacts table.
- public void Insert(Contacts newcontact)
- {
- using (var dbConn = new SQLiteConnection(App.DB_PATH))
- {
- dbConn.RunInTransaction(() =>
- {
- dbConn.Insert(newcontact);
- });
- }
- }
- //Delete specific contact
- public void DeleteContact(int Id)
- {
- using (var dbConn = new SQLiteConnection(App.DB_PATH))
- {
- var existingconact = dbConn.Query<Contacts>("select * from Contacts where Id =" + Id).FirstOrDefault();
- if (existingconact != null)
- {
- dbConn.RunInTransaction(() =>
- {
- dbConn.Delete(existingconact);
- });
- }
- }
- }
- //Delete all contactlist or delete Contacts table
- public void DeleteAllContact()
- {
- using (var dbConn = new SQLiteConnection(App.DB_PATH))
- {
- //dbConn.RunInTransaction(() =>
- // {
- dbConn.DropTable<Contacts>();
- dbConn.CreateTable<Contacts>();
- dbConn.Dispose();
- dbConn.Close();
- //});
- }
- }
- }
2.1 Writing DatabaseHelper Class to handle database operations (CRUD operations):
C# Code
In the preceding Step 2.1, I created a database helper class named "DatabaseHelperClass.cs" that is the main head for this sample to perform all the SQlite operations. Let's first see my project hierarchy like this.

In the app.xaml class let's create a database. In the constructor we check if the database exists and if it does not we create it. Since if no file exists, it will get an exception.
C# Code
- public partial class App : Application
- {
- public static string DB_PATH = Path.Combine(Path.Combine(ApplicationData.Current.LocalFolder.Path, "ContactsManager.sqlite"));//DataBase Name
- public App()
- {
- if (!CheckFileExists("ContactsManager.sqlite").Result)
- {
- using (var db = new SQLiteConnection(DB_PATH))
- {
- db.CreateTable<Contacts>();
- }
- }
- }
- private async Task<bool> CheckFileExists(string fileName)
- {
- try
- {
- var store = await Windows.Storage.ApplicationData.Current.LocalFolder.GetFileAsync(fileName);
- return true;
- }
- catch
- {
- }
- return false;
- }
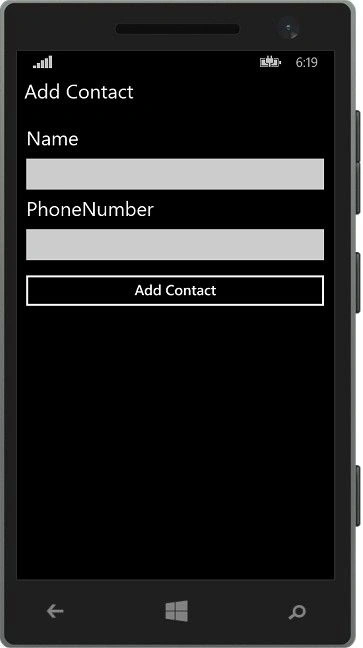
- AddConatct.xaml: This page is for adding a contact to the database. When the "Add Contact" button is clicked it will add the contact into the database like this:
C# Code
- private async void AddContact_Click(object sender, RoutedEventArgs e)
- {
- DatabaseHelperClass Db_Helper = new DatabaseHelperClass();//Creating object for DatabaseHelperClass.cs from ViewModel/DatabaseHelperClass.cs
- if (NametxtBx.Text != "" & PhonetxtBx.Text != "")
- {
- Db_Helper.Insert(new Contacts(NametxtBx.Text, PhonetxtBx.Text));
- Frame.Navigate(typeof(ReadContactList));//after add contact redirect to contact listbox page
- }
- else
- {
- MessageDialog messageDialog = new MessageDialog("Please fill two fields");//Text should not be empty
- await messageDialog.ShowAsync();
- }
- }
- ReadContactList.xaml: This page is for displaying the entire DB contact list with a listbox. And in this screen there are two buttons (Add Contact and DeleteAll) for correspondingly adding a contact to the DB and to delete the entire table data. First I made the following listbox datatemplate for binding the database contacts.
XAML
- <Grid x:Name="ContentPanel" Grid.Row="1" Margin="12,0,12,0">
- <Grid.RowDefinitions>
- <RowDefinition Height="auto"/>
- <RowDefinition Height="*"/>
- </Grid.RowDefinitions>
- <StackPanel Width="400" Orientation="Horizontal" Grid.Row="0">
- <Button Margin="20,0,0,0" Content="Add Contact" Click="AddContact_Click"/>
- <Button Name="Btn_Delete" Margin="100,0,0,0" Content="DeleteAll" Click="DeleteAll_Click"/>
- </StackPanel>
- <ListBox Background="Transparent" Margin="6" Height="auto" BorderThickness="2" MaxHeight="580" Grid.Row="1" x:Name="listBoxobj" SelectionChanged="listBoxobj_SelectionChanged">
- <ListBox.ItemTemplate>
- <DataTemplate>
- <Grid Width="350" >
- <Border Margin="5" BorderBrush="White" BorderThickness="1">
- <Grid>
- <Grid.RowDefinitions>
- <RowDefinition Height="Auto"/>
- <RowDefinition Height="Auto"/>
- </Grid.RowDefinitions>
- <TextBlock Margin="5,0,0,0" Grid.Row="0" x:Name="NameTxt" TextWrapping="Wrap" Text="{Binding Name}" FontSize="28" Foreground="White"/>
- <TextBlock Grid.Row="0" Text=">" FontSize="28" HorizontalAlignment="Right" VerticalAlignment="Center" Foreground="White"/>
- <TextBlock Margin="5,0,0,0" Grid.Row="1" x:Name="PhoneTxt" TextWrapping="Wrap" Foreground="White" FontSize="18" Text="{Binding PhoneNumber}" />
- <TextBlock HorizontalAlignment="Right" Margin="0,0,35,0" Grid.Row="3" x:Name="CreateddateTxt" Foreground="White" FontSize="18" TextWrapping="Wrap" Text="{Binding CreationDate}" />
- </Grid>
- </Border>
- </Grid>
- </DataTemplate>
- </ListBox.ItemTemplate>
- </ListBox>
- </Grid>
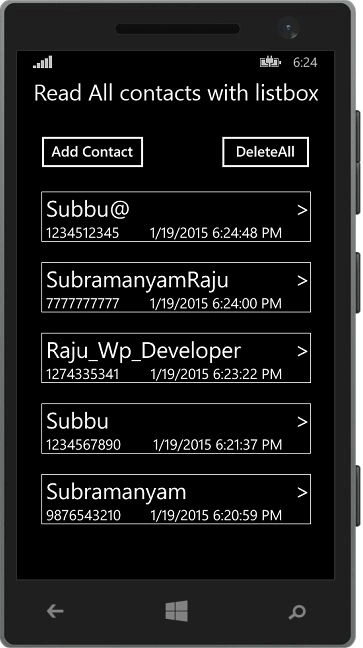
So when the page is loaded, I do the following:
C# Code
When the "Add Contact" button is clicked it navigates to the "AddConatct.xaml" page to add the contact in the DB.- private void ReadContactList_Loaded (object sender, RoutedEventArgs e)
- {
- ReadAllContactsList dbcontacts = new ReadAllContactsList();
- DB_ContactList = dbcontacts.GetAllContacts();//Get all DB contacts
- if (DB_ContactList.Count > 0)
- {
- Btn_Delete.IsEnabled = true;
- }
- listBoxobj.ItemsSource = DB_ContactList.OrderByDescending(i => i.Id).ToList();//Binding DB data to LISTBOX and Latest contact ID can Display first.
- }
C# Code
For when the "DeleteAll" button is clicked, I did it like this:- private void AddContact_Click(object sender, RoutedEventArgs e)
- {
- Frame.Navigate(typeof(AddConatct));
- }
C# Code
When a listbox item is selected, I navigate to the "Delete_UpdateContacts.xaml" page to delete/update the corresponding contact details upon the listbox SelectionChanged event like this.- private async void DeleteAll_Click(object sender, RoutedEventArgs e)
- {
- var dialog = new MessageDialog("Are you sure you want to remove all your data ?");
- dialog.Commands.Add(new UICommand("No", new UICommandInvokedHandler(Command)));
- dialog.Commands.Add(new UICommand("Yes", new UICommandInvokedHandler(Command)));
- await dialog.ShowAsync();
- }
- private void Command(IUICommand command)
- {
- if (command.Label.Equals("Yes"))
- {
- DatabaseHelperClass Db_Helper = new DatabaseHelperClass();
- Db_Helper.DeleteAllContact();//delete all DB contacts
- DB_ContactList.Clear();//Clear collections
- Btn_Delete.IsEnabled = false;
- listBoxobj.ItemsSource = DB_ContactList;
- }
- }
C# Code
- private void listBoxobj_SelectionChanged(object sender, SelectionChangedEventArgs e)
- {
- int SelectedContactID = 0;
- if (listBoxobj.SelectedIndex != -1)
- {
- Contacts listitem = listBoxobj.SelectedItem as Contacts;//Get slected listbox item contact ID
- Frame.Navigate(typeof(Delete_UpdateContacts),SelectedContactID=listitem.Id);
- }
- }
- Delete_UpdateContacts.xaml: This page is for updating/deleting selected contact details.
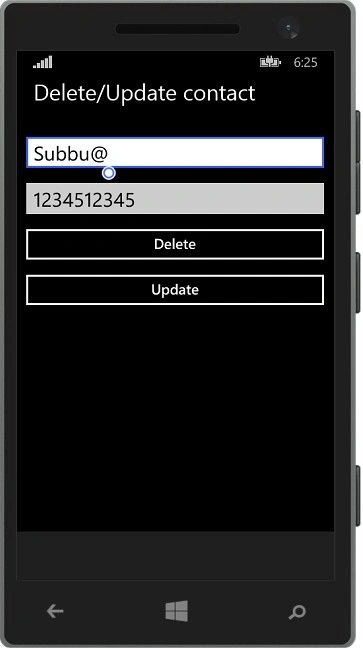
See in the preceding, when the listbox item is selected, I passed the selected contact Id as the query string, So in this I get that id in the "OnNavigatedTo" method like this.
C# Code
When the "Delete" button is pressed I do it like this.- protected override void OnNavigatedTo(NavigationEventArgs e)
- {
- Selected_ContactId = int.Parse(e.Parameter.ToString());
- currentcontact = Db_Helper.ReadContact(Selected_ContactId);//Read selected DB contact
- NametxtBx.Text = currentcontact.Name;//get contact Name
- PhonetxtBx.Text = currentcontact.PhoneNumber;//get contact PhoneNumber
- }
C# Code
When the "Update" button is pressed I do it like this.- private void DeleteContact_Click(object sender, RoutedEventArgs e)
- {
- Db_Helper.DeleteContact(Selected_ContactId);//Delete selected DB contact Id.
- Frame.Navigate(typeof(ReadContactList));
- }
C# Code
- private void UpdateContact_Click(object sender, RoutedEventArgs e)
- {
- currentcontact.Name = NametxtBx.Text;
- currentcontact.PhoneNumber = PhonetxtBx.Text;
- Db_Helper.UpdateContact(currentcontact);//Update selected DB contact Id
- Frame.Navigate(typeof(ReadContactList));
- }
The Isolated Storage Explorer tool gets the database file. This tool is installed under the folder path Program Files (x86)\Microsoft SDKs\Windows Phone\v8.1\Tools\IsolatedStorageExplorerTool.
To use the Isolated Storage Explorer, the following things must be true:
- The app that you want to test must be installed on the emulator or device.
- The emulator or device must be running, but the app doesn't have to be running.
You cannot do the following things with the Isolated Storage Explorer:
- You can't view isolated storage for apps that you've installed from the Windows Phone Store.
- You can't view app settings that are stored in the local folder in the Isolated Storage Explorer. These are settings that the app has saved using the IsolatedStorageSettings class.
Then execute the following command from the command prompt.
- First change the command prompt directory path to Program Files (x86)\Microsoft SDKs\Windows Phone\v8.1\Tools\IsolatedStorageExplorerTool.

- Get the Product Id from the project Package.appxmanifest file in the Packaging Tab under the Package name attribute (in other words 9f68177c-0add-437b-8b43-95ec429ee5b5).
- If your app is run in the emulator execute this command: ISETool.exe ts xd 9f68177c-0add-437b-8b43-95ec429ee5b5 c:\data\myfiles.

- If your app is run on the device execute this command: ISETool.exe ts de 9f68177c-0add-437b-8b43-95ec429ee5b5 c:\data\myfiles.
Now the DB content can be found in your computer at c:\data\myfiles like this.
Note: This content might change in the future.
Summary:
In this article, we saw the basics of SQLite, how to install the engine, the library SQLite-net and saw the most common operations (also known as code first), such as inserting, updating and deleting data from a table of a database.
This article is also available at my original blog.
mazhar saleemPosted Mar 1, 2017, 12:01 PM
Same article on http://bsubramanyamraju.blogspot.com.es/2015/01/windowsphone-81-sqlite-how-to-store.html
Asfend YarPosted Feb 26, 2016, 3:10 PM
nice
Prakash ChasiyaPosted Nov 3, 2015, 3:19 AM
Superb article..Many thanks...
santhosh nainiPosted Jul 10, 2015, 2:39 AM
Thank You Sir..i faced some problems while running command prompt.Here run command prompt as "Run as Admin" mode and packageName You can find from the "Package.AppManifest" file in that packaging and package name..
Theo MotsisiPosted Jul 3, 2015, 5:15 AM
Great!...i cant seem to download the sample...by the way have you done an article on Registration and Login for windows phone 8.1?
Santhakumar MunuswamyPosted Apr 25, 2015, 7:37 AM
Good
AungthuPosted Apr 24, 2015, 3:57 AM
public Contacts SearchContactByName(string Name) { using (var dbConn = new SQLiteConnection(App.DB_PATH)) { var existingconact = dbConn.Query<Contacts>("select * from Contacts where Name LIKE" + "'%"+Name+"%'").FirstOrDefault(); return existingconact; } }
niyazmohammad heranPosted Feb 12, 2015, 2:58 AM
Dear Sir please add Search Page for a specific Contact to search in the database for someone and then display it
Vithal WadjePosted Jan 27, 2015, 10:08 PM
nice