

This article starts by explaining what is designer re-hosting, what is workflow designer re-hosting and how it can be of benefit in dynamically editing workflows and rules. Then later it explains how you can re-host the workflow designer and then how it can be used to edit a rule.
I assume that the reader knows what Windows Workflow Foundation (WF) is, what an Activity is, how to create Rules etc. If you are not familiar with it, I recommend you to first please go to my blog on this topic.
What is Designer Re-hosting?
Designer re-hosting refers to the ability to reuse the various controls offered within Visual Studio’s workflow design experience in custom applications. Such a tailored graphical user interface enables non-developers such as business users to easily create and edit workflows. These users are not familiar with the Visual Studio environment in most cases and they don’t need all the features it offers. Re-hosting the workflow designer provides a way to provide a developer experience for workflow, outside of Visual Studio.
Why Designer Re-hosting?
Let us consider Visual Studio – a great IDE from Microsoft for development of various technologies/tools like Workflow Foundation, ASP.NET, Entity Framework etc. Each such technology may use a different kind of design components for development. For example, WF has its own designer for creating workflows, activities etc. and provides XAML editing. ASP.NET provides a designer for adding controls and changing their HTML.
Some applications may require workflows and rules to be edited dynamically. Well, that is a bit challenging thing if you think about the designer environment which is used to create workflows and rules. Of course, you can create rules using the code without using graphical interface. For writing code, you should be a developer. I want the end users to be able to edit rules in my application. So, the option of writing code is ruled out; so, we are ended up with an option of providing the same kind of designer interface which was used to design the rules.
If we provide the same designer experience to the user to create rules, a user should be able to create rules which might help to reduce a lot of time and effort. That sounds very promising, right? Workflow Designer Re-hosting is the solution for this. It is useful in creating rules at runtime as well as editing the rules at runtime.
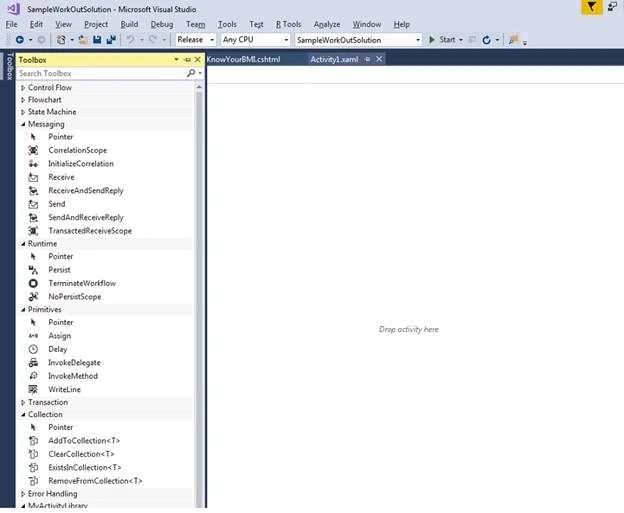
Figure 1
What is the scope?
You might still be wondering in what real scenario where designer re-hosting can be applied! Will the user be able to add any number of rules? Does the application need to be compiled again for the rules to be reflected?
I already mentioned that we can use re-hosting for creating rules dynamically as well as editing rules dynamically.
However, one major thing we need to understand about designer re-hosting is, rule engine will have to be compiled again to get the changes reflected in the application.
Then, you might ask what is the purpose of all this, if re-hosting is not an easy task.
Let us consider a business, where the rules are very complex. If a developer wants to create rules in this case, first, the business user will have to convey the logic of the rules to the developer. While produced by the user, it is found that some of the logic is not as the user expected. So, the developer will have to go back and modify the rule and bring it back to the user of another round of review. This process may continue until the developer is able to produce the rules correctly. We can see that a lot of time and energy is wasted perceiving the logic and implementing it.
If the user themselves can create or edit the rule, it will significantly reduce the time and effort. They will create or edit rules; all that the developer needs to do is just compile the rule engine. That’s it, the new/modified rules are reflected in the system!
Re-Hosting Architecture
Figure 2 below, demonstrates the Workflow design components that can be re-hosted outside of the Visual Studio environment. It will provide the user a compelling experience for designing and editing workflows.
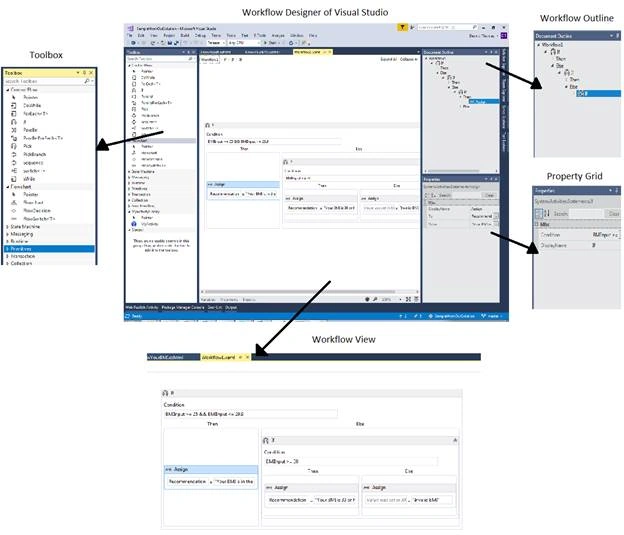
Figure 2
Workflow View
This is the designer area for the workflow. This is where we add controls and add connections and flows to create a workflow. This control provides a tree view summary of a workflow design thus helps in fast navigation to specific activities within the design.
Toolbox
This contains activities required for creating or modifying a workflow.
Property Grid
This is another useful component while creating/editing rules. It is a standard Windows Forms control that can be used here for setting properties of activities and rules.
Workflow Outline
This is mainly used for easy navigation through the workflow view, especially when the design is very big.
With designer re-hosting, the user will be able to drag and drop components from the Toolbox to the workflow view and set their properties using Property Grid and navigate through the workflow view using workflow outline. All these happen with a well-defined service interface handles the numerous service requests and responses that take place for example, when you drag and drop an activity to the workflow view.
As we have got a basic understanding about re-hosting, we can go ahead and do a re-hosting to find how it works.
How to re-host the workflow designer?
This sample demonstrates how you can re-host the workflow designer. It contains only one project.
I am using Visual Studio 2017 for creating the workflow designer re-hosted project.
Step 1 - Create a WPF Windows application
- In Visual Studio 2017, take File -> New -> Project
- Choose Windows Classic Desktop on the left pane and WPF App on the right pane
- Name the project WorkflowDesignerRehostingDemo and click OK
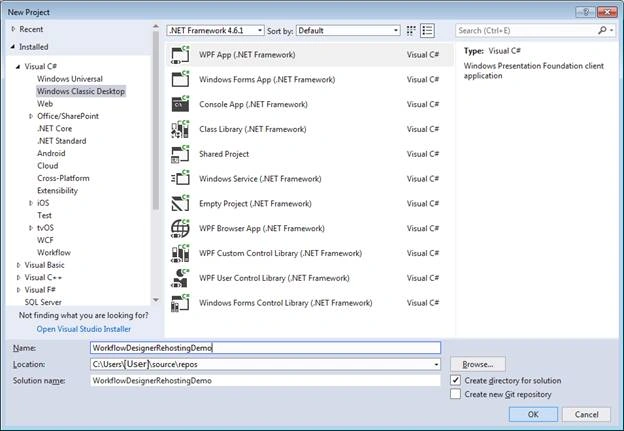
Figure 3
By default, a WPF window name MainWindow.xaml will be created. You can rename it to if you wish. I am going to delete it and create a new WPF window.
Step 2 Add a WPF Window for acting as the workflow designer
- Right-click on the project -> Add -> New Item
- Choose WPF on the left pane and WPF Window on the right pane
- Name it as DesignerWindow.xaml and click Add
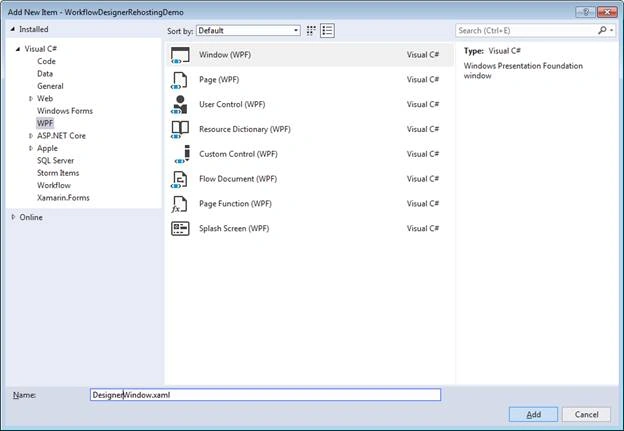
Figure 4
Step 3 - Add a File menu and Areas for Toolbox, Properties grid and workflow view
Now, I am going to give a little makeover to the window so that it will be fit for showing the workflow designer components for editing a workflow.
First, let’s divide the window into three columns – one for Toolbox, one for property grid and one for workflow view.
- <Grid.RowDefinitions>
- <RowDefinition Height="25" />
- <RowDefinition Height="*" />
- <RowDefinition Height="40" />
- </Grid.RowDefinitions>
- <Grid.ColumnDefinitions>
- <ColumnDefinition Width="200" MinWidth="100" />
- <ColumnDefinition Width="*" MinWidth="300" />
- <ColumnDefinition Width="220" MinWidth="100" />
- </Grid.ColumnDefinitions>
Listing 1
Then, add a File menu and a few menu options to it.
- <StackPanel Grid.ColumnSpan="3">
- <Menu Height="20"
- VerticalAlignment="Top">
- <MenuItem Header="_File">
- <MenuItem Header="_New"
- Command="{Binding Path=NewCommand}"/>
- <MenuItem Header="_Open"
- Command="{Binding Path=OpenCommand}"/>
- <Separator />
- <MenuItem Header="_Save"
- Command="{Binding Path=SaveCommand}"/>
- <MenuItem Header="Save _As"
- Command="{Binding Path=SaveAsCommand}"/>
- <Separator />
- <MenuItem Header="E_xit"
- Command="{Binding Path=ExitCommand}"/>
- </MenuItem>
- </Menu>
- </StackPanel>
Listing 2
The binding variables we used here like NewCommand, OpenCommand etc. will be declared later.
Then add 3 Tab Controls, one each for each column.
Name the tab item in the first column as Toolbox.
Name the tab item in the last column as Properties.
The second column needs two tab items – one for the designer view and one for the XAML view.
- <TabControl HorizontalAlignment="Stretch"
- VerticalAlignment="Stretch"
- Margin="0,0,4,0"
- Grid.Column="0"
- Grid.Row="1">
- <TabItem Header="Toolbox">
- <ContentControl Content="{Binding WFToolboxControl}"/>
- </TabItem>
- </TabControl>
- <TabControl HorizontalAlignment="Stretch"
- VerticalAlignment="Stretch"
- Margin="0,0,0,0"
- Grid.Column="1"
- Grid.Row="1">
- <TabItem Header="Designer">
- <ContentControl Content="{Binding WorkflowDesignerControl}"/>
- </TabItem>
- <TabItem Header="XAML"
- GotFocus="RefreshXamlTabOnTabItemFocus" >
- <TextBox Name="xamlTabTextBox" Text="{Binding XAML, Mode=OneWay}"
- AcceptsReturn="True"
- HorizontalScrollBarVisibility="Auto"
- VerticalScrollBarVisibility="Auto" IsReadOnly="True">
- </TextBox>
- </TabItem>
- </TabControl>
- <TabControl HorizontalAlignment="Stretch"
- VerticalAlignment="Stretch"
- Margin="5,0,0,0" Grid.Column="2"
- Grid.Row="1">
- <TabItem Header="Properties">
- <ContentControl Content="{Binding WorkflowPropertyControl}"/>
- </TabItem>
- </TabControl>
Listing 3
The binding variables we used here like WFToolboxControl, WorkflowDesignerControl etc. will be declared later.
Step 4 - Add an empty workflow to be used for creating New Workflow
Right-click on the project, Add -> New Item
On the screen appeared, Choose Workflow from the left pane, and Activity from the right pane.
Name the file as sampleWorkflow and click Add.
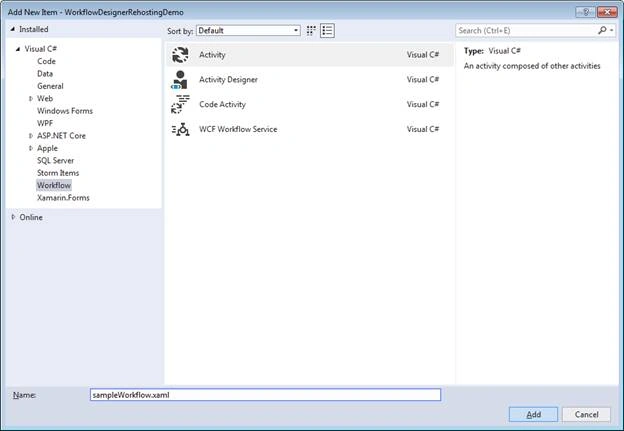
Figure 5
We don’t have to do anything with this workflow. This is used as a template workflow when the user adds a new workflow using the New option from the File menu.
Step 5 - Add a Class – DesignerViewModel
This class will act as the backbone of the designer and will hold the data and handle the events of the designer window.
Add the fields, properties, events mentioned in the XAML to find different controls.
Also, add the methods for handling the events fired while selecting the File menu options on the designer window.
Since we are going to deal with workflows in this class, we need to add these namespaces related to workflow creation and manipulation.
- using System.Activities;
- using System.Activities.Core.Presentation;
- using System.Activities.Presentation;
- using System.Activities.Presentation.Metadata;
- using System.Activities.Presentation.Toolbox;
Listing 4
We have created a File menu and added menu options to it in Listing 2. Now we need to add the commands in the ViewModel class which will get executed when user clicks on each menu option.
- public ICommand NewCommand { get; set; }
- public ICommand OpenCommand { get; set; }
- public ICommand SaveCommand { get; set; }
- public ICommand SaveAsCommand { get; set; }
- public ICommand ExitCommand { get; set; }
Listing 5
To Implement the methods CanExecute and Execute, we will create a class. Then, we will use this class to create the instances of the command objects we created in Listing 5.
Step 6 - Add a class RunCommand which will invoke the right delegates and execute the command
Add a class named RunCommand and implement ICommand interface. So, when a user clicks on a File menu item, this class invokes the event handler associated with the clicked menu item and executes it. This class may look like as shown in Listing 6.
- private readonly Predicate<object> canExecute;
- /// <summary>
- /// Action to be executed when the command is invoked
- /// </summary>
- private readonly Action<object> execute;
- /// <summary>
- /// Creates a new command
- /// </summary>
- /// <param name="execute"></param>
- /// <param name="canExecute"></param>
- public RunCommand(Action<object> execute, Predicate<object> canExecute)
- {
- if (execute == null)
- {
- throw new ArgumentNullException("execute");
- }
- this.execute = execute;
- this.canExecute = canExecute;
- }
- [DebuggerStepThrough]
- public bool CanExecute(object parameter)
- {
- return this.canExecute == null || this.canExecute(parameter);
- }
- public void Execute(object parameter)
- {
- this.execute(parameter);
- }
- public event EventHandler CanExecuteChanged
- {
- add
- {
- CommandManager.RequerySuggested += value;
- }
- remove
- {
- CommandManager.RequerySuggested -= value;
- }
- }
Listing 6
Step 7 - Add properties to DesignerViewModel class.
Now, coming back to DesignerViewModel class, let’s create the properties which we must bind to various controls in the DesingerWindow.xaml.
- public string FileName
- {
- get
- {
- return this.fileName;
- }
- private set
- {
- this.fileName = value;
- this.Title = string.Format("{0} - {1}", title, this.FileName);
- }
- }
- public WorkflowDesigner RehostedWFDesigner
- {
- get
- {
- return this.rehostedWFDesigner;
- }
- private set
- {
- this.rehostedWFDesigner = value;
- this.NotifyChanged("WorkflowDesignerControl");
- this.NotifyChanged("WorkflowPropertyControl");
- }
- }
- public object WorkflowDesignerControl
- {
- get
- {
- return this.RehostedWFDesigner.View;
- }
- }
- public object WorkflowPropertyControl
- {
- get
- {
- return this.RehostedWFDesigner.PropertyInspectorView;
- }
- }
- public string XAML
- {
- get
- {
- if (this.RehostedWFDesigner.Text != null)
- {
- this.RehostedWFDesigner.Flush();
- return this.RehostedWFDesigner.Text;
- }
- return null;
- }
- }
Listing 7
Step 8 - Create instances of Commands and Load Workflow Toolbox items and their icons
Add the code given in Listing 8 to the constructor.
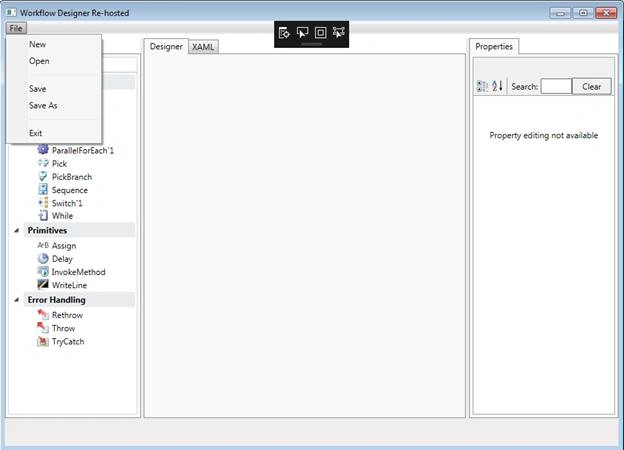
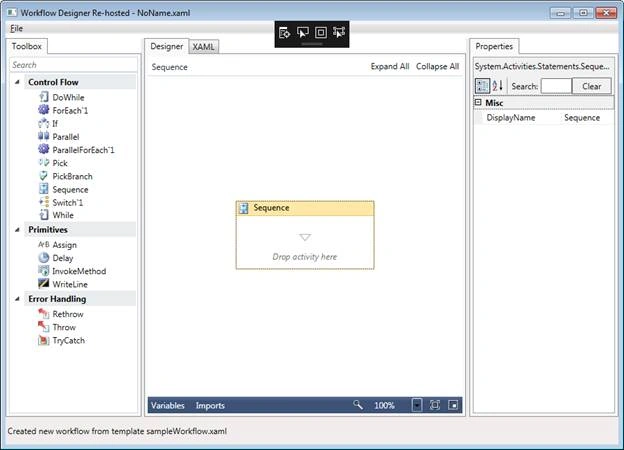
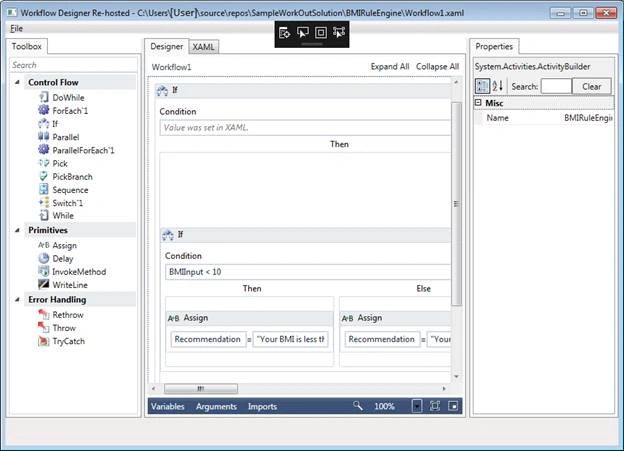
Here, we will initialize the commands of File menu items, load Workflow (WF) toolbox items and icons for the toolbox items.
Sahariar HussainPosted Apr 13, 2020, 11:50 AM
"The important thing to know is, editing a workflow using designer re-hosting doesn’t ensure updating the workflow dynamically until the edited workflow is rebuilt." What is the solution of this??
Subramaniyan VeerasekaranPosted Oct 22, 2018, 2:25 AM
Hello Dennis How can i set Background color for Workflow designer? I can able to set Background color for Property grid but not for designer!!
Vickey ChandPosted Oct 1, 2018, 11:37 AM
How can we integrate execution of xaml file in the same solution?
Tridip BhattacharjeePosted Dec 4, 2017, 4:10 AM
Thanks for your link. i would definitely check those but can you please briefly explain what is work flow and what it does? in what kind of scenario people go for it? thanks
Tridip BhattacharjeePosted Nov 29, 2017, 4:58 AM
HI, i need a help that i like to know what is work flow and when people use it in real life. if we need to submit the design of a software then we can do it by hand using uml. so tell me few good scenario where people love to use workflow. thanks
J0SE AUGUSTINEPosted Nov 29, 2017, 12:45 AM
Nice Article. Very informative