

This chapter is taken from book "Programming Windows Phone 7" by Charles Petzold published by Microsoft press. http://www.charlespetzold.com/phone/index.html
Animating Attached Properties
You can use Silverlight animations in a couple different ways to move an element around the screen. One way is to target a TranslateTransform set to the element's RenderTransform property. But programmers who are more comfortable with Canvas might want to animate the Canvas.Left and Canvas.Top attached properties. A special syntax is required to animate attached properties, but it's fairly simple.
This program defines a
Canvas that is 450 pixels square, centers it in the
content area, instantiates an Ellipse that is 50 pixels in size, and then moves
that Ellipse around the perimeter of the Canvas
in four seconds, repeated forever.
<Grid
x:Name="ContentPanel"
Grid.Row="1"
Margin="12,0,12,0">
<Canvas
Width="450"
Height="450"
HorizontalAlignment="Center"
VerticalAlignment="Center">
<Ellipse
Name="ball"
Fill="{StaticResource
PhoneAccentBrush}"
Width="50" Height="50"
/>
<Canvas.Triggers>
<EventTrigger>
<BeginStoryboard>
<Storyboard
RepeatBehavior="Forever">
<DoubleAnimationUsingKeyFrames
Storyboard.TargetName="ball"
Storyboard.TargetProperty="(Canvas.Left)">
<DiscreteDoubleKeyFrame
KeyTime="0:0:0"
Value="0"
/>
<LinearDoubleKeyFrame
KeyTime="0:0:1"
Value="400" />
<DiscreteDoubleKeyFrame
KeyTime="0:0:2"
Value="400"
/>
<LinearDoubleKeyFrame
KeyTime="0:0:3"
Value="0" />
<DiscreteDoubleKeyFrame
KeyTime="0:0:4"
Value="0"
/>
</DoubleAnimationUsingKeyFrames>
<DoubleAnimationUsingKeyFrames
Storyboard.TargetName="ball"
Storyboard.TargetProperty="(Canvas.Top)">
<DiscreteDoubleKeyFrame
KeyTime="0:0:0"
Value="0"
/>
<DiscreteDoubleKeyFrame
KeyTime="0:0:1"
Value="0"
/>
<LinearDoubleKeyFrame
KeyTime="0:0:2"
Value="400" />
<DiscreteDoubleKeyFrame
KeyTime="0:0:3"
Value="400"
/>
<LinearDoubleKeyFrame
KeyTime="0:0:4"
Value="0" />
</DoubleAnimationUsingKeyFrames>
</Storyboard>
</BeginStoryboard>
</EventTrigger>
</Canvas.Triggers>
</Canvas>
</Grid>
Notice that the Storyboard.TargetName is set to reference the Ellipse element, and the Storyboard.TargetProperty attributes are set to the strings "(Canvas.Left)" and "(Canvas.Top)". When targeting attached properties in an animation, put the fully-qualified property names in parentheses.
And now, the downside: Animations that target properties of type Point are not handled in the GPU on the render thread. If that's a concern, stick to animating properties of type double.
If you value fun more than performance, you can construct a PathGeometry using explicit PathFigure, LineSegment, ArcSegment, BezierSegment, and QuadraticBezierSegment objects, and every property of type Point can be an animation target.
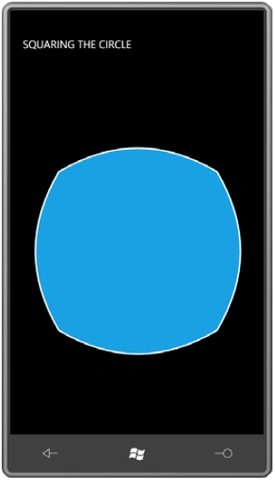
Here's a program that stretches that concept to an extreme. It creates a
circle from four Bezier splines, and then animates the various
Point properties,
turning the circle into a square and solving a geometric problem that's been
bedeviling mathematicians since the days of Euclid:
<Grid
x:Name="ContentPanel"
Grid.Row="1"
Margin="12,0,12,0">
<Path
HorizontalAlignment="Center"
VerticalAlignment="Center"
Fill="{StaticResource
PhoneAccentBrush}"
Stroke="{StaticResource
PhoneForegroundBrush}"
StrokeThickness="3"
>
<Path.Data>
<PathGeometry>
<PathFigure
x:Name="bezier1"
IsClosed="True">
<BezierSegment
x:Name="bezier2"
/>
<BezierSegment
x:Name="bezier3"
/>
<BezierSegment
x:Name="bezier4"
/>
<BezierSegment
x:Name="bezier5"
/>
</PathFigure>
<PathGeometry.Transform>
<TransformGroup>
<ScaleTransform
ScaleX="2"
ScaleY="2"
/>
<RotateTransform
Angle="45"
/>
<TranslateTransform
X="200"
Y="200"
/>
</TransformGroup>
</PathGeometry.Transform>
</PathGeometry>
</Path.Data>
<Path.Triggers>
<EventTrigger>
<BeginStoryboard>
<Storyboard
RepeatBehavior="Forever"
AutoReverse="True"
>
<PointAnimation
Storyboard.TargetName="bezier1"
Storyboard.TargetProperty="StartPoint"
From="0 100" To="0
125" />
<PointAnimation
Storyboard.TargetName="bezier2"
Storyboard.TargetProperty="Point1"
From="55 100" To="62.5
62.5" />
<PointAnimation
Storyboard.TargetName="bezier2"
Storyboard.TargetProperty="Point2"
From="100 55" To="62.5
62.5" />
<PointAnimation
Storyboard.TargetName="bezier2"
Storyboard.TargetProperty="Point3"
From="100 0" To="125
0" />
<PointAnimation
Storyboard.TargetName="bezier3"
Storyboard.TargetProperty="Point1"
From="100 -55"
To="62.5 -62.5" />
<PointAnimation
Storyboard.TargetName="bezier3"
Storyboard.TargetProperty="Point2"
From="55
-100" To="62.5
-62.5" />
<PointAnimation
Storyboard.TargetName="bezier3"
Storyboard.TargetProperty="Point3"
From="0
-100" To="0 -125"
/>
<PointAnimation
Storyboard.TargetName="bezier4"
Storyboard.TargetProperty="Point1"
From="-55
-100" To="-62.5
-62.5" />
<PointAnimation
Storyboard.TargetName="bezier4"
Storyboard.TargetProperty="Point2"
From="-100 -55"
To="-62.5 -62.5" />
<PointAnimation
Storyboard.TargetName="bezier4"
Storyboard.TargetProperty="Point3"
From="-100
0" To="-125 0" />
<PointAnimation
Storyboard.TargetName="bezier5"
Storyboard.TargetProperty="Point1"
From="-100 55"
To="-62.5 62.5" />
<PointAnimation
Storyboard.TargetName="bezier5"
Storyboard.TargetProperty="Point2"
From="-55
100" To="-62.5
62.5" />
<PointAnimation
Storyboard.TargetName="bezier5"
Storyboard.TargetProperty="Point3"
From="0
100" To="0 125"
/>
</Storyboard>
</BeginStoryboard>
</EventTrigger>
</Path.Triggers>
</Path>
</Grid>
Here's halfway between a square and a circle:
Splines and Key Frames
Three of the key-frame classes begin with the word Spline:SplineDoubleKeyFrame,SplinePointKeyFrame, and SplineColorKeyFrame. These classes have KeyTime and Value properties like the Discrete and Linear keyframes, but they also define a property named KeySpline. This property allows you to create a key frame that speeds up or slows down (or both) during its course but still ending at the correct value by the time KeyTimecomes around. The change in velocity is governed by a Bezier spline, Certainly the best way to get a feel for spline-based key frames is to experiment with them, and I have just the program. It's even called SplineKeyFrameExperiment:
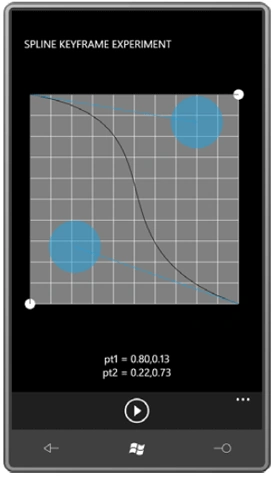
You can move the control points of the spline using the blue semi-translucent circles. The ApplicationBar has only one button labeled "animate":
<phone:PhoneApplicationPage.ApplicationBar>
<shell:ApplicationBar>
<shell:ApplicationBarIconButton
IconUri="/Images/appbar.transport.play.rest.png"
Text="animate"
Click="OnAppbarAnimateButtonClick"
/>
</shell:ApplicationBar>
</phone:PhoneApplicationPage.ApplicationBar>
When you press it, the white ball on the bottom of the grid moves linearly from left to right, representing the linear increase in time. The white ball at the right of the grid moves nonlinearly from top to bottom based on the shape of the spline.
For purposes of simplicity, the layout of the screen is based on a grid with a fixed width and height of 400 pixels, so the program will need to be modified a bit for a smaller screen.
Here are the two little white balls that appear on the bottom and right, one representing time and the other representing the animated object:
<Path
Fill="{StaticResource
PhoneForegroundBrush}">
<Path.Data>
<EllipseGeometry
x:Name="timeBall"
RadiusX="10"
RadiusY="10"
Center="0
400" />
</Path.Data>
</Path>
<Path
Fill="{StaticResource
PhoneForegroundBrush}">
<Path.Data>
<EllipseGeometry
x:Name="animaBall"
RadiusX="10"
RadiusY="10"
Center="400
0" />
</Path.Data>
</Path>
You can't see it when the program is inactive, but two lines-one horizontal and one vertical-connect the small balls with the spline curve. These lines track the spline curve when the small balls are moving:
<Line
x:Name="timeTrackLine"
Stroke="{StaticResource
PhoneBackgroundBrush}"
Y2="400"
/>
<Line
x:Name="animaTrackLine"
Stroke="{StaticResource
PhoneBackgroundBrush}"
X2="400"
/>
Finally, two semi-transparent circles respond to touch
input and are used to drag the control points within the grid:
<Path
Name="dragger1"
Fill="{StaticResource
PhoneAccentBrush}"
Opacity="0.5">
<Path.Data>
<EllipseGeometry
x:Name="dragger1Geometry"
RadiusX="50"
RadiusY="50"
Center="200
80" />
</Path.Data>
</Path>
<Path
Name="dragger2"
Fill="{StaticResource
PhoneAccentBrush}"
Opacity="0.5">
<Path.Data>
<EllipseGeometry
x:Name="dragger2Geometry"
RadiusX="50"
RadiusY="50"
Center="200
320" />
</Path.Data>
</Path>
The centers of these two EllipseGeometry objects provide the two control points of the KeySpline object. In the code-behind file, the constructor initializes the TextBlock at the bottom with the values, normalized to the range of 0 to 1:
public
partial class
MainPage :
PhoneApplicationPage
{
public MainPage()
{
InitializeComponent();
UpdateTextBlock();
}
void UpdateTextBlock()
{
txtblk.Text = String.Format("pt1
= {0:F2}\npt2 = {1:F2}",
NormalizePoint(dragger1Geometry.Center),
NormalizePoint(dragger2Geometry.Center));
}
Point NormalizePoint(Point
pt)
{
return new
Point(pt.X / 400, pt.Y / 400);
}
.....
}
When the button in the ApplicationBar is pressed, the program needs to set four different animations with identical KeySpline objects and then start the Storyboard going:
void
OnAppbarAnimateButtonClick(object sender,
EventArgs args)
{
Point controlPoint1 =
NormalizePoint(dragger1Geometry.Center);
Point controlPoint2 =
NormalizePoint(dragger2Geometry.Center);
splineKeyFrame1.KeySpline = new
KeySpline();
splineKeyFrame1.KeySpline.ControlPoint1 = controlPoint1;
splineKeyFrame1.KeySpline.ControlPoint2 = controlPoint2;
splineKeyFrame2.KeySpline = new
KeySpline();
splineKeyFrame2.KeySpline.ControlPoint1 = controlPoint1;
splineKeyFrame2.KeySpline.ControlPoint2 = controlPoint2;
splineKeyFrame3.KeySpline = new
KeySpline();
splineKeyFrame3.KeySpline.ControlPoint1 = controlPoint1;
splineKeyFrame3.KeySpline.ControlPoint2 = controlPoint2;
splineKeyFrame4.KeySpline = new
KeySpline();
splineKeyFrame4.KeySpline.ControlPoint1 = controlPoint1;
splineKeyFrame4.KeySpline.ControlPoint2 = controlPoint2;
storyboard.Begin();
}
The storyboard is defined in the Resources collection of the page, try it out: If you set both control points to (1, 0) you get an animation that starts off slow and then gets very fast. Setting both control points to (0, 1) has the opposite effect. Set the first control point to (1, 0) and the second to (0, 1) and you get ananimation that starts off slow, then gets fast, and ends up slow. Switch them and get the opposite effect.
The Easing Functions
You might prefer something more "canned" that gives you an overall impression of adherence to physical law without requiring a lot of thought. This is the purpose of the animation easing functions. These are classes that derive from EasingFunctionBase with common types of transitions that you can add to the beginning or end (or both beginning and end) of your animations.DoubleAnimation,PointAnimation, and ColorAnimationall have properties named EasingFunction of type EasingFunctionBase. There are also EasingDoubleKeyFrame, EasingColorKeyFrame, and EasingPointKeyFrame classes.
EasingFunctionBase defines just one property: EasingMode of the enumeration type EasingMode, either EaseOut (the default, which uses the transition only at the end of the animation), EaseIn, or EaseInOut. Eleven classes derive from EasingFunctionBase and you can derive your own if you want to have even more control and power.
The project named TheEasingLife lets you choose among the eleven
EasingFunctionBase derivatives to see their effect on a simple PointAnimation involving a ball-like object. The
content area is populated with two Polyline elements and a Path but no
coordinates are supplied; that's done in code.
<Grid
x:Name="ContentPanel"
Grid.Row="1"
Margin="12,0,12,0">
<Polyline
Name="polyline1"
Stroke="{StaticResource
PhoneForegroundBrush}" />
<Polyline
Name="polyline2"
Stroke="{StaticResource
PhoneForegroundBrush}" />
<Path
Fill="{StaticResource
PhoneAccentBrush}">
<Path.Data>
<EllipseGeometry
x:Name="ballGeometry"
RadiusX="25"
RadiusY="25"
/>
</Path.Data>
</Path>
</Grid>
The coordinates for the two Polyline elements and EllipseGeometry are set
during the Loaded event handler based on the size of the content panel. The ball
is intended to be animated between a Polyline at the top and a Polyline at the
bottom; the actual points are stored in the ballPoints array. The direction
(going down or going up) is governed by the isForward
field.
public
partial class
MainPage : PhoneApplicationPage
{
PointCollection ballPoints =
new PointCollection();
bool isForward =
true;
public MainPage()
{
InitializeComponent();
Loaded += OnMainPageLoaded;
}
public
EasingFunctionBase EasingFunction { get;
set; }
void OnMainPageLoaded(object
sender, RoutedEventArgs args)
{
double left = 100;
double right =
ContentPanel.ActualWidth - 100;
double center =
ContentPanel.ActualWidth / 2;
double top = 100;
double bottom =
ContentPanel.ActualHeight - 100;
polyline1.Points.Add(new
Point(left, top));
polyline1.Points.Add(new
Point(right, top));
polyline2.Points.Add(new
Point(left, bottom));
polyline2.Points.Add(new
Point(right, bottom));
ballPoints.Add(new
Point(center, top));
ballPoints.Add(new
Point(center, bottom));
ballGeometry.Center = ballPoints[1 -
Convert.ToInt32(isForward)];
}
void
OnAppbarPlayButtonClick(object sender,
EventArgs args)
{
pointAnimation.From = ballPoints[1 -
Convert.ToInt32(isForward)];
pointAnimation.To = ballPoints[Convert.ToInt32(isForward)];
pointAnimation.EasingFunction = EasingFunction;
storyboard.Begin();
}
void OnStoryboardCompleted(object
sender, EventArgs args)
{
isForward ^= true;
}
void OnAppbarSettingsButtonClick(object
sender, EventArgs args)
{
NavigationService.Navigate(new
Uri("/EasingFunctionDialog.xaml",
UriKind.Relative));
}
protected
override void OnNavigatedFrom(NavigationEventArgs
args)
{
if (args.Content
is
EasingFunctionDialog)
{
(args.Content as
EasingFunctionDialog).EasingFunction =
EasingFunction;
}
base.OnNavigatedTo(args);
}
protected
override void OnNavigatedTo(NavigationEventArgs
args)
{
ApplicationTitle.Text = "THE EASING LIFE
- " +
(EasingFunction != null ?
EasingFunction.GetType().Name : "none");
base.OnNavigatedTo(args);
}
}
Keep in mind that these EasingFunctionBase derivatives have all default property settings, including the EasingMode property that restricts the effect only to the end of the animation. You'll find that a couple of these effects-specifically BackEase and ElasticEase-actually overshoot the destination. While this doesn't matter in many cases, for some properties it might result in illegal values.
Join the conversation! Your thoughts help the community grow.