

In the previous tutorial we created an MVC application that displays data using the Entity Framework and SQL Server Database. In this tutorial we will customize the Create, Update and Delete (CRUD) code using Entity Framework.
For this, we customized the Index Page of the previous article. In the table structure where we display the data, add a new column to add two new link buttons for it.
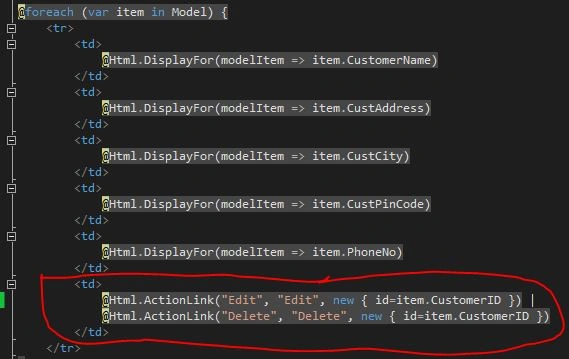
Also, we add a <p> tag above the <table> tag and provide the following code:

Also, we add a <p> tag above the <table> tag and provide the following code:
Now the Create New link button will be used to create new records for a customer and save into the database. For doing that, we first add an action to the controller as below:
- public ActionResult Create()
- {
- return View();
- }
- @model EFRndProject.Models.Customer
- @{
- ViewBag.Title = "Create";
- Layout = "~/Views/Shared/_Layout.cshtml";
- }
- <h2>Create</h2>
- @using (Html.BeginForm())
- {
- @Html.AntiForgeryToken()
- <div class="form-horizontal">
- <h4>Customer</h4>
- <hr />
- @Html.ValidationSummary(true)
- <div class="form-group">
- @Html.LabelFor(model => model.CustomerName, new { @class = "control-label col-md-2" })
- <div class="col-md-10">
- @Html.EditorFor(model => model.CustomerName)
- @Html.ValidationMessageFor(model => model.CustomerName)
- </div>
- </div>
- <div class="form-group">
- @Html.LabelFor(model => model.CustAddress, new { @class = "control-label col-md-2" })
- <div class="col-md-10">
- @Html.EditorFor(model => model.CustAddress)
- @Html.ValidationMessageFor(model => model.CustAddress)
- </div>
- </div>
- <div class="form-group">
- @Html.LabelFor(model => model.CustCity, new { @class = "control-label col-md-2" })
- <div class="col-md-10">
- @Html.EditorFor(model => model.CustCity)
- @Html.ValidationMessageFor(model => model.CustCity)
- </div>
- </div>
- <div class="form-group">
- @Html.LabelFor(model => model.CustPinCode, new { @class = "control-label col-md-2" })
- <div class="col-md-10">
- @Html.EditorFor(model => model.CustPinCode)
- @Html.ValidationMessageFor(model => model.CustPinCode)
- </div>
- </div>
- <div class="form-group">
- @Html.LabelFor(model => model.PhoneNo, new { @class = "control-label col-md-2" })
- <div class="col-md-10">
- @Html.EditorFor(model => model.PhoneNo)
- @Html.ValidationMessageFor(model => model.PhoneNo)
- </div>
- </div>
- <div class="form-group">
- <div class="col-md-offset-2 col-md-10">
- <input type="submit" value="Create" class="btn btn-default" />
- </div>
- </div>
- </div>
- }
- <div>
- @Html.ActionLink("Back to List", "Index")
- </div>
- @section Scripts {
- @Scripts.Render("~/bundles/jqueryval")
- }
Now we need a different action method for the Create Button and also for returning back to the main view, in other words the index view, we called the index action that we already created in our previous article.
- [HttpPost]
- [ValidateAntiForgeryToken]
- public ActionResult Create([Bind(Include="CustomerID,CustomerName,CustAddress,CustCity,CustPinCode,PhoneNo")] Customer customer)
- {
- if (ModelState.IsValid)
- {
- db.Customers.Add(customer);
- db.SaveChanges();
- return RedirectToAction("Index");
- }
- return View(customer);
- }
Update the Existing Data with HttpPost
In Controllers\CustomerController.cs, the HttpGet Edit method (the one without the HttpPost attribute) uses the Find method to retrieve the selected Customer entity, as you saw in the Details method. You don't need to change this method. However, replace the HttpPost Edit action method with the following code to add a try-catch block:
- public ActionResult Edit(int? id)
- {
- if (id == null)
- {
- return new HttpStatusCodeResult(HttpStatusCode.BadRequest);
- }
- Customer customer = db.Customers.Find(id);
- if (customer == null)
- {
- return HttpNotFound();
- }
- return View(customer);
- }
The key value is ed to the method as the id parameter and comes from route data in the Edit hyperlink on the Index page. Also, now create the HttpPost Edit action method to update the data into the database.
- [HttpPost]
- [ValidateAntiForgeryToken]
- public ActionResult Edit([Bind(Include="CustomerID,CustomerName,CustAddress,CustCity,CustPinCode,PhoneNo")] Customer customer)
- {
- if (ModelState.IsValid)
- {
- db.Entry(customer).State = EntityState.Modified;
- db.SaveChanges();
- return RedirectToAction("Index");
- }
- return View(customer);
- }
For this, we must create another view named "Edit" and provide the following code:
- @model EFRndProject.Models.Customer
- @{
- ViewBag.Title = "Edit";
- Layout = "~/Views/Shared/_Layout.cshtml";
- }
- <h2>Edit</h2>
- @using (Html.BeginForm())
- {
- @Html.AntiForgeryToken()
- <div class="form-horizontal">
- <h4>Customer</h4>
- <hr />
- @Html.ValidationSummary(true)
- @Html.HiddenFor(model => model.CustomerID)
- <div class="form-group">
- @Html.LabelFor(model => model.CustomerName, new { @class = "control-label col-md-2" })
- <div class="col-md-10">
- @Html.EditorFor(model => model.CustomerName)
- @Html.ValidationMessageFor(model => model.CustomerName)
- </div>
- </div>
- <div class="form-group">
- @Html.LabelFor(model => model.CustAddress, new { @class = "control-label col-md-2" })
- <div class="col-md-10">
- @Html.EditorFor(model => model.CustAddress)
- @Html.ValidationMessageFor(model => model.CustAddress)
- </div>
- </div>
- <div class="form-group">
- @Html.LabelFor(model => model.CustCity, new { @class = "control-label col-md-2" })
- <div class="col-md-10">
- @Html.EditorFor(model => model.CustCity)
- @Html.ValidationMessageFor(model => model.CustCity)
- </div>
- </div>
- <div class="form-group">
- @Html.LabelFor(model => model.CustPinCode, new { @class = "control-label col-md-2" })
- <div class="col-md-10">
- @Html.EditorFor(model => model.CustPinCode)
- @Html.ValidationMessageFor(model => model.CustPinCode)
- </div>
- </div>
- <div class="form-group">
- @Html.LabelFor(model => model.PhoneNo, new { @class = "control-label col-md-2" })
- <div class="col-md-10">
- @Html.EditorFor(model => model.PhoneNo)
- @Html.ValidationMessageFor(model => model.PhoneNo)
- </div>
- </div>
- <div class="form-group">
- <div class="col-md-offset-2 col-md-10">
- <input type="submit" value="Save" class="btn btn-default" />
- </div>
- </div>
- </div>
- }
- <div>
- @Html.ActionLink("Back to List", "Index")
- </div>
- @section Scripts {
- @Scripts.Render("~/bundles/jqueryval")
- }
In Controllers\CustomerController.cs, the template code for the HttpGet Delete method uses the Find method to retrieve the selected Customer entity, as you saw in the Details and Edit methods. However, to implement a custom error message when the call to SaveChanges fails, you'll add some functionality to this method and its corresponding view.
As you saw for the update and create operations, delete operations require two action methods. The method that is called in response to a GET request displays a view that gives the user a chance to approve or cancel the delete operation. If the user approves it, a POST request is created. When that happens, the HttpPost Delete method is called and then that method actually does the delete operation.
As you saw for the update and create operations, delete operations require two action methods. The method that is called in response to a GET request displays a view that gives the user a chance to approve or cancel the delete operation. If the user approves it, a POST request is created. When that happens, the HttpPost Delete method is called and then that method actually does the delete operation.
- public ActionResult Delete(int? id)
- {
- if (id == null)
- {
- return new HttpStatusCodeResult(HttpStatusCode.BadRequest);
- }
- Customer customer = db.Customers.Find(id);
- if (customer == null)
- {
- return HttpNotFound();
- }
- return View(customer);
- }
- [HttpPost, ActionName("Delete")]
- [ValidateAntiForgeryToken]
- public ActionResult DeleteConfirmed(int id)
- {
- Customer customer = db.Customers.Find(id);
- db.Customers.Remove(customer);
- db.SaveChanges();
- return RedirectToAction("Index");
- }
The HttpPost DeleteConfirmed method code retrieves the selected entity, then calls the Remove method to set the entity's status to Deleted. When SaveChanges is called, a SQL DELETE command is generated.
Now add a new view named "Delete" under the views/Customer folder and provide the following code:
- @model EFRndProject.Models.Customer
- @{
- ViewBag.Title = "Delete";
- Layout = "~/Views/Shared/_Layout.cshtml";
- }
- <h2>Delete</h2>
- <h3>Are you sure you want to delete this?</h3>
- <div>
- <h4>Customer</h4>
- <hr />
- <dl class="dl-horizontal">
- <dt>
- @Html.DisplayNameFor(model => model.CustomerName)
- </dt>
- <dd>
- @Html.DisplayFor(model => model.CustomerName)
- </dd>
- <dt>
- @Html.DisplayNameFor(model => model.CustAddress)
- </dt>
- <dd>
- @Html.DisplayFor(model => model.CustAddress)
- </dd>
- <dt>
- @Html.DisplayNameFor(model => model.CustCity)
- </dt>
- <dd>
- @Html.DisplayFor(model => model.CustCity)
- </dd>
- <dt>
- @Html.DisplayNameFor(model => model.CustPinCode)
- </dt>
- <dd>
- @Html.DisplayFor(model => model.CustPinCode)
- </dd>
- <dt>
- @Html.DisplayNameFor(model => model.PhoneNo)
- </dt>
- <dd>
- @Html.DisplayFor(model => model.PhoneNo)
- </dd>
- </dl>
- @using (Html.BeginForm()) {
- @Html.AntiForgeryToken()
- <div class="form-actions no-color">
- <input type="submit" value="Delete" class="btn btn-default" /> |
- @Html.ActionLink("Back to List", "Index")
- </div>
- }
- </div>
Ensuring that Database Connections Are Not Left Open
To ensure that database connections are properly closed and the resources they hold freed up, you need to dispose of the context instance when you are done with it. For this, we need to add the following Dispose method in the CustomerController.
protected override Dispose(bool disposing).
- {
- db.Dispose();
- base.Dispose(disposing);
- }
The base Controller class already implements the IDisposable interface, so this code simply adds an override to the Dispose(bool) method to explicitly dispose of the context instance.
Sr KarthigaPosted Apr 16, 2016, 4:34 AM
good one
Sr KarthigaPosted Apr 16, 2016, 4:34 AM
Nice explanation
Vithal WadjePosted Jan 3, 2015, 3:30 AM
nice explanation