

As I said previously, I am starting a demo series of CRUD (Create, read, update, and delete) operations in Angular2. This is part two of that series. In case you missed part one, “How to Create RESTful API using Node.js and MySQL", you can read it from here.
In this second part of the tutorial, I am going to cover the following topics:
- Fetching JSON data from URL
- Filter pipe
- Introduction to HTTP module
- Services
- Conditionally apply CSS class and more
At the end of the article, you can find the link to the source code on Github. So, feel free to play with the code yourself.
Here is the list of a few commands which can be used with Angular-CLI.
Create new component
Command
ng g c "name of the component"
Example
ng g c demo
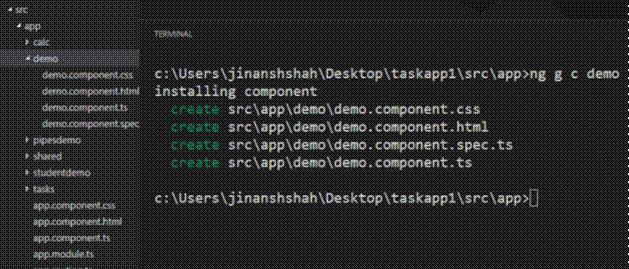
Explanation
Here, ng stands for Angular, g stands for generate, and c stands for component.
Create new component but not the directory (inside the directory )
Command
ng g c "name of the component" –flat
Example
ng g c demo1 –flat
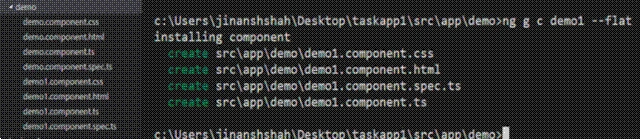
–flat will not create new directory
Create component with inline CSS and inline HTML
Command
ng g c "name of the component" –flat -is -it
Example
ng g c demo1 –flat -is -it

-is stands for Inline Style
-it stands for Inline template
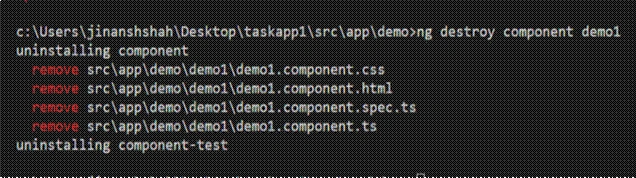
Deleting Component
Command
Create Service
Command

Explanation
s stands for service
Create Class
Command
ng g cl "name of class"
Example
ng g cl demo

Explanation
cl stands for class
Create custom pipe
Command
ng g p "name of pipe"
Example
ng g p power

Explanation
p stands for pipe
Creating data structure/Class
- cmd > ng g cl tasks[code language = ”typescript”]
- export class Task {
- constructor(public Id: String, public Title: String, public Status: String) {}
- }
- [/code]
Creating Service
cmd>ng g s taskdata
First, navigate to shared folder, then write the above code to generate service.
- Communicate with database.
- Communicate with components /classes.
- Some other business logic which is accessible from various places of our application.
- [code language = ”typescript”]
- public url: string = "https://localhost:3000/Tasks/";
- getAllTasks() {
- return this._http.get(this.url).map((response: Response) => response.json());
- }
- [/code]
- [code language = ”typescript”]
- import {
- Injectable
- } from '@angular/core';
- import {
- Task
- } from '../tasks/task';
- import {
- Http,
- Headers,
- Response,
- RequestOptions
- } from '@angular/http';
- import 'rxjs/Rx';
- @Injectable()
- export class TaskdataService {
- public url: string = "https://rkdemotask.herokuapp.com/Tasks/";
- constructor(private _http: Http) {}
- getAllTasks() {
- return this._http.get(this.url).map((response: Response) => response.json());
- }
- deleteTask(item: Task) {
- let headers = new Headers({
- 'Content-Type': 'application/json'
- });
- let options = new RequestOptions({
- headers: headers
- });
- return this._http.delete(this.url + item.Id, options).map((response: Response) => response.json());
- }
- addTask(item: Task) {
- let body = JSON.stringify(item);
- let headers = new Headers({
- 'Content-Type': 'application/json'
- });
- let options = new RequestOptions({
- headers: headers
- });
- return this._http.post(this.url, body, options).map((response: Response) => response.json());
- }
- getTaskId(id: any) {
- return this._http.get(this.url + id).map((response: Response) => response.json());
- }
- editTask(item: Task) {
- let body = JSON.stringify(item);
- let headers = new Headers({
- 'Content-Type': 'application/json'
- });
- let options = new RequestOptions({
- headers: headers
- });
- return this._http.put(this.url + item.Id, body, options).map((response: Response) => response.json());
- }
- }
- [code]
- [code language = ”typescript”]
- import {
- TaskdataService
- } from './shared/taskdata.service';
- providers: [TaskdataService], [/code]
So far, we have created class and service. Now, it’s time for component to display the data.
cmd>ng g c tasks
As I am using Angular2-CLI, it will create four files for us.
- tasks.component.css
- tasks.component.html
- tasks.component.ts
- tasks.component.spec.ts
In this article, I am not going to talk about testing, so I removed tasks.component.spec.ts file.
Angular 2 comes with global declaration concept. So, whenever we are creating a component, we need to declare it in app.module.ts, inside the declaration array. But, as we are using Angular-CLI, it will be done automatically by the system, as shown below.
- [code language = ”typescript”]
- import {
- TasksComponent
- } from './tasks/tasks.component';
- @NgModule({
- declarations: [
- AppComponent,
- TasksComponent
- ],
- [/code]
Tasks.component.ts
- [code language = ”typescript”]
- import {
- Component,
- OnInit
- } from '@angular/core';
- import {
- Task
- } from './task';
- import {
- TaskdataService
- } from '../shared/taskdata.service';
- import {
- Router
- } from '@angular/router';
- @Component({
- selector: 'app-tasks',
- templateUrl: './tasks.component.html',
- styleUrls: ['./tasks.component.css']
- })
- export class TasksComponent implements OnInit {
- allTasks: Task[] = [];
- constructor(private _datatask: TaskdataService) {}
- ngOnInit() {
- this._datatask.getAllTasks().subscribe(
- (data: Task[]) => {
- this.allTasks = data;
- });
- }
- }
- [/code].
- imports section - contains all the library files used in component. Like task, taskdata.service,etc.
- component metadata - contains the metadata like selector, templateurl, styleurl and more.
- class - contains all the logic.
So, in our example -
- First, create the array named allTasks which is the type of task.
- Then, inject the taskdataservice inside the constructor and create the instance of our service.
- And then finally, call getAllTasks method of our service inside the ngOnInIt event that is a life-cycle hook called by Angular2 for indicating that Angular is done creating the component.
So now, we are good to go for displaying data on our .html. To display the data on HTML, I am using string interpolation method - remember this {{ }}. You can find more about data bindings here.
tasks.component.html
- [code language = ”html”] < div class = "container" > < div class = "row" > < div[hidden] = "allTasks.length>0"
- class = "progress" > < div class = "progress-bar progress-bar-striped active"
- role = "progressbar"
- aria - valuenow = "45"
- aria - valuemin = "0"
- aria - valuemax = "100"
- style = "width: 45%" > < span class = "sr-only" > 45 % Complete < /span> < /div> < /div> < div class = "row" > < table class = "table" > < thead > < th > Id < /th> < th > Title < /th> < th > Status < /th> < /thead> < tr * ngFor = "let item of allTasks " > < td > {
- {
- item.Id
- }
- } < /td> < td > {
- {
- item.Title
- }
- } < /td> < td > {
- {
- item.Status
- }
- } < /td> < /tr> < /table> < /div> < /div> [/code]
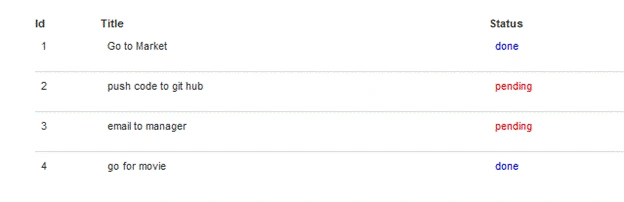
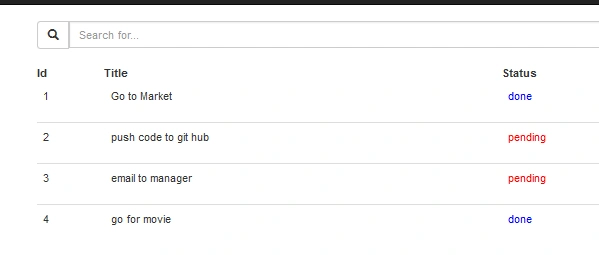
Now, you all are wondering by seeing the output that the color of status is changing depending on the values ‘done’ and ‘pending’. It is very simple to assign runtime CSS class to any element of HTML, conditionally. So now, let’s see how we can do so.
First, I am creating two CSS classes named as .donestatus and .pendingstatus.
- [code language = ”css”].donestatus {
- color: blue;
- }.pendingstatus {
- color: red;
- }
- [/code]
- [code language = ”html”] < tr * ngFor = "let item of (allTasks |filter:input1.value)" > < td > {
- {
- item.Id
- }
- } < /td> < td > {
- {
- item.Title
- }
- } < /td> < td > < span[ngClass] = "{'donestatus': item.Status=='done','pendingstatus': item.Status=='pending'}" > {
- {
- item.Status
- }
- } < /span></td > < /tr> [/code]
If you don’t know what pipe is? You don’t need to worry about that, because I had already described what pipes are in my previous article. You can read it here.
cmd>ng g p filter
Note - To use this pipe anywhere in the application, we must declare the pipe inside app.module.ts, same as what we did with components.
- [code language = ”typescript”]
- import {
- FilterPipe
- } from './shared/filter.pipe';
- @NgModule({
- declarations: [
- AppComponent,
- FilterPipe
- ],
- })[/code]
- [code language = ”typescript”]
- import {
- Pipe,
- PipeTransform
- } from '@angular/core';
- @Pipe({
- name: 'filter'
- })
- export class FilterPipe implements PipeTransform {
- transform(value: any[], arg: any) {
- return value.filter(item => item.Title.startsWith(arg));
- }
- }
- [/code]
Final task.component.html will look like the following, after applying the filter.
tasks.component.html
- [code language = ”html”] < input type = "text" (keyup) = "0"#
- input1 class = "form-control"
- placeholder = "Search for..." > < tr * ngFor = "let item of (allTasks |filter:input1.value)" > [/code][code language=”html”] < div class = "container" > < div class = "row" > < div[hidden] = "allTasks.length>0"
- class = "progress" > < div class = "progress-bar progress-bar-striped active"
- role = "progressbar"
- aria - valuenow = "45"
- aria - valuemin = "0"
- aria - valuemax = "100"
- style = "width: 45%" > < span class = "sr-only" > 45 % Complete < /span> < /div> < /div> < div class = "input-group" > < span class = "input-group-btn" > < button class = "btn btn-default"
- type = "button" > < span class = "glyphicon glyphicon-search" > < /span></button > < /span> < input type = "text" (keyup) = "0"#
- input1 class = "form-control"
- placeholder = "Search for..." > < /div> < /div> < br / > < div class = "row" > < table class = "table" > < thead > < th > Id < /th> < th > Title < /th> < th > Status < /th> < /thead> < tr * ngFor = "let item of (allTasks |filter:input1.value)" > < td > {
- {
- item.Id
- }
- } < /td> < td > {
- {
- item.Title
- }
- } < /td> < td > < span[ngClass] = "{'donestatus': item.Status=='done','pendingstatus': item.Status=='pending'}" > {
- {
- item.Status
- }
- } < /span></td > < /tr> < /table> < /div> < /div> [/code]
- [code language = ”html”] < input type = "text" (keyup) = "0"#
- input1 class = "form-control"
- placeholder = "Search for..." > < tr * ngFor = "let item of (allTasks |filter:input1.value)" > [/code]
Output
Summary
Angular 2 is simply awesome. Isn’t it?
We covered a lot in this tutorial. Let’s just summarize it.
- Angular-CLI
- Created class
- Services
- Components
- Run time css class
- Filter pipe and more…
There is a lot more to come in the next part of the tutorial (routing, insert, validations, update, and delete). So, stay tuned for more. I will provide the Github link of the demo application in the last part of this tutorial.
Puneet GoelPosted Mar 16, 2017, 7:13 AM
I am facing an issue, when I run ng g c home it just pops up 'Open With' dialogue and ask me to select a program to open ng file. Please help me out. I am using windows 7.
Debasis SahaPosted Dec 4, 2016, 11:30 PM
Nice article ... thanks for sharing..
Former memberPosted Dec 4, 2016, 9:38 PM
Very nice article Jinal !