

Overview
There are multiple business scenarios when in an application you would need to display up to date presence information of a user from Microsoft Teams.
Microsoft had announced getPresence endpoint to get the user's presence, including their availability and user activity. However, this is a pull mechanism, your application had to make continous polling "get" call to know the current status and if the status is changed in the interim there was no way to know the latest status.
To address this issue, Microsoft has announced a presence subscription API, this API can be used to subscribe other users presence in Microsoft Teams.
Once you create a subscription for the presence for a user and register a HTTPS endpoint to receive a notification, Microsoft Graph will tell you when there are changes. Typically this subscription is good for up to 60 minutes but you can renew them using the "update subscription" endpoint.
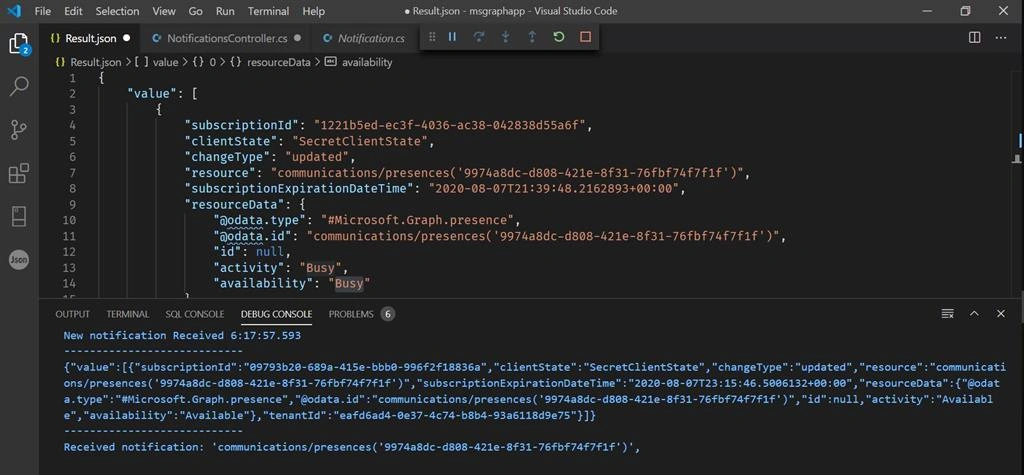
In this article, we will see the step by step configuration to get the users presence status from Microsoft Teams automatically.
Prerequisites
- App registered in Azure active directory(AAD) with Presence.Read and Presence.Read all delegated permissions.
- Install ngrokTool (For Development)
- HTTPS endpoint up and running (For PROD)
Create a web API to receive notifications :
Microsoft Graph will send notifications to a registered HTTPS endpoint. In this case, we will create a ASP.NET Core web API, to receive the notifications.
ngrok is a free tool for sharing projects online that are created in localhost. During development, you can use the ngrok tool to tunnel the requests via the internet.
1. Open the command prompt and navigate to the directory where you would like to create the project
2. Execute below commands to create ASP.net core Web API
- dotnet new webapi -o PresenceReceiverAPI
3. Once the project is created, navigate to the project directory and execute below commands in the command prompt:
Pl note we are using Microsoft.Graph.Beta instead of Microsoft.Graph so that we can call the beta endpoint of Microsoft Graph API.
- cd PresenceReceiverAPI
- dotnet add package Microsoft.Identity.Client
- dotnet add package Microsoft.Graph.Beta --version 0.20.0-preview
- dotnet run
4.Once you excute above commands application will start and display following in the console:
- info: Microsoft.Hosting.Lifetime[0]
- Now listening on: https://localhost:5001
- info: Microsoft.Hosting.Lifetime[0]
- Now listening on: http://localhost:5000
- info: Microsoft.Hosting.Lifetime[0]
- Application started. Press Ctrl+C to shut down.
- info: Microsoft.Hosting.Lifetime[0]
- Hosting environment: Development
- info: Microsoft.Hosting.Lifetime[0]
- Content root path: [your file path]\PresenceReceiverAPI
5. Press Ctrl+C to stop the application and open your favorite IDE (I like Visual Studio Code..  ) to add controllers that receive the notifications.
 6. Add below function in the controller class to receive the notification.
- [HttpGet]
- public async Task<ActionResult<string>> Get()
- {
- var graphServiceClient = GetGraphClient();
- var sub = new Microsoft.Graph.Subscription();
- sub.ChangeType = "updated";
- sub.NotificationUrl = config.Ngrok + "/api/notifications";
- sub.Resource = "/users";
- sub.ExpirationDateTime = DateTime.UtcNow.AddMinutes(5);
- sub.ClientState = "SecretClientState";
- var newSubscription = await graphServiceClient
- .Subscriptions
- .Request()
- .AddAsync(sub);
- Subscriptions[newSubscription.Id] = newSubscription;
- if (subscriptionTimer == null)
- {
- subscriptionTimer = new Timer(CheckSubscriptions, null, 5000, 15000);
- }
- return $"Subscribed. Id: {newSubscription.Id}, Expiration: {newSubscription.ExpirationDateTime}";
- }
- public async Task<ActionResult<string>> Post([FromQuery]string validationToken = null)
- {
- // verify the validation token
- if (!string.IsNullOrEmpty(validationToken))
- {
- Console.WriteLine($"Received Token: '{validationToken}'");
- return Ok(validationToken);
- }
- // process the notifications and display on the console
- using (StreamReader reader = new StreamReader(Request.Body))
- {
- string content = await reader.ReadToEndAsync();
- Console.WriteLine(content);
- var notifications = JsonConvert.DeserializeObject<Notifications>(content);
- foreach (var notification in notifications.Items)
- {
- Console.WriteLine($"Received notification: '{notification.Resource}', {notification.ResourceData?.Id}");
- }
- }
- await CheckForUpdates();
- return Ok();
- }
8. Once you add the code to fetch the access token, "controller" code should be as below:
DeveloperPosted Nov 18, 2022, 2:54 PM
If we would like to implement same in a custom Teams BOT, what would be the approach
Harri KylliäinenPosted Mar 9, 2021, 7:17 AM
How would you add automatic subscription creation without navigating to http://.../api/notifications?
Martin PfeiferPosted Aug 9, 2020, 6:18 PM
How do I get the id?Every time it appears as null