

- Typeface custom_font = Typeface.createFromAsset(getAssets(), "fonts/font name.ttf");
- tv.setTypeface(custom_font);
With the help of data binding, you will be able to set custom font with just one line and that too without creating any object of TextView/EditText. Doesn't it sound interesting? Let’s follow the step by step instructions to implement it.
Step 1 - Implement data binding in your Android Studio project.
Refer to my previous tutorial to setup DataBinding “Working with DataBinding Android“.
Step 2 - Create custom class (CustomFontFamily) for storing and accessing custom fonts.
- public class CustomFontFamily {
- static CustomFontFamily customFontFamily;
- HashMap <String, String> fontMap = new HashMap<>();
- public static CustomFontFamily getInstance() {
- if (customFontFamily == null)
- customFontFamily = new CustomFontFamily();
- return customFontFamily;
- }
- public void addFont(String alias, String fontName) {
- fontMap.put(alias, fontName);
- }
- public Typeface getFont(String alias) {
- String fontFilename = fontMap.get(alias);
- if (fontFilename == null) {
- Log.e("", "Font not available with name " + alias);
- return null;
- } else {
- Typeface typeface = Typeface.createFromAsset(CustomApplication.getContext().getAssets(), "fonts/" + fontFilename);
- return typeface;
- }
- }
- }
Step 3 - Define custom fonts in Application class.
- public class CustomApplication extends Application {
- private static Context context;
- CustomFontFamily customFontFamily;
- @Override
- public void onCreate() {
- super.onCreate();
- CustomApplication.context = this;
- customFontFamily = CustomFontFamily.getInstance();
- // add your custom fonts here with your own custom name.
- customFontFamily.addFont("amatic", "AmaticSC-Regular.ttf");
- customFontFamily.addFont("pacific", "Pacifico.ttf");
- customFontFamily.addFont("seasrn", "SEASRN.ttf");
- customFontFamily.addFont("capture", "Capture_it.ttf");
- customFontFamily.addFont("xcelsion", "Xcelsion_Italic.ttf");
- }
- public static Context getContext() {
- return context;
- }
- }
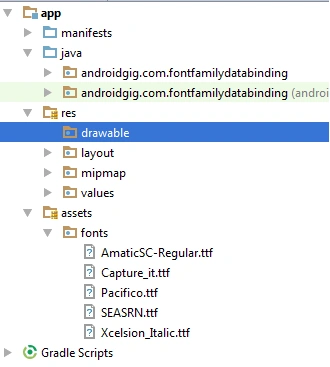
Step 4 - Write FontBinding class to use fonts throughout the application.
- public class FontBinding {
- @BindingAdapter({"bind:font"})
- public static void setFont(TextView textView, String fontName) {
- textView.setTypeface(CustomFontFamily.getInstance().getFont(fontName));
- }
- }
Step 5 - Access fonts from XML.

Join the conversation! Your thoughts help the community grow.